Journey with Confidence RV GPS App RV Trip Planner RV LIFE Campground Reviews RV Maintenance Take a Speed Test Free 7 Day Trial ×


Reply
 
Thread Tools Display Modes
 
Old 01-30-2017, 10:34 AM   #1
Member
 
Join Date: Mar 2014
Posts: 53
DIY Quigley to MG 4x4 Conversion

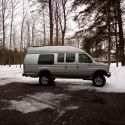
In March of 2014 I bought a 2012 E350 EB Passenger with Quigley 4x4 conversion and ~36,000 miles on it. The previous owner bought the van new as a support vehicle for his dirt bike trips down the Baja peninsula. I've ridden dirt bikes and mountain bikes with the previous owner and he seemed to take good care of his stuff. He had a sprinter van built by Outside Van and said he was getting ready to sell his E350. I told him I would be interested, we agreed on a price, and I bought the van when he took delivery of his Sprinter. I had only test driven the E350 around town when I bought it and everything seemed good with it.

In my first weekend of van ownership, I loaded my dirt bikes and hit the road with my new (to me) van. I quickly discovered the Quigley bump travel problem and had a hard time steering through curves on the highway as the steering was a little unpredictable. I was also unhappy with the interior configuration, so I ripped out the interior behind the front seats and set out on a mission to rebuild the interior that I wanted and find a way to improve the suspension and steering. I've made some progress with the interior and same with the suspension, but almost 3 years later, I've put less than 1,000 miles on the van and the interior is still not done.

I purchased and installed Agile's Quigley RIP kit which seemed to cure Quigley bump travel problem, but not the steering issue. I've always felt like the front axle sits too far rearward and would like to run a 35" tire. When MGMetalworks posted his 4x4 conversion it seemed like the solution to all my steering and tire clearance problems, so I promptly sourced a 2013 F250 front axle and the MGMetalworks kit from U-Joint Offroad.

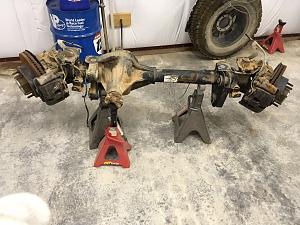
I found a junkyard about 30 miles away with 5 2013 or newer Ford Superduty front axles. I called ahead and the guy said they had them off the vehicles and ready to go for $1500. I took off work early and drove to the junkyard with the stock numbers for the axles. For some reason I was expecting them to stacked neatly on some sort of axle rack where I could quickly look at them and pick one out. When I arrived I told the guy I had called and would like to look at the axles. It turned out that he had ~5,000 axles of all makes and type sitting on the ground along the fence. I had to walk through and identify the 5 I was interested in, then compare them to find which I though was best. I did manage to identify 4 of the 5 axles and picked the best looking one. Oh, and the axle didn't have any of the suspension or steering linkage. Here is what I came home with:
Click image for larger version

Name:	IMG_1894.jpg
Views:	65
Size:	108.9 KB
ID:	14818
I went back to the junk yard the following weekend and pulled radius arms, drag link, tie rod, and sway bar off other trucks for $100.

Since this axle has 3.73 gears and my van has 4.10 gears, I would have to have the axle re-geared. Since I didn't know how many miles were on the axle, I went ahead and replaced all the wear items in/on the axle. $4,431 later I have an axle with new gears, bearings, seals, u-joints, ball joints, unit bearings, and brakes. Also, the housing was sandblasted and painted.
Click image for larger version

Name:	IMG_1962.jpg
Views:	70
Size:	111.1 KB
ID:	14819
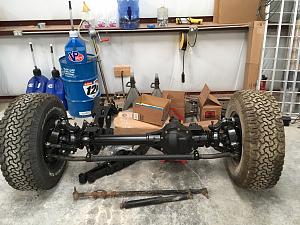
My new drag link is not in the picture, but I won't be using the junkyard draglink sitting under the axle. I put my 2 spare tires on the axle to make easier to move around my shop.

Sitting under and behind the axle are MG and UJOR parts for my conversion. I'm planning to start the conversion this weekend and have it finished after 2 weekends. I'm hoping to get the rear done (just swapping leaf packs, adding wheel spacers, and maybe a longer brake line), and removing the Quigley parts from the front this weekend. The next weekend will be installing the new front axle.

I was not able to get the bolts for the radius arms where they connect to the front axle from the junkyard where I got the axle and radius arms. I see ford-parts.com sells the bolts for $28.50 each and the nuts for $10.36 each. They have the same part number as the bolts and nuts on the other end of the radius arms where the bolt to the radius arm mounts. I did get this hardware from the junkyard, so I ordered very similar nuts and bolts from Fastenal much cheaper than ford-parts.com. My question is how to you adjust caster on these axles? None of the radius arm bolts appear to be eccentric.

__________________
2012 E350 EB Passenger V10
MG/Expovans full exterior and interior
ohsix is offline   Reply With Quote
Old 01-30-2017, 10:59 AM   #2
Senior Member
 
shenrie's Avatar
 
Join Date: Nov 2012
Location: boise idaho
Posts: 2,625
Garage
iirc, mg's setup adds the appropriate amount of caster with his locator bracket. somewhere between 3.5 and 5 degrees. ive helped install one of his setups. ill be interested to hear how it goes removing the Quigley stuff and replacing with mg's stuff. please keep us posted.

what ujoint stuff are you installing?
__________________
"understeer is when you hit the wall with the front of your car, oversteer is when you hit the wall with the rear of your car, horsepower is how hard your car hits the wall, and torque is how far your car moves the wall."
shenrie is offline   Reply With Quote
Old 01-30-2017, 11:18 AM   #3
Senior Member
 
Join Date: Sep 2013
Location: Newberg, OR
Posts: 1,385
The radius arm brackets drop the rear mounting point down far enough to get 3.5deg of caster on most vans. If you want more caster there are some modifications that can be done to the radius arm (relocating the bottom mounting hole slightly with some custom made plates). Ujoint sells pre-modified radius arms for a fair price. If you want to DIY, please send me a message or give me a call. You're welcome to contact me anytime during the installation if you have questions too.
mgmetalworks is offline   Reply With Quote
Old 01-30-2017, 11:19 AM   #4
Senior Member
 
Join Date: Sep 2013
Location: Newberg, OR
Posts: 1,385
fordpartsgiant.com has a better price on those radius arm nuts and bolts. They're sold in packages of 2 or 4 depending on which part number, that's why the price seems high.
mgmetalworks is offline   Reply With Quote
Old 01-30-2017, 11:36 AM   #5
Member
 
Join Date: Mar 2014
Posts: 53
Quote:
Originally Posted by shenrie View Post
iirc, mg's setup adds the appropriate amount of caster with his locator bracket. somewhere between 3.5 and 5 degrees. ive helped install one of his setups. ill be interested to hear how it goes removing the Quigley stuff and replacing with mg's stuff. please keep us posted.

what ujoint stuff are you installing?
I ordered the MG kit from U-joint which includes spring perches, radius arm mounts, and track bar mount. I also bought 6" lift rear leaf springs, longer rear u-bolts, rear wheel spacers, longer brake lines, Carli track bar, Moog coil springs, and 4 Fox shocks from U-joint.
__________________
2012 E350 EB Passenger V10
MG/Expovans full exterior and interior
ohsix is offline   Reply With Quote
Old 01-30-2017, 11:51 AM   #6
Member
 
Join Date: Mar 2014
Posts: 53
Quote:
Originally Posted by mgmetalworks View Post
fordpartsgiant.com has a better price on those radius arm nuts and bolts. They're sold in packages of 2 or 4 depending on which part number, that's why the price seems high.
I bought 6 grade 8 bolts ($4.83 ea), 6 grade 8 locknuts ($2.37 ea), and 12 washers ($0.3171 ea) from Fastenal. The bolts are M18-2.5 x 140mm partial thread which should be pretty similar to the Ford bolts.

Thanks for the info on fordpartsgiant.com. Looks like those bolts are $4.24 each at fordpartsgiant.com vs $4.83 each at Fastenal, so I didn't spend too much extra.

Any special tools or bits you can think of that would help installing your parts? I don't have a right angle drill, but I do have a pneumatic drill and impact. I have drill bits up 5/8". Should I buy a right angle drill for this? What's the recommended torque for the radius arm bolts and radius arm mount bolts? I don't have a lift, so I'll probably bolt the radius arms to the axle before putting it under the van. If any of the recommended torque values are real high under the van, I'll probably just give it them a few ugga-chuggas with the impact and make sure I can't tighten it anymore by hand with breaker bars.
__________________
2012 E350 EB Passenger V10
MG/Expovans full exterior and interior
ohsix is offline   Reply With Quote
Old 01-30-2017, 11:54 AM   #7
Senior Member
 
shenrie's Avatar
 
Join Date: Nov 2012
Location: boise idaho
Posts: 2,625
Garage
Quote:
Originally Posted by ohsix View Post
I ordered the MG kit from U-joint which includes spring perches, radius arm mounts, and track bar mount. I also bought 6" lift rear leaf springs, longer rear u-bolts, rear wheel spacers, longer brake lines, Carli track bar, Moog coil springs, and 4 Fox shocks from U-joint.
^^^ very nice!

are the fox shocks you got from ujoint different than the ones you got from agile?
__________________
"understeer is when you hit the wall with the front of your car, oversteer is when you hit the wall with the rear of your car, horsepower is how hard your car hits the wall, and torque is how far your car moves the wall."
shenrie is offline   Reply With Quote
Old 01-30-2017, 12:07 PM   #8
Senior Member
 
Join Date: Sep 2013
Location: Newberg, OR
Posts: 1,385
I bought a cheap right angle drill from Home Depot ($69) and it has done 4 installs already like a champ. Step bits and a good cutting fluid are a good thing to have too. I've used Harbor Freight step bits for three installs. I also use Rapid Tap cutting fluid and drilling just sails through the frame. New Rapid Tap | Relton Corporation

You'll need to assemble the spring perches on the axle before the radius arms.

Torque specs for the big stuff are:
-Radius arm bolts = 222 lb-ft (torque bolts with van sitting on the ground at ride height...very important)
-Upper trac bar bolt = 406 lb-ft (Any alignment shop can do this once you're up and running. You can get close with an impact but have someone with the right torque wrench check)
-Lower trac bar ball joint nut = 184 lb-ft

I don't have the drag link or steering box values memorized...
mgmetalworks is offline   Reply With Quote
Old 01-30-2017, 12:09 PM   #9
Senior Member
 
Join Date: Sep 2013
Location: Newberg, OR
Posts: 1,385
Quote:
Originally Posted by shenrie View Post
^^^ very nice!

are the fox shocks you got from ujoint different than the ones you got from agile?
The shock part number that I use for this kit is the same base part number that Agile uses for their shock before it is tuned. Meaning the overall dimensions are the same, the valving is just different. You can probably reuse the Agile shock if you wanted.
mgmetalworks is offline   Reply With Quote
Old 01-30-2017, 12:25 PM   #10
Senior Member
 
shenrie's Avatar
 
Join Date: Nov 2012
Location: boise idaho
Posts: 2,625
Garage
^^^ exactly what I was wondering. thanks mg
__________________
"understeer is when you hit the wall with the front of your car, oversteer is when you hit the wall with the rear of your car, horsepower is how hard your car hits the wall, and torque is how far your car moves the wall."
shenrie is offline   Reply With Quote
Reply

Thread Tools
Display Modes

Posting Rules
You may not post new threads
You may not post replies
You may not post attachments
You may not edit your posts

BB code is On
Smilies are On
[IMG] code is On
HTML code is Off
Trackbacks are Off
Pingbacks are Off
Refbacks are Off

» Featured Campgrounds

Reviews provided by

Powered by vBadvanced CMPS v3.2.3
Disclaimer:

This website is not affiliated with or endorsed by Sportsmobile SIP or any of its affiliates. This is an independent, unofficial site.


All times are GMT -6. The time now is 03:07 PM.


Powered by vBulletin® Version 3.8.8 Beta 4
Copyright ©2000 - 2024, vBulletin Solutions, Inc.