|
|
 10-16-2016, 09:26 AM
|
#171
|
|
Junior Member
Join Date: Feb 2014
Posts: 13
|
Fitz, Do you happen to know the spec on the Thule rails? This looks like a clean way to mount the solar panels. Thanks!
|

|

|
|
10-16-2016, 09:45 AM
|
#172
|
|
Senior Member
Join Date: Jul 2011
Location: TN
Posts: 10,241
|
Fitz, we got bored with the interstate coming home from Glacier one year and decided to take Hwy 2 across northern Montana before we dropped down to the interstate in North Dakota. This was in late summer and bugs were worse than I've ever seen, similar to your pics and maybe even worse. I mistakenly hit the wiper/washers too in a desperate attempt to see where I was going. Bad mistake. In the end I stopped at virtually every small town gas station we came to that day, about every half hour, to clear the windshield. The worst part for the rest of the trip was the smell. My radiator and front end was so clogged with dead bugs you could smell it every time you walked near the van. Pretty crazy how bad they can be in places.
Thanks for the profile pics. Your van looks great!

|
|
|
|
|
10-16-2016, 10:27 AM
|
#173
|
|
Junior Member
Join Date: Feb 2014
Posts: 13
|
Quote:
Originally Posted by buggymancan

Fitz, Do you happen to know the spec on the Thule rails? This looks like a clean way to mount the solar panels. Thanks!
|
Fitz, I located the Thule "top tracks" you used. I assume they are the 60" version (x2) = 119" total length?
My van s being up-fitted now, so I don't have access to measure the top. What width (or spacing are your rails mounted at? I am looking at the Thule Aeroblade cross bars, available in 43' , 47" and 51" widths. I am concerned that the rack x- bars the base feet when mounted might be too tall for my garage. I have a 109" max garage opening. I appreciate any feedback you can provide!
|
|
|
|
|
10-16-2016, 10:29 PM
|
#174
|
|
Senior Member
Join Date: Nov 2015
Location: Vacaville, just east of the San Francisco Bay Area
Posts: 1,062
|
Quote:
Originally Posted by buggymancan
Fitz, I located the Thule "top tracks" you used. I assume they are the 60" version (x2) = 119" total length?
My van s being up-fitted now, so I don't have access to measure the top. What width (or spacing are your rails mounted at? I am looking at the Thule Aeroblade cross bars, available in 43' , 47" and 51" widths. I am concerned that the rack x- bars the base feet when mounted might be too tall for my garage. I have a 109" max garage opening. I appreciate any feedback you can provide!
|
Yes to you first question, the Thule rails are in two pieces, thru bolted through the PH outside the canvass line.
Will your van have the 265's like mine? Mine is 101" to the rail from the ground. Your garage is 109", I know the Thule rack system will be less than the 8" difference, thus you should be good. We are on I-15 at the moment, Laura driving, I will add width measurements when I can. If I recall the 47" width is what I am planning to install, we just haven't slowed down enough for me to do it!
__________________
Flint - 2016 SMB Sprinter 4x4 144" RB 150S w/ PH
KN6BJX
|
|
|
|
|
10-17-2016, 08:31 AM
|
#175
|
|
Junior Member
Join Date: Feb 2014
Posts: 13
|
Thanks, Yes I will be running the 265 tires. Thanks for your offer to verify the rail spacing. It will also be helpful to know the size/ width measurement of your solar panels, even the brand. Thanks!
|
|
|
|
|
10-17-2016, 09:41 AM
|
#176
|
|
Senior Member
Join Date: Nov 2015
Location: Vacaville, just east of the San Francisco Bay Area
Posts: 1,062
|
Quote:
Originally Posted by buggymancan
Thanks, Yes I will be running the 265 tires. Thanks for your offer to verify the rail spacing. It will also be helpful to know the size/ width measurement of your solar panels, even the brand. Thanks!
|
The Thule rails are 50-1/2" center to center. They are located close to the edge of the PH top and outside of the canvas below.
The solar panels are Zamp black 100 watt panels. The panels measure 39-1/2" x 26-1/2" each, put together they measure 39-1/2" x 52-1/2", see previous post #103 above for pictures.
__________________
Flint - 2016 SMB Sprinter 4x4 144" RB 150S w/ PH
KN6BJX
|
|
|
|
|
10-22-2016, 07:20 PM
|
#177
|
|
Senior Member
Join Date: Nov 2015
Location: Vacaville, just east of the San Francisco Bay Area
Posts: 1,062
|
We just finished our second long trip and I thought an update was in order.
1,566 miles, 15.3 mpg, average price of fuel $2.89. MPG was down by 1 vs. our previous trip, the big difference on this trip was a fully loaded van, a lot of off-road time and none of that “keep it below 60 mph” for the first thousand miles.
In one of Snowy’s recent posts he asked about DEF usage. I topped off the DEF tank before this trip and again upon our return, total usage was 17-3/4 cups = 1.11 gallons.1,566/1.11 = 1,410 mpg (DEF). This vs. my first fill at 3,400 miles @ 1,417 mpg (DEF).Seems pretty consistent!
This trip saw quite a bit of time off road. We started at the Valley of Fire Meet Up where we got the chance do the 28 mile Bitter Springs Trail with a group of 6 Fords – a great feeling when taking the Sprinter off road for the first time knowing that plenty of help was there if needed!We scratched up the Nerf Bars a bit, we put a few stripes in the paint on the sides and we definitely tested the skid plates, but no help was required and I am pleased to report that the Sprinter performed well and kept up with the group. Here are five of the seven vans at lunch.
 Following the Valley of Fire we spent the next three days rock hounding in the Mojave, this time with a Jeep owner who was surprised we could go the places we went. With the Sprinter 4x4 you need to remember to keep your foot on the gas, especially when a wheel starts to spin. It’s a different mindset than with a locked differential, but overall I was very pleased with how the van handled rocky terrain and (deep) loose sand and gravel.
 From there we worked our way over to the Carrizo Plain and went from one end to the other, south to north. More off road, more satisfaction with what the Sprinter can handle, more dirt on, in and under Flint. We haven’t tried the van in mud or snow yet, but hopefully our California winter (if we have one this year) will provide opportunities for both in the coming months. Here is Soda Lake on the Carrizo Plain:
 We picked up Flint on September 8th and it is now six weeks later and we have totaled just under 5k miles and we have spent 20 nights in the van. Unfortunately, needing to work for a living is about to intrude on our easy-to-become-accustomed-to recent lifestyle. Some observations:
1. I am looking into adding the Battery Monitor Kit (ME-BMK) as an addition to the Magnum Inverter/Charger. For those of you in the build process, I suggest you look at including this simple addition.
2. I picked up a surge tank to add to the water system, but haven’t gotten around to installing it yet. I have had these in RV’s in the past and they do a good job of keeping the water pump from running constantly. This is another addition I would suggest for those of you in the build process, I will add mine as time allows.
3. Additions to your normal tool kit. Suggest adding a breaker bar with the correct sized deep sockets for the lug nuts, and don’t forget to check the locking lug nuts also – mine are different on the van vs. the spare. Also, a Torx set is required to get into various Sprinter locations, such as the dash panels or to access the battery in the driver’s foot well. And if you are new to RV’ing, a multi-meter is always useful when it comes to tracking down electrical issues in the various systems. I carry a fair sized tool/recovery kit, this might be an interesting topic to explore further in the future with lots of input from you all!
4. No regrets on the decision to omit propane and a built-in cooktop.
5. We added additional USB outlets in various locations as part of the build and they have worked out exceptionally well. The SMB provided lights work great, except for when you want just a bit of light when relaxing at night. I ordered some little flexible plug-in USB lights and a couple of those strategically located really do a good job of providing “just enough” light at the end of the day.
We picked up Flint on September 8th and it is now six weeks later and we have totaled just under 5k miles and we have spent 20 nights in the van. Unfortunately, needing to work for a living is about to intrude on our easy-to-become-accustomed-to recent lifestyle. Some observations:
1. I am looking into adding the Battery Monitor Kit (ME-BMK) as an addition to the Magnum Inverter/Charger. For those of you in the build process, I suggest you look at including this simple addition.
2. I picked up a surge tank to add to the water system, but haven’t gotten around to installing it yet. I have had these in RV’s in the past and they do a good job of keeping the water pump from running constantly. This is another addition I would suggest for those of you in the build process, I will add mine as time allows.
3. Additions to your normal tool kit. Suggest adding a breaker bar with the correct sized deep sockets for the lug nuts, and don’t forget to check the locking lug nuts also – mine are different on the van vs. the spare. Also, a Torx set is required to get into various Sprinter locations, such as the dash panels or to access the battery in the driver’s foot well. And if you are new to RV’ing, a multi-meter is always useful when it comes to tracking down electrical issues in the various systems. I carry a fair sized tool/recovery kit, this might be an interesting topic to explore further in the future with lots of input from you all!
4. No regrets on the decision to omit propane and a built-in cooktop.
5. We added additional USB outlets in various locations as part of the build and they have worked out exceptionally well. The SMB provided lights work great, except for when you want just a bit of light when relaxing at night. I ordered some little flexible plug-in USB lights and a couple of those strategically located really do a good job of providing “just enough” light at the end of the day.

 The next planned addition will either be a set of Maxtrax or aluminum sand ladders, I’m still researching to determine which will be the best fit for us. The Trasharoo has taken over the back of the spare tire and has turned into a permanent chair carrier (thanks to Chris T in Santa Rosa for the great idea), thus a roof mounted solution is most likely, we will see. And of course that means an Aluminess ladder on the side of the van, it seems every good idea has an impact on the checkbook!
To close, a dirty van (that’s a black Trasharoo in the picture) is a happy van!
The next planned addition will either be a set of Maxtrax or aluminum sand ladders, I’m still researching to determine which will be the best fit for us. The Trasharoo has taken over the back of the spare tire and has turned into a permanent chair carrier (thanks to Chris T in Santa Rosa for the great idea), thus a roof mounted solution is most likely, we will see. And of course that means an Aluminess ladder on the side of the van, it seems every good idea has an impact on the checkbook!
To close, a dirty van (that’s a black Trasharoo in the picture) is a happy van!

__________________
Flint - 2016 SMB Sprinter 4x4 144" RB 150S w/ PH
KN6BJX
|
|
|
|
|
10-23-2016, 03:36 AM
|
#178
|
|
Senior Member
Join Date: Feb 2014
Location: Perth, Western Australia
Posts: 459
|
Fitz,
Great report. Look forward to every post.
We have had MB 4x4 Vans here in Australia
for about 10-12 years, but prices start at about
aud$195,000. They perform very well offroad.
www.trakka.com.au
then go to Jabiru 4x4.
Cheers Doug
__________________
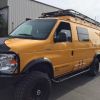
2008 Yellow Ford E350 6.0 diesel eb50 4x4, Front E Locker, Asheville Eng Rebuil 20th @ 261miles, ARP Studds, 200amp Alternator, Performance Aluminium Radiator, OnBoardAir, RoadmasterActiveSuspension, Front & Rear Aluminess with Spare Tire Carrier, Aluminess Roof Rack, Titan Aft 30gallon Fuel Tank.
|
|
|
|
|
10-25-2016, 11:30 PM
|
#179
|
|
Senior Member
Join Date: Nov 2015
Location: Vacaville, just east of the San Francisco Bay Area
Posts: 1,062
|
Carport Update
Quote:
Originally Posted by Fitz
The carport is not yet built, I will provide a picture when it finally gets done. I decided to do it "right" and get a permit, as a result I am currently serving as the intermediary between two engineers (and I make a third!) as they go back and forth in the process of resolving minor design details. We are down to one final question and I am confident we will come to resolution, but...
|
The above text is from post #135 in the string above.
Flash! The "it will take 15 days to review" building permit is finally in hand. Permit application submitted 7/20/16, permit received 10/24/16. One submittal and two re-submittals for a pre-fabricated metal carport....
I told the fabricator I have the permit in hand. The response: " Our lead time is 6-8 weeks and we will call you 2-3 days prior to installation."
Hurry up and wait some more. I should have designed it myself and stick-built it...
__________________
Flint - 2016 SMB Sprinter 4x4 144" RB 150S w/ PH
KN6BJX
|
|
|
|
|
10-30-2016, 12:12 PM
|
#180
|
|
Senior Member
Join Date: Nov 2015
Location: Vacaville, just east of the San Francisco Bay Area
Posts: 1,062
|
Forum member E350 caught my attention with a post he put up previously, one that I read when I was going through the design process. The topic was the Sparebumper that he installed, plus his comment "The idea of replacing the boxes or the bumper grates my teeth so I'm protecting it." I thought it was a really good idea and I followed up on it, as you can see in the following pictures.
The Sparebumper compresses upon impact, per their literature up to a total of 2". Some of the pictures make it look like it sticks out a long way, some don't, thus the selection of pictures so you can judge for yourself. If you are interested, here is the link to their website. http://www.sparebumper.com/
I used a 12" extension to mount the Sparebumper, different lengths can be used for different needs. A 10" would have worked and would have allowed just enough room for the maximum compression, but is not a readily available size so I went with the 12" vs. making a 10".
Like E350, my goal is to protect the box and bumper from someone getting a bit too close when parking behind the van, also from me doing the same when backing up! For offroad use it is a simple matter to remove and store, I will try it out and see how it works.


__________________
Flint - 2016 SMB Sprinter 4x4 144" RB 150S w/ PH
KN6BJX
|
|
|
|
|
|
 Posting Rules
|
You may not post new threads
You may not post replies
You may not post attachments
You may not edit your posts
HTML code is Off
|
|
|
|
 » Recent Threads
 |
|
|
|
|
|
|
|
|
|
|
|
|
|
|
|
|
|
|
|
|
|
|
|
|
|
|
|
|
|
|
|
|
|


 2008 Ford e350
 Linear Mode