|
|
 10-30-2016, 12:33 PM
|
#181
|
|
Senior Member
Join Date: Nov 2015
Location: Vacaville, just east of the San Francisco Bay Area
Posts: 1,062
|
Part of the process of installing the Superbumper included setting up the van to be able to haul my small utility trailer. I don't use it often, but it sure is nice to have when needed.
I mentioned in the post above that I used a 12" extension. The utility trailer requires a 2" drop, here is what the hitch extension and ball drop looks like when attached.


Keep in mind that an extension reduces the tongue weight capacity by half. The capacity of the standard Aluminess rear bumper (for the Sprinter) is 350 lbs. I had Aluminess add some additional gussets to mine, thus it will carry a bit more, let's say 500 lbs. without doing the calculation. Keep in mind also that the weight of everything attached to the bumper - swing arms, spare tire, box and contents and etc. all count against this rating, so plan accordingly. In my case I don't see the tongue weight of my trailer ever exceeding 150 lbs. or so, thus I feel I am good. Note also that I have a little 1974 Honda CT70 that I may want to carry here, it weighs 155 lbs and served as my design case when considering all of this.
__________________
Flint - 2016 SMB Sprinter 4x4 144" RB 150S w/ PH
KN6BJX
|

|

|
|
10-30-2016, 01:10 PM
|
#182
|
|
Senior Member
Join Date: Feb 2014
Location: Perth, Western Australia
Posts: 459
|
Fitz. I have bought a 14 inch extension for my rear receiver hitch and a Smittybilt "BeaverStep
that I have painted bright orange, to use as a step, snatch strap attachmentpoint and as protection from other vehicles.
Smittybilt Automotive- Winches, Nerf Bars, Side Steps, Grille Guards, Seats and More then go to index, click on beaver step.
Cheers.
__________________
2008 Yellow Ford E350 6.0 diesel eb50 4x4, Front E Locker, Asheville Eng Rebuil 20th @ 261miles, ARP Studds, 200amp Alternator, Performance Aluminium Radiator, OnBoardAir, RoadmasterActiveSuspension, Front & Rear Aluminess with Spare Tire Carrier, Aluminess Roof Rack, Titan Aft 30gallon Fuel Tank.
|
|
|
|
|
10-30-2016, 01:23 PM
|
#183
|
|
Senior Member
Join Date: Nov 2015
Location: Vacaville, just east of the San Francisco Bay Area
Posts: 1,062
|
Quote:
Originally Posted by Sheriffdoug

Fitz. I have bought a 14 inch extension for my rear receiver hitch and a Smittybilt "BeaverStep
that I have painted bright orange, Cheers.
|
The bright orange is a good idea. I have been thinking I will apply reflective tape across the back of the Sparebumper.
__________________
Flint - 2016 SMB Sprinter 4x4 144" RB 150S w/ PH
KN6BJX
|
|
|
|
|
10-30-2016, 07:24 PM
|
#184
|
|
Senior Member
Join Date: Apr 2016
Location: Oregon
Posts: 1,186
|
Great idea. I use my step hitch to keep people from using my bumper as a gauge for their parking space. But this thing looks like it could really take some impact.
__________________
"PhoTo" - 2014 Ford E350 5.4L RB - Agile 4x4 - CCV Poptop
|
|
|
|
|
10-30-2016, 11:24 PM
|
#185
|
|
Senior Member
Join Date: Nov 2015
Location: Vacaville, just east of the San Francisco Bay Area
Posts: 1,062
|
Spare Fuses
I went through the two fuse panels (under the driver's seat and in the base of the rear bench seat) plus looked at the various in-line fuse holders scattered about and came up with a list. From there it was a simple matter to determine what I needed for spares.
What I didn't realize is that there are more fuses in the Sprinter battery compartment, and they are not your garden variety fuse!
To access, first you have to use the correct Torx driver (if you don't have a set add them to your on-board tool kit) to gain access to the panel below the floor, and then you need another size driver to remove the panel itself. Note: There is a MB-supplied Torx driver contained in the bag with the tools for the jack located in the passenger's side foot well.
The battery is located in the driver's side foot well. Here is what you see when you open it up.
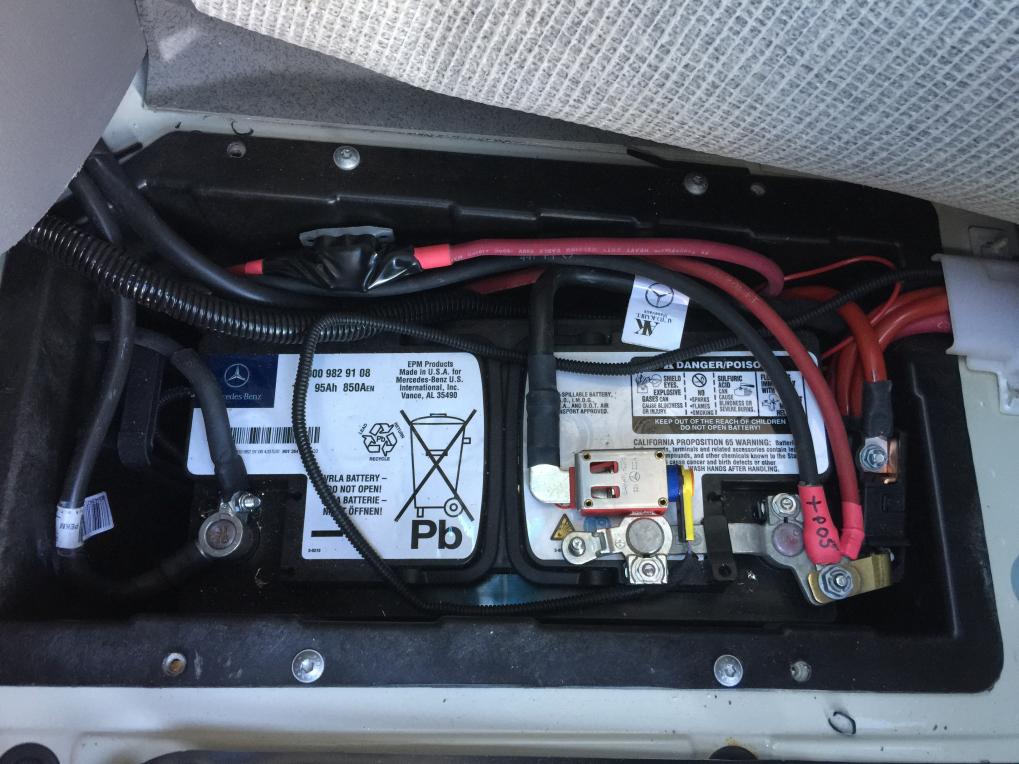
Note the brass bar on the right hand side coming off the positive terminal. Follow it and you will find a black plastic cover nestled immediately to the right of the battery. You can just see the uppermost part of it in this picture.
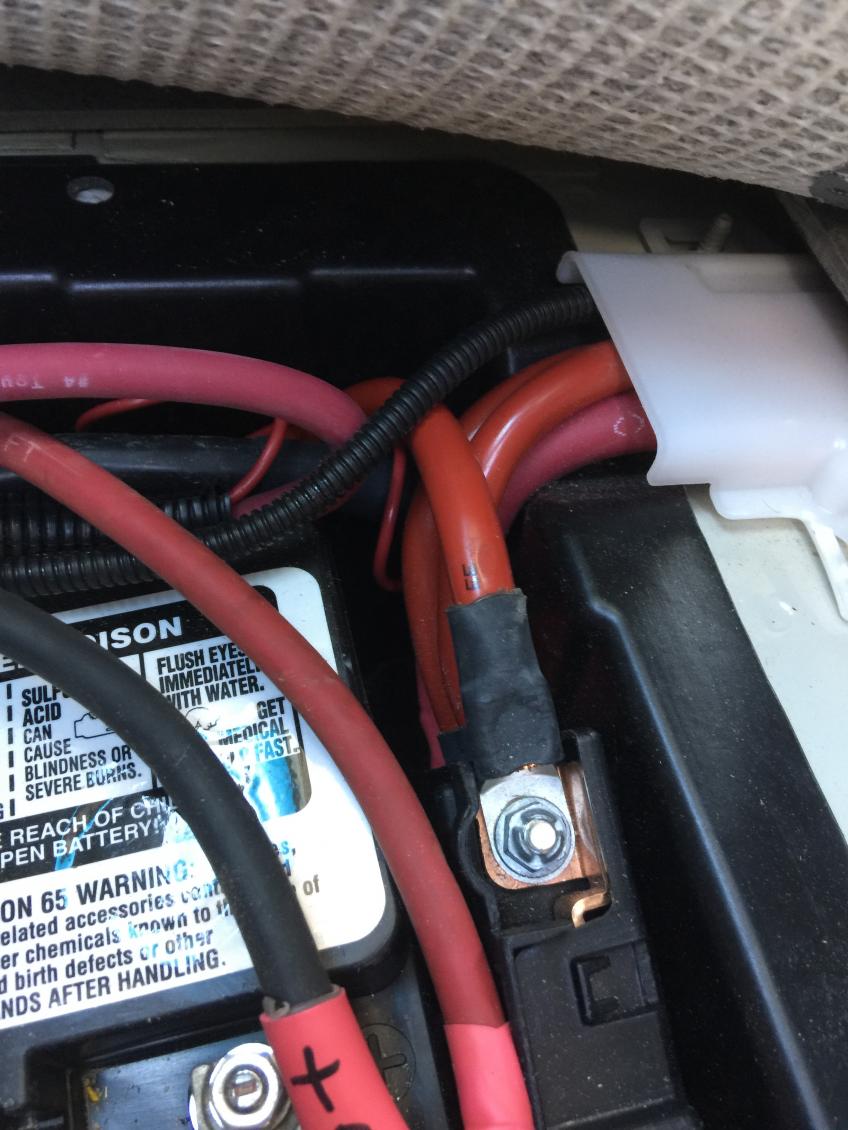
Remove the 13mm nut attaching the brass bar to the positive terminal and carefully extract all that is attached to it. Remove the plastic cover and this is what you will find.
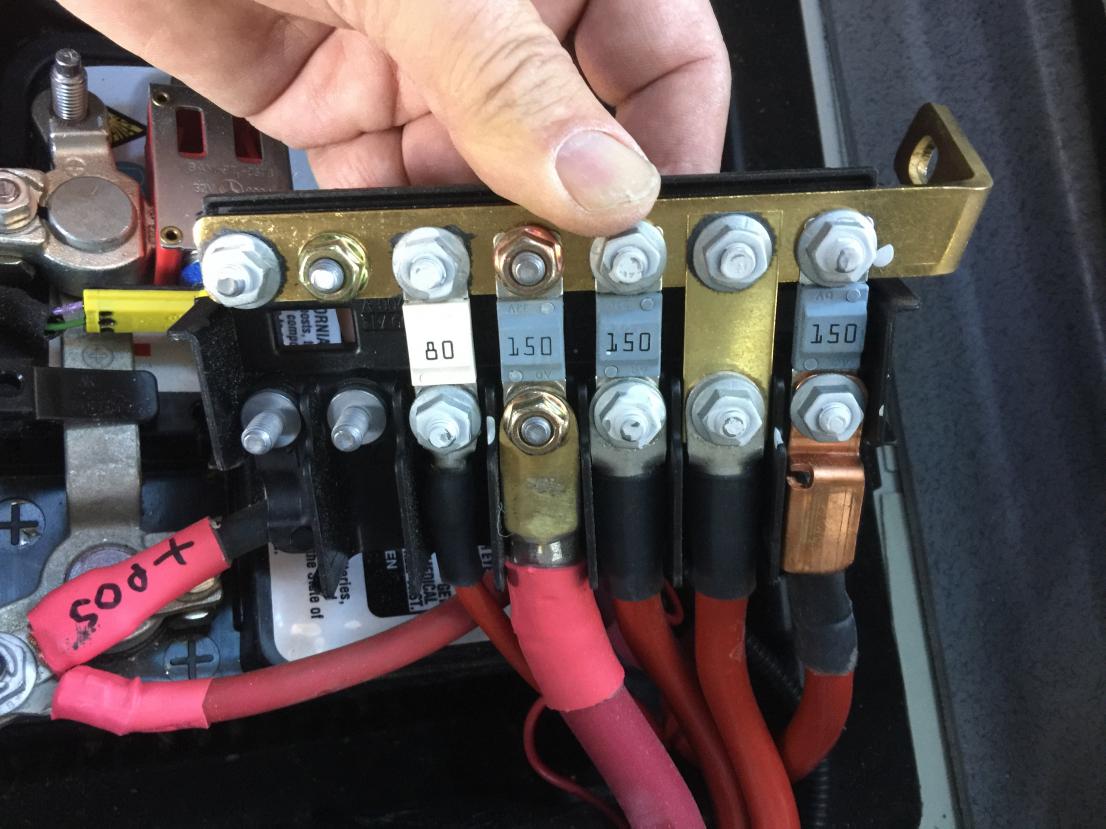
Note the first 150 amp fuse from the left, this is what SMB added to run power to the separator and then on to the house battery. The other fuses are MB factory and I have no idea what they are for. I haven't started to look yet, but I will. If anyone knows what they are for please pass on the information as I want to label them.
Next I thought I'd run to the auto parts store and pick up a couple of spares. No luck, and I tried several different stores. Not only were they not in stock, but I didn't find one person behind the counter who had ever seen them! Of course that meant an on-line search followed by an Amazon delivery. If you want spares, and who doesn't, here is what to look for.
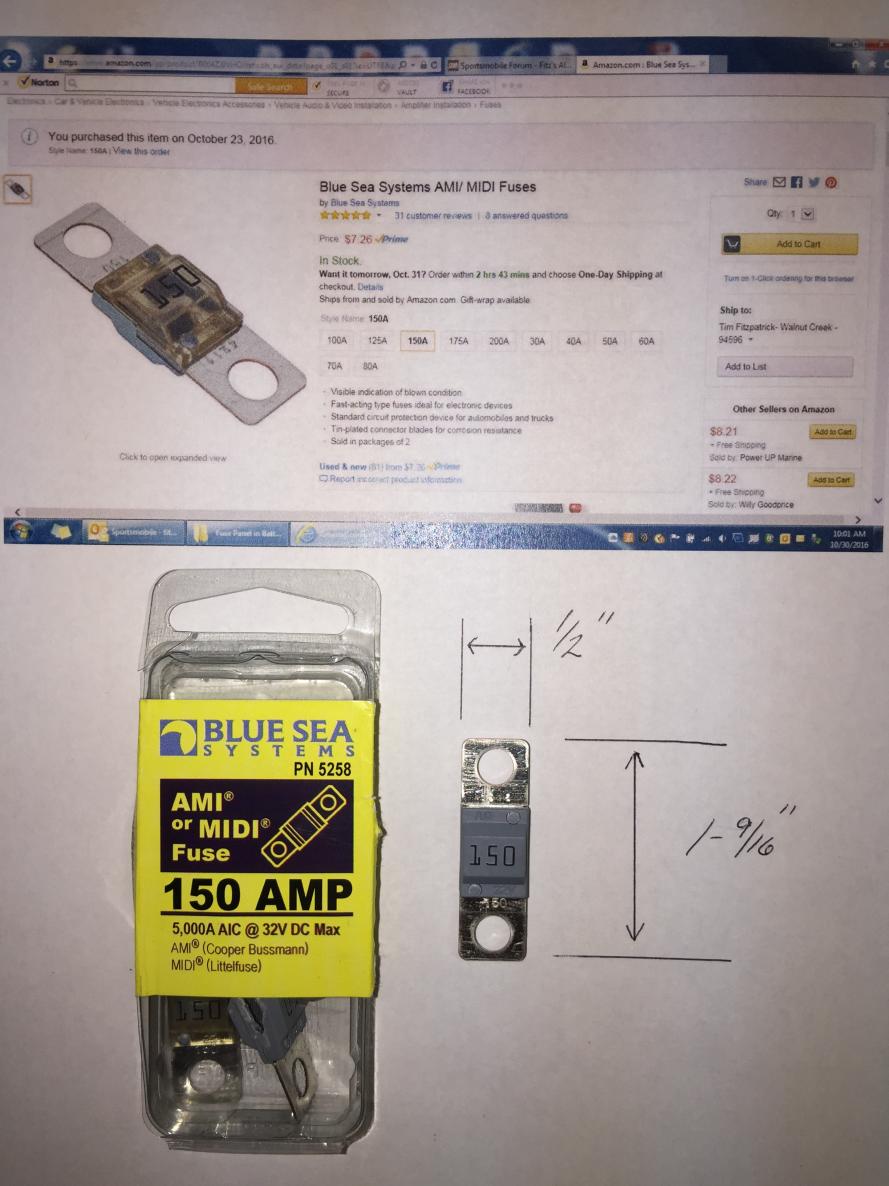
I hope to never need them, but having them and knowing where they are located is the best way I know of to assure that I won't need them. If you run across any other odd-ball Sprinter items like this, please pass them on for the rest of us to learn from.
__________________
Flint - 2016 SMB Sprinter 4x4 144" RB 150S w/ PH
KN6BJX
|
|
|
|
|
11-06-2016, 05:06 PM
|
#186
|
|
Member
Join Date: Mar 2011
Location: San Diego
Posts: 95
|
USB outlets
Any idea who makes these USB outlets? I'm having a hard time locating any withot the small led on them. Any help is appreciated
Quote:
Originally Posted by Fitz
We just finished our second long trip and I thought an update was in order.
1,566 miles, 15.3 mpg, average price of fuel $2.89. MPG was down by 1 vs. our previous trip, the big difference on this trip was a fully loaded van, a lot of off-road time and none of that keep it below 60 mph for the first thousand miles.
In one of Snowys recent posts he asked about DEF usage. I topped off the DEF tank before this trip and again upon our return, total usage was 17-3/4 cups = 1.11 gallons.1,566/1.11 = 1,410 mpg (DEF). This vs. my first fill at 3,400 miles @ 1,417 mpg (DEF).Seems pretty consistent!
This trip saw quite a bit of time off road. We started at the Valley of Fire Meet Up where we got the chance do the 28 mile Bitter Springs Trail with a group of 6 Fords a great feeling when taking the Sprinter off road for the first time knowing that plenty of help was there if needed!We scratched up the Nerf Bars a bit, we put a few stripes in the paint on the sides and we definitely tested the skid plates, but no help was required and I am pleased to report that the Sprinter performed well and kept up with the group. Here are five of the seven vans at lunch.
 Following the Valley of Fire we spent the next three days rock hounding in the Mojave, this time with a Jeep owner who was surprised we could go the places we went. With the Sprinter 4x4 you need to remember to keep your foot on the gas, especially when a wheel starts to spin. Its a different mindset than with a locked differential, but overall I was very pleased with how the van handled rocky terrain and (deep) loose sand and gravel.
 From there we worked our way over to the Carrizo Plain and went from one end to the other, south to north. More off road, more satisfaction with what the Sprinter can handle, more dirt on, in and under Flint. We havent tried the van in mud or snow yet, but hopefully our California winter (if we have one this year) will provide opportunities for both in the coming months. Here is Soda Lake on the Carrizo Plain:
 We picked up Flint on September 8th and it is now six weeks later and we have totaled just under 5k miles and we have spent 20 nights in the van. Unfortunately, needing to work for a living is about to intrude on our easy-to-become-accustomed-to recent lifestyle. Some observations:
1. I am looking into adding the Battery Monitor Kit (ME-BMK) as an addition to the Magnum Inverter/Charger. For those of you in the build process, I suggest you look at including this simple addition.
2. I picked up a surge tank to add to the water system, but havent gotten around to installing it yet. I have had these in RVs in the past and they do a good job of keeping the water pump from running constantly. This is another addition I would suggest for those of you in the build process, I will add mine as time allows.
3. Additions to your normal tool kit. Suggest adding a breaker bar with the correct sized deep sockets for the lug nuts, and dont forget to check the locking lug nuts also mine are different on the van vs. the spare. Also, a Torx set is required to get into various Sprinter locations, such as the dash panels or to access the battery in the drivers foot well. And if you are new to RVing, a multi-meter is always useful when it comes to tracking down electrical issues in the various systems. I carry a fair sized tool/recovery kit, this might be an interesting topic to explore further in the future with lots of input from you all!
4. No regrets on the decision to omit propane and a built-in cooktop.
5. We added additional USB outlets in various locations as part of the build and they have worked out exceptionally well. The SMB provided lights work great, except for when you want just a bit of light when relaxing at night. I ordered some little flexible plug-in USB lights and a couple of those strategically located really do a good job of providing just enough light at the end of the day.
We picked up Flint on September 8th and it is now six weeks later and we have totaled just under 5k miles and we have spent 20 nights in the van. Unfortunately, needing to work for a living is about to intrude on our easy-to-become-accustomed-to recent lifestyle. Some observations:
1. I am looking into adding the Battery Monitor Kit (ME-BMK) as an addition to the Magnum Inverter/Charger. For those of you in the build process, I suggest you look at including this simple addition.
2. I picked up a surge tank to add to the water system, but havent gotten around to installing it yet. I have had these in RVs in the past and they do a good job of keeping the water pump from running constantly. This is another addition I would suggest for those of you in the build process, I will add mine as time allows.
3. Additions to your normal tool kit. Suggest adding a breaker bar with the correct sized deep sockets for the lug nuts, and dont forget to check the locking lug nuts also mine are different on the van vs. the spare. Also, a Torx set is required to get into various Sprinter locations, such as the dash panels or to access the battery in the drivers foot well. And if you are new to RVing, a multi-meter is always useful when it comes to tracking down electrical issues in the various systems. I carry a fair sized tool/recovery kit, this might be an interesting topic to explore further in the future with lots of input from you all!
4. No regrets on the decision to omit propane and a built-in cooktop.
5. We added additional USB outlets in various locations as part of the build and they have worked out exceptionally well. The SMB provided lights work great, except for when you want just a bit of light when relaxing at night. I ordered some little flexible plug-in USB lights and a couple of those strategically located really do a good job of providing just enough light at the end of the day.

 The next planned addition will either be a set of Maxtrax or aluminum sand ladders, Im still researching to determine which will be the best fit for us. The Trasharoo has taken over the back of the spare tire and has turned into a permanent chair carrier (thanks to Chris T in Santa Rosa for the great idea), thus a roof mounted solution is most likely, we will see. And of course that means an Aluminess ladder on the side of the van, it seems every good idea has an impact on the checkbook!
To close, a dirty van (thats a black Trasharoo in the picture) is a happy van!
The next planned addition will either be a set of Maxtrax or aluminum sand ladders, Im still researching to determine which will be the best fit for us. The Trasharoo has taken over the back of the spare tire and has turned into a permanent chair carrier (thanks to Chris T in Santa Rosa for the great idea), thus a roof mounted solution is most likely, we will see. And of course that means an Aluminess ladder on the side of the van, it seems every good idea has an impact on the checkbook!
To close, a dirty van (thats a black Trasharoo in the picture) is a happy van!

|
|
|
|
|
|
11-06-2016, 10:05 PM
|
#187
|
|
Senior Member
Join Date: Nov 2015
Location: Vacaville, just east of the San Francisco Bay Area
Posts: 1,062
|
Quote:
Originally Posted by clark
Any idea who makes these USB outlets? I'm having a hard time locating any withot the small led on them. Any help is appreciated
|
I pulled one out this evening and couldn't find a manufacturer's name or model anywhere, only that it complied with "SAEJ1171 & is USCG IGNITION PROTECTED".
I want to replace the standard MB 12 volt plug located in the front of the van with one of these so I did an internet search. Maybe found one without an indicator light, not sure, so I sent Brian at SMB Texas a note asking for make and model. Will report back when I know.
__________________
Flint - 2016 SMB Sprinter 4x4 144" RB 150S w/ PH
KN6BJX
|
|
|
|
|
11-06-2016, 11:29 PM
|
#188
|
|
Member
Join Date: Mar 2011
Location: San Diego
Posts: 95
|
Thanks! ---------
|
|
|
|
|
11-12-2016, 09:33 PM
|
#189
|
|
Senior Member
Join Date: Nov 2015
Location: Vacaville, just east of the San Francisco Bay Area
Posts: 1,062
|
Does Flint need to go on a diet????
I finally got around to putting Flint on a scale. Not sure why I procrastinated, I guess I just wanted to put everything in and on the van I wanted before confusing the issue with facts!
Anyway, with us in the van and with all tanks topped off and all of our "stuff", (which includes all of Laura's rock hounding tools), loaded up and ready to go, here are the facts:
Front axle GAWR: 3,970 lbs.
Front axle actual weight: 4,060 lbs.
102.3% of GAWR
Rear axle GAWR: 5,360 lbs.
Rear axle actual weight: 4,540 lbs.
84.7% of GAWR
Total GVWR: 8,550 lbs.
Total actual weight: 8,600 lbs.
100.6% of GVWR
I'm currently running 50 psi in the front and 70 psi in the rear on BFG KO2 265-70R17's and the van handles great. My inclination is to not change a thing!
Any thoughts or comments?
__________________
Flint - 2016 SMB Sprinter 4x4 144" RB 150S w/ PH
KN6BJX
|
|
|
|
|
11-13-2016, 06:26 PM
|
#190
|
|
Senior Member
Join Date: Jun 2016
Location: Denver, CO
Posts: 242
|
That's minor and would not worry about it. Use a tire depth gauge to measure the wear going across the tread in 3 spots (outer, middle, inner). It should remain fairly even f you have a good alignment and you're rotating the tires every 5-7K miles. If you're wearing in the middle, dial back the air pressure.
I'm going to guess many Class B RV's are right at the GVWR. Nothing magical happens once you exceed that number. Your van will stop much sooner with nothing in it compared to being at GVWR. Just make sure to give yourself some healthy distances between you and the car in front of you. If you dropped a few lbs to get just under the GVWR, that's not going to change anything perceivable.
Heavy vehicles will have more wear and worse performance than a light vehicle. If you were over by 500 lbs, that might be worth looking into a bit of a diet.
|
|
|
|
|
|
 Posting Rules
|
You may not post new threads
You may not post replies
You may not post attachments
You may not edit your posts
HTML code is Off
|
|
|
|
 » Recent Threads
 |
|
|
|
|
|
|
|
|
|
|
|
|
|
|
|
|
|
|
|
|
|
|
|
|
|
|
|
|
|
|
|
|
|


 2008 Ford e350
 PhoTo
PhoTo Linear Mode