|
|
 03-09-2019, 03:51 PM
|
#641
|
|
Senior Member
Join Date: Nov 2015
Location: Vacaville, just east of the San Francisco Bay Area
Posts: 1,062
|
Another Maintenance Item - Radio Antenna
I know of two forum members who have had to deal with leaks from their external radio antennas this winter. In both cases the electrical below the antenna and the headliner were affected, not good things to have happen...
Close inspection revealed nothing out of the ordinary on Flint's antenna, but I decided a little preventative maintenance would be a good thing so I sealed the joint between the two plastic pieces and the joint to the painted surface. I have had good luck with 3M Flexiclear Body Seam Sealer 08405, so that is what I used. This material is UV resistant and it is compatible with automotive painted finishes (plus it's expensive!) so what's not to like?
Nothing dramatic to see in the pictures, hopefully this will help to keep it that way for years to come.


__________________
Flint - 2016 SMB Sprinter 4x4 144" RB 150S w/ PH
KN6BJX
|

|

|
|
03-11-2019, 04:49 AM
|
#642
|
|
Senior Member
Join Date: Jan 2011
Location: Reynoldsburg, Ohio
Posts: 3,774
|
Quote:
Originally Posted by Fitz

I have had good luck with 3M Flexiclear Body Seam Sealer 08405, so that is what I used. This material is UV resistant and it is compatible with automotive painted finishes (plus it's expensive!) so what's not to like?
|
Yeah 'tis pricey but yet it pretty much performs as advertised which is rare for a lot of automotive-type products.
There might be cheaper alternatives but to my mind we get what we pay for---those wanting to do a job once in a very long time don't mind the extra cost. I use a few 3M products in my service business and rarely do I have an issue with material failures, almost always "operator error". 
|
|
|
|
|
03-21-2019, 10:09 PM
|
#643
|
|
Senior Member
Join Date: Nov 2015
Location: Vacaville, just east of the San Francisco Bay Area
Posts: 1,062
|
Additional Info Regarding Sure Power Separator vs. Blue Sea ACR
A recent post byrean1mator http://www.sportsmobileforum.com/forums/f11/2018-sprinter-battery-drain-23581.html discusses the (high) battery drain that Sprinter owners typically experience. Rean1mator had a dealer measure the parasitic drain on his 2018 Sprinter, he came back with a reading of 54 milliamps. I took the same measurement myself on my 2016 Sprinter and obtained a similar result of 50 milliamps. My comment in rean1mator’s thread: 0.05x24= 1.2 Amps/Day. 1.2x7= 8.4 Amps/Week. My stock engine battery is a 95 AmpHour AGM, using the rule of thumb of never discharge below 50%, 95/2= 47.5 AmpHours available. 47.5/8.4= about 5 weeks for the battery to reach a state of charge (SOC) of 50%. Of course all this is assuming the battery starts out at 100% SOC, something that the alternator can’t really achieve.
In Post #617 of this thread I detailed my installation of a small 12-volt charger for the engine battery. Simple and easy to use, I plug it in if I know Flint has sat for more than 2-3 weeks, something that seldom happens.
Like so often happens on this forum, a great information exchange ensued, reference Posts #618 thru #640. Key learnings that I came away with (note that much of this content is not mine, refer to the posts referenced above to give credit where credit is due):
- SMB Texas installs the Sure Power Model 1314-200 Battery Separator, https://www.ase-supply.com/Sure_Powe...p-1314-200.htm
- SMB Fresno installs the Blue Sea 7620 ML-ACR Automatic Charging Relay, https://www.bluesea.com/products/7620/ML-ACR_Automatic_Charging_Relay_-_12V_DC_1A The Separator allows both batteries to charge when the engine is running and only the house battery to charge from shore or solar input
- The ACR allows both batteries to charge when the engine is running and it has the capability to charge from either solar or shore power, but the way SMB Fresno installs it mimics the Austin-installed Separator in that it only charges both batteries when the engine is running and it does not allow charging of the engine battery from either solar or shore power
- The Separator combines both batteries when the key is in the ON position, thus providing the capability of a start assist if the engine battery is low
- The way SMB Fresno wires the ACR both batteries are combined when the unit is powered, thus always providing a start assist but in a way that masks the condition of the engine battery and that makes troubleshooting the electrical system difficult
- The Separator is a continuous duty solenoid, thus it is always using power when connected
- The ACR is a magnetic latch, thus it only uses power during the state change
- The ACR is a much more robust solution, with twice the cycle life as the Separator
- Many forum members have changed out the Separator for the ACR
- Re-wiring the Fresno installed ACR and adding the ML-Series Remote Control Contura Switch PN 2146 will provide the desired Start Isolation feature and the ability to manually combine the batteries as required
I want the functionality to charge both the engine and house batteries when I am parked with solar input or am connected to shore power, thus for me installing a unit with Start Isolation capability is the way to go. SMB Texas installed the Sure Power Separator under the driver’s seat, thus I took a look at the space available to determine what the next steps will be for me. The following pictures tell the story of what I found. Note: Disconnect the van’s electrical system by utilizing the disconnect (located just above the accelerator pedal) before doing anything, and DO NOT turn on the key while doing this:
Layout under the seat, Separator located on the right side, mounted to the back of the seat base:
 Close up of Separator (top):
 Close up of Separator (side):
 Under seat access with the seat in place, seat moved forward and swiveled 90 degrees to the right:
 Looking at the last picture made me realize that I have both the room and the access to install the Blue Sea Model 7622 ML-ACR Automatic Charging Relay with Manual Control and the ML-Series Remote Control Contura Switch PN 2146 https://www.bluesea.com/products/7622/ML-ACR_Automatic_Charging_Relay_with_Manual_Control_-_12V_DC_500A The manual control switch built into the unit offers the added functionality of allowing control with or without power and it includes a Lock Off capability for servicing.
Installation looks to be fairly straightforward, thus it looks like this project just moved higher up on the list. That means this topic is to be continued….
Looking at the last picture made me realize that I have both the room and the access to install the Blue Sea Model 7622 ML-ACR Automatic Charging Relay with Manual Control and the ML-Series Remote Control Contura Switch PN 2146 https://www.bluesea.com/products/7622/ML-ACR_Automatic_Charging_Relay_with_Manual_Control_-_12V_DC_500A The manual control switch built into the unit offers the added functionality of allowing control with or without power and it includes a Lock Off capability for servicing.
Installation looks to be fairly straightforward, thus it looks like this project just moved higher up on the list. That means this topic is to be continued….
One last comment. This discussion is based on having batteries with the same charge profile, in my case AGM's. The newer lithium builds have two separate and distinct charging systems, starting with two separate alternators. Owners have to go a different way when looking at how to combine the systems.
__________________
Flint - 2016 SMB Sprinter 4x4 144" RB 150S w/ PH
KN6BJX
|
|
|
|
|
03-22-2019, 07:26 AM
|
#644
|
|
Member
Join Date: Nov 2016
Posts: 37
|
Thanks for pulling all this info together for a concise summary of the different components and their capabilities and configurations. There aren’t a lot of upsides to waiting so long for a van but one major one is being able, in the build process, to take advantage of forum members post-delivery issues, experiences and fixes.
|
|
|
|
|
04-28-2019, 09:36 AM
|
#645
|
|
Senior Member
Join Date: Nov 2015
Location: Vacaville, just east of the San Francisco Bay Area
Posts: 1,062
|
Completing the Journey, from Separator to ACR
With the exception of posts 641 & 642, everything from post 617 to here chronicles my journey from simply adding a small battery charger for the engine battery to gaining a much deeper understanding of the system to adding one more thing to the (seemingly) never-ending list of to-do items!
As of about a week ago, the Sure Power 1314-200 Battery Separator has been removed and replaced with the Blue Sea 7622 ML-ACR Automatic Charging Relay (ACR) with the 2146 Switch, wired to operate in the Start Isolation configuration.
First of all, thanks to everyone who contributed to the knowledge share itemized in the posts above. Another great example of Forum collaboration!
Some might say I took the easy way out.... I had an appointment with John and Jesus at Agile for something else (I will share later), so I added this change to the list. I do not believe they have wired the 7620/7622 in the Start Isolation configuration in the past, but they have it down now so if you are looking for some help you now have another option. When the job was done, the one piece of paper that John kept was Scalf's system sketch (shown below), John told me that was what made all things clear. Thanks Greg!

Here is a shot with the driver's seat removed and with the original Separator in place. The Separator is located at the rear of the seat on the right hand side.

And here is a shot with the Blue Sea ACR in place illustrating the access by pulling the seat forward and rotating it to the side. Having this access is what convinced me to go with the 7622 vs. the 7620.

And here is where the 7622 switch is installed. I specifically didn't want it up on the dash, thus this location on the front of the seat base made for an easy install that is readily accessible.

I am very happy with the installation. The ACR announces its presence with a loud "click" as it engages/disengages and it is great to know that the engine battery is now getting the same charge as the house battery whenever Flint is plugged into shore power (typically only happens for us when sitting in the backyard) or when out and about and parked with solar input.
Thanks for all of the input, now on to the next item on the to-do list!
__________________
Flint - 2016 SMB Sprinter 4x4 144" RB 150S w/ PH
KN6BJX
|
|
|
|
|
05-04-2019, 12:06 PM
|
#646
|
|
Senior Member
Join Date: Nov 2015
Location: Vacaville, just east of the San Francisco Bay Area
Posts: 1,062
|
Auxiliary Fuel Tank Additions/Modifications
From the post above: Some might say I took the easy way out.... I had an appointment with John and Jesus at Agile for something else (I will share later)
Time to share...
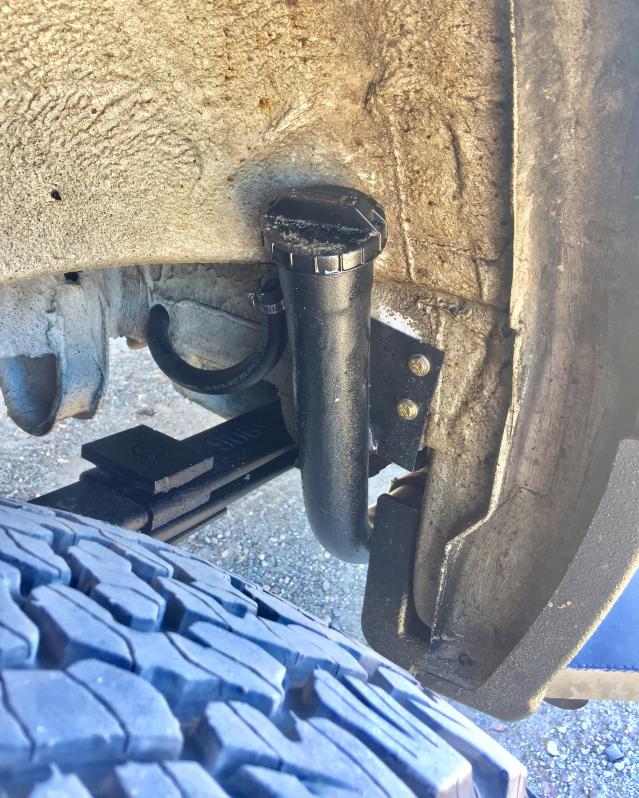
When the order was placed for the Aero/Agile 14 gallon auxiliary fuel tank it was ordered with the second layer "skid plate" bottom. This was overlooked in the manufacturing and not discovered until we arrived at the shop for the installation. I wasn't going to have the (work of art, see pictures in Post #613) stainless steel tank sent back for modifications as that would have meant a second round trip from the Bay Area, thus installation proceeded while John and I made plans to correct the situation.
I got home and rolled (it sure is nice to have clearance, a creeper and a flat slab of concrete!) under the van and came up with a sketch and a plan. That all went off to John and materials were procured and a date was set. Installation is complete, here is the result:
Here is an overview shot of the new skid plate, fabbed from 3/16" 6061-T6 aluminum:

The skid plate is attached in three places, thus it is very solid. The two through bolts were replaced, here is a close up of the attachment. As you can see, we lost the recessed nut attachment, but John came up with these tapered skid plate washers made specifically for this purpose and I am satisfied with the outcome.

And here is the third attachment point, located at the bottom of the Van Compass center Rocker Guard support. Three points of contact make for a very solid installation.

And while they were at it, I had a couple of other related modifications done....
The fuel tank is 14 gallons and the transfer pump pushes 0.83 GPM. 14/0.83 = 16.7 minutes to transfer a full tank of fuel. The original (defective, it wouldn't turn itself off) timer switch was a 60 minute model, so as long as it needed to be replaced I sourced a 15 minute switch and now I feel the two components are much more closely aligned in purpose. When driving down the road in the dark and making a transfer it's nice to simply turn the switch all the way knowing that the pump isn't going to run dry for a long period of time.

And speaking of running down the road in the dark, I found it frustrating to not be able to know that the fuel transfer had occurred. This is a MB issue, the way the stock fuel gauge is set up it will not read the new level until a "fuel event" happens. To avoid this and get a true fuel reading, Option J51 [Fuel Gauge, optimized for Aux. Fuel Tap (fleet only)] needs to be ordered, too late for me. (Note: I am about to take Flint in for the B service, I will ask then if this option can be added.) From the MB J51 description: In the standard specification, the fuel level display in the instrument cluster is controlled solely by the fuel consumption as calculated by the on-board computer. The level is only reconciled with the fuel level sensor in the tank and corrected when refueling is detected. With this code (J51), the fuel level display in the instrument cluster is reprogrammed so that it is solely controlled by the fuel level sensor in the tank, and shows the approximate amount of fuel remaining in the tank.
Of course, the simple thing to do is to simply pull over after transferring fuel, shut down the engine (thus signaling a refueling event) then start the engine again and read the fuel level on the dash gauge. Simple enough, but the whole point is to not pull over, but to keep running down the road! Here is my solution:
The van now has two auxiliary tank fuel gauges, one on either side of the seat base. The original location is easy to read when making a transfer with the van parked, the other is visible from the passenger's seat while the vehicle is in motion.

And of course, this necessitated a toggle switch to select which gauge is active, here it is located in an accessible-to-the-driver location:

Now we can see from inside the van that the auxiliary fuel gauge has gone from full to empty, thus providing confirmation that the transfer was successful. All in all, I am very happy with the changes and the functionality they provide.
Finally, here are two pictures of the seat base as viewed from outside with the door open, one without the Element fire extinguisher (there is one located in this position on either side of the van) and one with it in place.


__________________
Flint - 2016 SMB Sprinter 4x4 144" RB 150S w/ PH
KN6BJX
|
|
|
|
|
05-04-2019, 01:16 PM
|
#647
|
|
Senior Member
Join Date: Mar 2016
Location: Boulder
Posts: 127
|
Fitz,
Even with the optimized fuel guage the readings are inconsistently updated after a transfer. That MB fuel guage has a mind of its own and sometimes a reset is the only sure way to get an updated level.
I spoke to the mftr of the guage Agile uses with the tanks and there should be a way to wire two guages without the need for a toggle. It would be nice to have a secondary guage in a visible location.
|
|
|
|
|
05-04-2019, 01:35 PM
|
#648
|
|
Senior Member
Join Date: Nov 2015
Location: Vacaville, just east of the San Francisco Bay Area
Posts: 1,062
|
JFlo,
The auxiliary gauge uses resistance (Ohms) to measure the level. Two gauges connected at the same time throws the reading off, thus the need for the toggle switch. Please educate me if you find a better way!
__________________
Flint - 2016 SMB Sprinter 4x4 144" RB 150S w/ PH
KN6BJX
|
|
|
|
|
05-05-2019, 11:29 AM
|
#649
|
|
Senior Member
Join Date: Nov 2015
Location: Vacaville, just east of the San Francisco Bay Area
Posts: 1,062
|
More on the 14 Gallon Auxiliary Tank
Another member asked me if I had done anything about the trap/venting/fill issue associated with the 14 gallon auxiliary tank install.
When first installed, John told me that the vent line creates a trap that when filled with fuel prevents the tank from fully filling. Here is a picture that illustrates the issue, note the low spot in the vent line:
John's recommended solution was to disconnect the vent line and drain the small amount of fuel trapped there. I did so a couple of times and while effective, it seemed to me there had to be a better way...
My remedy was to re-align the vent tube that is part of the fill nozzle. Note: This would be a lot easier to do before the nozzle is installed!
Here is what the vent tube looks like in the stock configuration:

And here is what it looks like after I re-aligned it:

And finally, two shots with the vent hose back in place:


I have only filled the tank a couple of times with this new configuration in place, thus the jury is still out, but so far so good. And yes, I did share this info with John at Agile.
__________________
Flint - 2016 SMB Sprinter 4x4 144" RB 150S w/ PH
KN6BJX
|
|
|
|
|
05-19-2019, 03:20 PM
|
#650
|
|
Senior Member
Join Date: Nov 2015
Location: Vacaville, just east of the San Francisco Bay Area
Posts: 1,062
|
SpareBumper - Update to Post #180 on Page 18
It's nice to be able to report when something goes according to plan...
Post #180 on Page 18 details my installation of the SpareBumper: Receiver Hitch Step that helps eliminate rear end collision damage | shock absorbing hitch step | Superbumper | Bumper Shield
Below are two pictures of the SpareBumper after it was used for its intended purpose.


I won't go into the details, but suffice it to say that I am very happy that the SpareBumper performed as advertised! The $139 replacement was MUCH cheaper than what the repairs would have been without it in place.
Here is SpareBumper #2 in place, hopefully ready for whatever comes its way!

__________________
Flint - 2016 SMB Sprinter 4x4 144" RB 150S w/ PH
KN6BJX
|
|
|
|
|
|
 Posting Rules
|
You may not post new threads
You may not post replies
You may not post attachments
You may not edit your posts
HTML code is Off
|
|
|
|
 » Recent Threads
 |
|
|
|
|
|
|
|
|
|
|
|
|
|
|
|
|
|
|
|
|
|
|
|
|
|
|
|
|
|
|
|
|
|


 Linear Mode