Journey with Confidence RV GPS App RV Trip Planner RV LIFE Campground Reviews RV Maintenance Take a Speed Test Free 7 Day Trial ×


Reply
 
Thread Tools Display Modes
 
Old 11-02-2016, 05:11 PM   #91
Senior Member
 
Flux's Avatar
 
Join Date: Aug 2016
Location: Reno, NV
Posts: 1,420
Quote:
Originally Posted by boywonder View Post
...just welded to the top of the bumper.......but they get lots of stiffness from the brush guard tubes.

Thanks for that! I should have taken a much closer look at their stuff when I had a decked out rig right there.

Flux is offline   Reply With Quote
Old 11-02-2016, 09:00 PM   #92
Senior Member
 
boywonder's Avatar
 
Join Date: Jul 2013
Location: So Cal
Posts: 4,072
Quote:
Originally Posted by BroncoHauler View Post
Just keep in mind a lot of integrated bumper hitches are more accurately accessory-hitches, and not tow-hitches, even if that's what some people use them for.


Herb
^^^^^what he said......

Don't forget the bumper is aluminum......many things will tear the hitch off the bumper...or at least fatigue the material over time.

I only tow a motorcycle trailer, but I'm much more concerned about that staying back there then departure angle.
__________________
2008 E350 RB passenger 4WD SMB penthouse
2013 KTM 350 EXC
2008 KTM 250 XCF-W
2003 Honda Element
boywonder is offline   Reply With Quote
Old 09-05-2017, 12:14 PM   #93
Senior Member
 
boywonder's Avatar
 
Join Date: Jul 2013
Location: So Cal
Posts: 4,072
Quote:
Originally Posted by boywonder View Post

My plan is to cut the top hatch hole rough with a jigsaw then clean the hole up with a router and a wood template.......the rough hole will be about 1/16" small all the way around (assuming things go as planned!)
....quoting myself here from last November....

Finally making forward progress on this project; I cut this hole months ago but posting the process here in case anyone is interested.

As a refresher, the Aluminess swing arms latch to the bumper precisely in the area where my original hatch is.....so I'm moving the hatch to the top of the bumper and welding the rear facing hatch closed.

Step 1: Make an MDF template


Step 2: Clamp the template to the bumper after measuring about 16 times, then rough cut the hole undersize with a jig saw or a sawsall. You can also see the portion of the cut in this picture where I cleaned the hole up with the router.


Step 3: Using a 1/2" end mill and a collar in a router, clean the hole up. This could also be accomplished with a top bearing router bit. I used a 1/2" end mill to get 1/4" corner radii.


Step 4: Enjoy the fruits of your labor...
__________________
2008 E350 RB passenger 4WD SMB penthouse
2013 KTM 350 EXC
2008 KTM 250 XCF-W
2003 Honda Element
boywonder is offline   Reply With Quote
Old 09-05-2017, 12:26 PM   #94
Senior Member
 
boywonder's Avatar
 
Join Date: Jul 2013
Location: So Cal
Posts: 4,072
The next order of business was to get some tubing bent for brush guards/supports for the swingarms........this proved to be very challenging.

Since Freddy Cruz (Alfredo) flaked on forum members, I had to find someone else to bend tubes. I visited a few folks that I found on Craigslist and learned a lot about tube bending.....mostly that tube benders and die sets are very expensive, and there are different die sets for schedule 40 sized tubing (pipe!) and regular steel tubing. Also there is a centerline radius for each die set; I needed a tight bend in large tubing.

As it turns out a friend of mine has a sweet JD hydraulic tube bender with a 1 3/4" die set with a 6.5" centerline radius....which is closer to what I needed than any of the Craigslist folks.

So I picked up some 1 3/4" x .095 and .120 wall DOM steel tubing, and we started bending. We had to hand miter the ends of the tubes since his notcher was not playing nice with the compound bends.


__________________
2008 E350 RB passenger 4WD SMB penthouse
2013 KTM 350 EXC
2008 KTM 250 XCF-W
2003 Honda Element
boywonder is offline   Reply With Quote
Old 09-05-2017, 02:25 PM   #95
Senior Member
 
Flux's Avatar
 
Join Date: Aug 2016
Location: Reno, NV
Posts: 1,420
Will the brush guards work against shrubbery as well??

Nice looking work. Can't wait to see it all finished!
__________________
<br>
Tim - 2013 EB V10 Agile 4x4 SMB PH Ginger Army All Terrain Mobile HQ
Flux is offline   Reply With Quote
Old 09-05-2017, 03:17 PM   #96
Senior Member
 
boywonder's Avatar
 
Join Date: Jul 2013
Location: So Cal
Posts: 4,072
Quote:
Originally Posted by Flux View Post
Will the brush guards work against shrubbery as well??

Nice looking work. Can't wait to see it all finished!
A shrubbery!!

..As long as they stiffen up the swingarm supports I'll be happy......
__________________
2008 E350 RB passenger 4WD SMB penthouse
2013 KTM 350 EXC
2008 KTM 250 XCF-W
2003 Honda Element
boywonder is offline   Reply With Quote
Old 09-05-2017, 03:32 PM   #97
Senior Member
 
Flux's Avatar
 
Join Date: Aug 2016
Location: Reno, NV
Posts: 1,420
Dig it! I am a little apprehensive about my spindle bumper being rigid enough with just the low points holding the tire and box. But I am fully prepared to latch to a bracket I bolt high up on the doors if necessary. It's my van, I will mess it up as I see fit. I should think that steel tubing will be very effective.

nice looking stuff and you are lucky to have a buddy with a JD.
__________________
<br>
Tim - 2013 EB V10 Agile 4x4 SMB PH Ginger Army All Terrain Mobile HQ
Flux is offline   Reply With Quote
Old 09-05-2017, 09:00 PM   #98
Senior Member
 
shadetreevanman's Avatar
 
Join Date: Jun 2017
Location: Riverside, CA
Posts: 385
Amazing work. Always cool to see custom builds. Really like the in bumper storage.

I have an old steel Crowes Back Bumper from a friends van that replaced his with Aluminess. Been modifying mine this week for back up sensors and camera. Have bought a bunch of parts to build my own swing arms for tire and storage box.

Your post is inspiring. Thanks for the good pictures.

Shadetree
__________________
Tim Potts

2012 Chevrolet Express 3500 6.0
shadetreevanman is offline   Reply With Quote
Old 10-21-2017, 09:05 AM   #99
Senior Member
 
boywonder's Avatar
 
Join Date: Jul 2013
Location: So Cal
Posts: 4,072
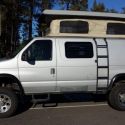
more progress.....got the brush guard tubes welded......

I found a guy locally who is a talented welder, and I had him TIG weld the tubing....much nicer than MIG.....


I'm now making all the final little doo-dads like delrin ramps for the swingarms and swingarm travel stops and brackets to tie the swingarm support structure to the upper door hinges....getting close to the end.

Weather sealing the top access hatch is also a bit of a challenge yet to come, and finally powder coating everything. The welder had some good input for powder coating; ask for UV resistant powder coat.

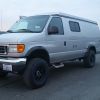
I have a swingarm tray and small swingarm box purchased from other members here, and I am toying with the idea of building a structure between them....mocked up in the pic by the 5 gallon bucket and cardboard box....the closed box is not as wide as the tray by a couple of inches.....


At the moment I'm leaning toward just using the closed box with the rails on top.


I'm also planning on a rear vertical piece of aluminum sheet on the passenger swingarm to mount a rotopax behind; this will drive relocating my license plate. I picked up a couple of tiny LEDs suitable for illuminating the plate once it's final home is determined.
__________________
2008 E350 RB passenger 4WD SMB penthouse
2013 KTM 350 EXC
2008 KTM 250 XCF-W
2003 Honda Element
boywonder is offline   Reply With Quote
Old 10-21-2017, 05:18 PM   #100
Senior Member
 
Glider's Avatar
 
Join Date: May 2016
Location: Pacific NW
Posts: 601
Garage
Very, very pretty. I really like it. With those beefy shrubbery guards, do you still feel the need for a bracket to the upper door hinge? Are you seeing movement?

__________________
OMG, the Silver Streak is Sold!
2006 SMB EB45ish.
5.4L, QuadVan 4x4
Ready to Rumble!
Glider is offline   Reply With Quote
Reply


Posting Rules
You may not post new threads
You may not post replies
You may not post attachments
You may not edit your posts

BB code is On
Smilies are On
[IMG] code is On
HTML code is Off
Trackbacks are Off
Pingbacks are Off
Refbacks are Off

» Featured Campgrounds

Reviews provided by

Powered by vBadvanced CMPS v3.2.3
Disclaimer:

This website is not affiliated with or endorsed by Sportsmobile SIP or any of its affiliates. This is an independent, unofficial site.


All times are GMT -6. The time now is 07:09 PM.


Powered by vBulletin® Version 3.8.8 Beta 4
Copyright ©2000 - 2024, vBulletin Solutions, Inc.