Journey with Confidence RV GPS App RV Trip Planner RV LIFE Campground Reviews RV Maintenance Take a Speed Test Free 7 Day Trial ×


Reply
 
Thread Tools Display Modes
 
Old 05-28-2017, 10:10 PM   #31
Senior Member
 
Join Date: Feb 2017
Posts: 106
I made the passenger corner end piece for the bumper. Came out pretty well, hopefully I can replicate the fit on the drivers side.

I also painted the corner and then the hood finally. Now only the back doors and roof need to be painted.

I am kind of annoyed with my self for not having done the electrical for the winch or the fog lights but I just haven't been in the mood for that kind of stuff.
Attached Thumbnails
IMAG1150.jpg   IMAG1153.jpg   IMAG1138.jpg   IMAG1140.jpg  

skoronesa is offline   Reply With Quote
Old 05-29-2017, 08:48 PM   #32
Senior Member
 
Join Date: Feb 2017
Posts: 106
Managed to get the kids to bed on time so I could make the corner piece for the drivers side of the front bumper.

The remainder for the bumper:
-round/trim corners
-upsize passenger side mounting bolts
-install/fabricate winch rollers
-clean and paint
-remount license plate/holder
-wire foglights and winch
-add jumper cable lugs

Other items:
-underlayment and floor mat
-insulate walls/ceiling
-paint roof/back doors
-add back door ladder
-add 4-4x6 speakers
-make boxes and mount 2-8" subs in side and back door
-remove remaining shelving and add 3 more seats in its place
-make boxes for subfloor storage and batteries
-wire in rear batteries and cabin lights
-mount and wire in 24" flatscreen
-make/mount roof cargo basket
-make/mount jerry can holders

As you can see, lots of things to do. Most of it can be done with free or already obtained materials. The subs I have, might have to buy speakers. The ladder I will most likely buy. The cabin lights I will buy. For everything on this list I estimate a cost of about 150$-200$
skoronesa is offline   Reply With Quote
Old 07-15-2017, 04:08 PM   #33
Senior Member
 
Join Date: Feb 2017
Posts: 106
WOOT WOOT!!

Installed a bus emergency hatch/vent with fan.

I also started insulating.
Attached Thumbnails
IMAG1428.jpg   IMAG1429.jpg   IMAG1430.jpg   IMAG1436.jpg   IMAG1438.jpg  

skoronesa is offline   Reply With Quote
Old 07-15-2017, 04:10 PM   #34
Senior Member
 
Join Date: Feb 2017
Posts: 106
And I got a trailer!!!! I traded an old car for it. Needs a bit of work but the end result should be nice.
Attached Thumbnails
IMAG1444.jpg   IMAG1445.jpg   IMAG1446.jpg   IMAG1447.jpg  
skoronesa is offline   Reply With Quote
Old 09-03-2017, 08:40 PM   #35
Senior Member
 
Join Date: Feb 2017
Posts: 106
It's been a while.

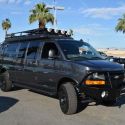
The van still has the passenger side shelving. I did get most of the insulating done though. We went on a week long family vacation about 6hrs away and it was really nice. The roof vent hasn't leaked and it provided the perfect airflow to keep the kids happy in the back while not being too loud. The insulation helped with road noise a lot too. Even going 70 on the highway with the back of the vent open ~4" I could understand them from the drivers seat. My wife isn't too crazy about the attention the camo van gets but it's only good attention so far, people love it. I was surprised being a couple states away from home in a camo van that we didn't get pulled over once.

We will be going on a shorter trip soon and I hope to have forced my self to remove the last bit of shelving before we go. It just sucks having to use a cut off wheel on the old rusted bolts.

Finally got around to working on the trailer, in the rain. I had ripped out the old bed a couple weeks ago. I was going to work on it yesterday but it looked like it was going to rain. It didn't until like 12pm. Boy was I pissed after sitting inside all morning and it was still raining. So I went outside and used power tools in the rain!!! Thank gosh we have cordless tools nowadays.

I used unistrut, mostly deep strut with a piece of shallow strut for the left to right rails. This is a mid 60's f-100 bed. It did not originally have left to right rails under the bedding. On top of this I am going to use deep strut front to back with 2x6 boards in between. The deep strut between the boards will provide a similar look to the original skid rails but will be much more functional for strapping loads allowing me to either put the ratchet strap hooks through the holes or mount eye bolts with strut nuts.

I also have a 5' black truck tool box I am planning on mounting in front of the bed. One of the strut mounts is badly rotted/worn at the top so I may just delete the struts when it wears out for good.
Attached Thumbnails
oemvsmine.jpg  
skoronesa is offline   Reply With Quote
Reply


Posting Rules
You may not post new threads
You may not post replies
You may not post attachments
You may not edit your posts

BB code is On
Smilies are On
[IMG] code is On
HTML code is Off
Trackbacks are Off
Pingbacks are Off
Refbacks are Off

» Featured Campgrounds

Reviews provided by

Powered by vBadvanced CMPS v3.2.3
Disclaimer:

This website is not affiliated with or endorsed by Sportsmobile SIP or any of its affiliates. This is an independent, unofficial site.


All times are GMT -6. The time now is 05:03 PM.


Powered by vBulletin® Version 3.8.8 Beta 4
Copyright ©2000 - 2024, vBulletin Solutions, Inc.