Journey with Confidence RV GPS App RV Trip Planner RV LIFE Campground Reviews RV Maintenance Take a Speed Test Free 7 Day Trial ×


Reply
 
Thread Tools Display Modes
 
Old 03-04-2017, 04:41 PM   #1
Senior Member
 
Join Date: Feb 2017
Posts: 106
2006 E-250 4.6l kid carrier

This will be updated as I work on the van.

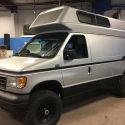
I recently bought one of my employers old vans and am (very slowly) turning it into a family vehicle for trips. This project will include but is not limited to:

-Adding seats
-New front bumper/winch mount for a 12,500lb winch I have
-Insulation/sound dampening
-Audio system
-Some sort of entertainment system for the kids
-Minimal sleeping options
-Extra battery/ugraded alternator(s)
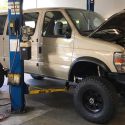
-And if I am lucky a 4x4 conversion and possibly 5.7l

First, the seats

I got some freedman seats(8 pairs for 300$ worth of scrap plus 200$ cash) out of an old bus and am going to mount 6 of them along the driver side wall in the back. Half of the seats have an armrest and a head/upper back rest while the others are plain. The bolt holes I need to drill towards the wall of the van will be easy to get at underneath, however the row of bolts towards the inside will all be above the gas tank. Luckily I have access to a camera and may just need a hand putting in the bolts. I went back today to give the guy the last 100$ and ended up trading him back 2 pairs of the seat style I didn't want for two nice tires on rims for our car. After I had bought the seats the weekend prior he realised some of them would have been nice in his utv he drives around the yard.

Inside I am bolting two unistrut p3300 rails to the floor of the van, which if I wasn't using up the whole distance would allow me to slide the seats forward or back. To bolt the seat base to the unistrut rails you use unistrut spring nuts which when loose can slide but have teeth to grip the rails when tightened. This makes the whole system semi-modular and will allow me to easily remove and slide seats for different trips with different numbers of people. The unistrut is about 5/8" tall but I will be putting down rubber mat and have rubber moulding pieces to go in the unused options of the rail to make the floor a smooth surface.

I have already removed the old shelving on the driver side of the van, for now the shelving will remain on the passenger side but may be removed to fit 2 or 3 more seats later. Most likely I will remove the shelving and remount it to unistrut so I can swap it out with extra seats when I need the space.

The bumper:

Is the stock bumper really only held on with two bolts that are easy to get at? Seems too good to be true. I have some I-beams and want to make a custom bumper that can accept the winch. I forget if the I-beams are 11" tall and 15' long or 15" tall and 11' long, either way they are nice 3/8" thick steel. I will cut one middle piece and two end pieces that will be mitered. I will also drill holes for weight reduction that should also double nicely as tow points. Initially at the mitered joints I will cut flat pieces to bolt the I-beam sections together but will have it welded at a later point. It might not look pretty but hey, it was free steel

skoronesa is offline   Reply With Quote
Old 03-04-2017, 04:51 PM   #2
Senior Member
 
Join Date: Feb 2017
Posts: 106
Okay, just measured the I-beams and they are 8" tall, 4" wide, and 12' long. This works out perfect for making a bumper. On top you can see the bladders from my two expansion tanks I use for compressed air. That picture is the little guy, 45 gallons, the bigger one is 65 gallons. I will probably use the bladders to make some floor mats.
Attached Thumbnails
IMAG0344.jpg   IMAG0346.jpg   IMAG0309.jpg   IMAG0314.jpg   IMAG0312.jpg  

skoronesa is offline   Reply With Quote
Old 03-04-2017, 08:13 PM   #3
Senior Member
 
Join Date: Feb 2017
Posts: 106
Pic of the van.
Attached Thumbnails
IMAG0278.jpg  
skoronesa is offline   Reply With Quote
Old 03-05-2017, 06:32 AM   #4
Senior Member
 
Annie O's Avatar
 
Join Date: Jun 2016
Location: OH
Posts: 518
My impression from reading about adding seats last year is that they need to be facing forward for crash safety. Sorry I can't put my finger on that info and it may have had to do with mounting of the seat belts.
__________________
2011 V10 E350 XLT SD Quigley/AOR (RIP'd)
Annie O is offline   Reply With Quote
Old 03-05-2017, 08:15 AM   #5
Senior Member
 
Join Date: Feb 2017
Posts: 106
They all have lap belts. We keep our kids in carseats/boosters that are in date and are well secured up until they are by state definition large/old enough to go without. Aside from the lap belts the car seats will be using the LATCH and I may even run a ratchet strap through the bases if these lap belts don't tighten enough. The seats will be mounted several inches off of the wall to allow for insulation and padding as well as some room for the wall to cave in should we be hit from the side at low speed.

I am following the guidelines on my states dmv website as to installation of seats in a "composite" vehicle. If you have any concerns feel free to pm me, discussions on safety can quickly balloon into huge arguments because everyone has their own definition of what is minimum and it's hard to argue against added safety measures especially when someone mentions children. I am meeting or exceeding my states requirements.
skoronesa is offline   Reply With Quote
Old 03-10-2017, 04:07 PM   #6
Senior Member
 
Join Date: Feb 2017
Posts: 106
So finally got the extra cash for some shallow unistrut. 15$ for a 10' piece, I got two. I got a bunch of spring nuts too at .55$ a piece because I am a dingle berry and forgot that the spring nuts are for deep strut. For shallow strut you get the ones without the spring. I think I may actually just cut the springs shorter so if I take some stuff out the nuts I can leave in and the won't rattle. Helps when you screw the bolts in too because the spring holds the nut in place. Unistrut is real easy to use and have it be strong. It is also readily available because it has been used in the trades for decades.

Also, ripped my pioneer avic-n2 out of my old cav. The stock ford stereo can easily be removed with some pieces of thick wire, about 12ga. I used some pieces of steel wire I cut from an old oven rack. Full insertion depth is about 1". I bought a plug harness so I wouldn't have to cut the stock plug off but if it doesn't come before I finish the rest of the stereo install I may just cut and solder anyway.

Of course I finally get the money for the strut and it has snowed and will be freezing this weekend.
Attached Thumbnails
IMAG0387.jpg   IMAG0388.jpg   IMAG0392.jpg   IMAG0394.jpg   IMAG0395.jpg  

skoronesa is offline   Reply With Quote
Old 03-10-2017, 04:12 PM   #7
Senior Member
 
Join Date: Feb 2017
Posts: 106
Most dvd capable head units have some sort of bs that stops you from being able to use all of the functions if you aren't in park. This completely defeats the purpose of having a dvd player, especially one with extra outputs for rear passengers. The whole idea is the passengers can watch a movie while you drive. For those of you who don't know the avic-n2 and several other pioneers have a built in work around/demo option. All you do is place a dab of solder connecting the two gold contacts under the tab on the bottom of the unit.
Attached Thumbnails
IMAG0396.jpg  
skoronesa is offline   Reply With Quote
Old 03-10-2017, 04:21 PM   #8
Senior Member
 
Join Date: Feb 2017
Posts: 106
You also have to ground the parking brake wire.
skoronesa is offline   Reply With Quote
Old 03-13-2017, 05:55 PM   #9
Senior Member
 
Join Date: Feb 2017
Posts: 106
Totally scored today. Got an 8'x6'x1/2" rubber mat fo free!

I have decided to mount three seats where the remaining shelfs are for the time being to avoid dealing with the gas tank right now.
skoronesa is offline   Reply With Quote
Old 03-19-2017, 06:49 AM   #10
Senior Member
 
Join Date: Feb 2017
Posts: 106
I installed my avic n2 in my e250. It was so easy thanks to the center console/engine cover being easy to get off which provides soooo much access. I have done a good number of audio installs and this was the easiest. Took me like 45min to marked out, cut, bent up, and pop rivet my sheet metal pocket enclosure but only 20min to get the stereo in and hooked up.

It was really weird pulling off the cover and suddenly engine/transmission/hole in the floor.
Attached Thumbnails
IMAG0464.jpg  
skoronesa is offline   Reply With Quote
Reply

Thread Tools
Display Modes

Posting Rules
You may not post new threads
You may not post replies
You may not post attachments
You may not edit your posts

BB code is On
Smilies are On
[IMG] code is On
HTML code is Off
Trackbacks are Off
Pingbacks are Off
Refbacks are Off

» Featured Campgrounds

Reviews provided by

Powered by vBadvanced CMPS v3.2.3
Disclaimer:

This website is not affiliated with or endorsed by Sportsmobile SIP or any of its affiliates. This is an independent, unofficial site.


All times are GMT -6. The time now is 12:58 AM.


Powered by vBulletin® Version 3.8.8 Beta 4
Copyright ©2000 - 2024, vBulletin Solutions, Inc.