I installed the PIAA 580 driving lights today. I havent had a chance yet to aim the lights or test the lights in the dark to see how they perform.
Bronco Hauler and Jage convinced me to install my auxiliary driving lights on my own. I am glad I did this as it was a good learning experience with minimal cursing on my part. Also, thanks again for all of the help and advice. The most difficult part was definitely routing the wires since space is so tight and limited underneath the hood. My van is a 2007 6.0 Powerstroke.
The lights came in a kit with a complete wiring harness including switch, fused relay, etc. However, the wiring was too short from the relay to the switch, so I spliced in two 12 strands of marine grade 18 gauge wire. This actually made the process much easier for routing the wire since it didnt have any connectors attached. I used weatherproof, shrinkable butt splices to reattach the wires and covered this with shrink wrap.
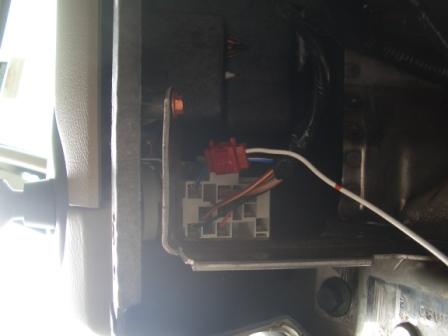
The first step was figuring out how to get the wiring through the firewall. I went through the grommet underneath the brake pedal. I just poked a small hole and ran the two wires (18 gauge) through it. I placed shrink wrap over this section for extra protection. You can see the grommet in the picture below where the silver metal awl is sticking out (center of picture).


Getting the wire into the hood area was another challenge. I went through a hole in the wheel well (drivers side). I inserted some split wire loom tubing into the hole so the wire would be protected and not rub on the metal. I realize this location is not ideal since it could be hit by sticks etc. However, I wasnt sure how to route it in another way and protect the wiring from hot or moving engine parts. It is tied away so it should be ok. I removed the coolant reservoir to make access to this area easier.

Next I placed the wire in some more split loom tubing and routed it to the large wire bundle that routs along the rear, top area under the hood from the driver to the passenger side. I fished the wire along this route and tied it off in several places.

I grounded the relay to point under the hood where other wires were already grounded. I ran the connectors and the light ground wire through the passenger headlight and down through the grill to the bumper.


The lights are grounded to the frame and the connectors from the lights were inserted to harness. The connecters and wiring are protected by the bumper.
I connected to the positive power at the power center.

The relay is mounted on top of the power center cover using Velcro.

Inside of the van, I tapped into the parking light power to the switch. This means the lights can be used if the parking lights, low beam or high beam is on. In my van the parking light power was the blue and white striped wire. The auxiliary lights will automatically be turned off when the van lights turned off. A bonus is the van alarm if you accidentally leave the lights on.
I installed the switch that came with the kit here.

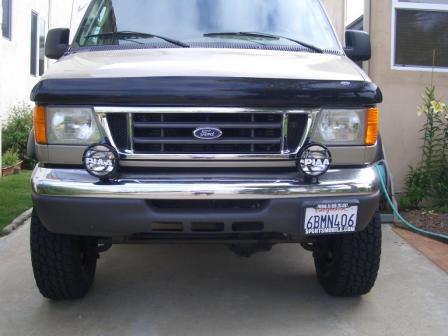
Here are the lights installed.

 Stock Front Bumper
I drilled two 7/8 holes in the bumper, starting from the top. First I lined up the lights so that they would not interfere with the stock headlights or block the front grill. Supposedly, the further apart they are the better, so this was an ideal location. The diameter of the hole may differ depending upon the lights used. These holes also went through the mounting brackets that attach the bumper to the frame. I triple checked my locations so both holes were even. If you are doing this, make sure the holes will not hit any bolts and that you will have room to place the washer & nut underneath. I applied a protective enamel to all surfaces that were drilled. It is a pain to tighten the nuts from underneath, but this also makes them less likely to be stolen. Let me know if you need any pictures of this as I have some. These lights work really well with the stock bumper since their depth is much less than some of the other lighting options I looked at. I really liked the Lightforce lights, but it was going to be tricky to fit them in this space.


 Linear Mode