Journey with Confidence RV GPS App RV Trip Planner RV LIFE Campground Reviews RV Maintenance Take a Speed Test Free 7 Day Trial ×


Reply
 
Thread Tools Display Modes
 
Old 10-07-2018, 09:25 PM   #1
REF
Senior Member
 
REF's Avatar
 
Join Date: Jan 2009
Location: Boulder, CO.
Posts: 2,550
Send a message via MSN to REF
My big fat interior (re)build

Ok, here ‘tis....the one you guys have all been patiently awaiting since I posted up for sale (sold to new forum members Slingskins) our original ‘03 SMB RB-50 interior a few weeks ago. I’ve already been asked why I would take a perfectly fine and in relatively good working order SMB build and gut it vs. selling this rig and finding an unmolested van to build out. Simple-I’ve owned this rig since ‘06, I’ve personally put on over 100K of the now 160K on the clock and counting. I know it and all the maintenance that’s been done and it’s never left me stranded. Another big part of it is all the upgrades it’s gotten over the years, including the suspension pretty much being rebuilt and the CCV top swap. Last but certainly not least is that I love my 7.3 diesel!!
The last piece to the puzzle is the aging interior. I’ve been thinking about doing a remodel for the last few years, an ambitious endeavor for sure, especially since we plan to be in Baja, with the rig in November, hopefully completed! Oye.....we shall see....
So far-
I started with the removal of the SMB interior....
Click image for larger version

Name:	IMG_3268.jpg
Views:	91
Size:	101.1 KB
ID:	23165
It was in pretty good shape considering it’s age and being put through the ringer over the years. It all remained fairly intact, and I left the sections assembled for easier install for the new owners....
Click image for larger version

Name:	IMG_3284.jpg
Views:	89
Size:	106.0 KB
ID:	23166
Click image for larger version

Name:	IMG_3288.jpg
Views:	79
Size:	101.0 KB
ID:	23167
Click image for larger version

Name:	IMG_3289.jpg
Views:	83
Size:	100.6 KB
ID:	23168
Click image for larger version

Name:	IMG_3320.jpg
Views:	88
Size:	106.7 KB
ID:	23169
Click image for larger version

Name:	IMG_3322.jpg
Views:	83
Size:	97.5 KB
ID:	23170
Click image for larger version

Name:	IMG_3336.jpg
Views:	96
Size:	105.6 KB
ID:	23171
Click image for larger version

Name:	IMG_3338.jpg
Views:	79
Size:	109.3 KB
ID:	23172
The happy new owners (and me)....
Click image for larger version

Name:	IMG_3353.jpg
Views:	75
Size:	102.4 KB
ID:	23173
Stay tuned(only if you want). More to come....as I catch up to where I’m at now and I’ll post things up as I go and details of what’s in the plans for the new build.

__________________
'03 Ford E350 7.3L Diesel
(de)SMB'd Custom RB-50
Quigley 4X4 w/Deavers & Agile Offroad's R.I.P. package
CCV High Profile Pop Top
REF is offline   Reply With Quote
Old 10-07-2018, 09:30 PM   #2
Senior Member
 
86Scotty's Avatar
 
Join Date: Jul 2011
Location: TN
Posts: 10,220
Start with the necessities. You need one of these on the dashboard.

Bling bling!!!!

https://www.amazon.com/Creative-Crys...+car+dashboard
86Scotty is offline   Reply With Quote
Old 10-07-2018, 11:06 PM   #3
REF
Senior Member
 
REF's Avatar
 
Join Date: Jan 2009
Location: Boulder, CO.
Posts: 2,550
Send a message via MSN to REF
My big fat interior (re)build

Perfect! I’ll even let you buy it for me...[emoji146]
There wasn’t too many surprises uncovered, although there were many places I found that SMB used the “throw some screws in until one sticks” method, missed taking any pics of that.
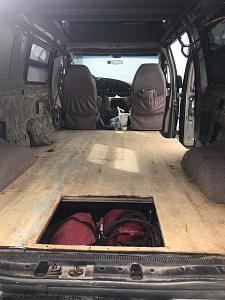
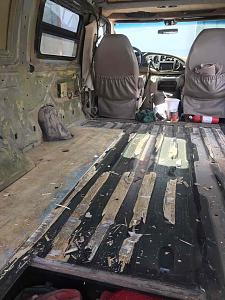
Here’s more shots of the interior in different stages of deconstruction....
A decent amount of fiberglass insulation, gotta go!
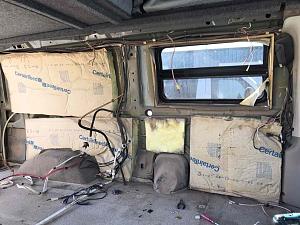
Click image for larger version

Name:	IMG_3339.jpg
Views:	102
Size:	110.3 KB
ID:	23176
The “rats nest” of wiring, both from SMB’s original build, but added to over the years by aftermarket stereo guys, CCV for both their pop top and all my LED lights on the roof and solar.
Click image for larger version

Name:	IMG_3340.jpg
Views:	79
Size:	106.4 KB
ID:	23177
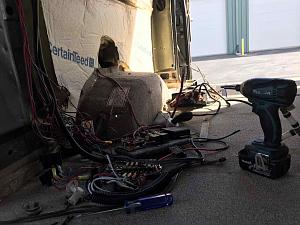
Most if not all of the 12V and shore power wire....romex!! Gotta go!
Click image for larger version

Name:	IMG_3346.JPG
Views:	76
Size:	66.8 KB
ID:	23179
Click image for larger version

Name:	IMG_3347.jpg
Views:	64
Size:	114.0 KB
ID:	23178
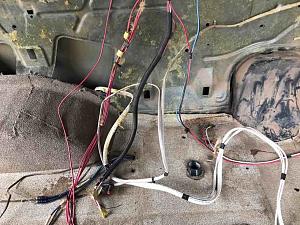
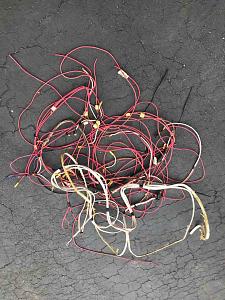
And yes, that is the remains of the copper tubing from the propane system and enough coaxial cable to wire up a house built in the 80’s....gone!
Click image for larger version

Name:	IMG_3341.jpg
Views:	66
Size:	104.7 KB
ID:	23180
Getting there....
Click image for larger version

Name:	IMG_3344.jpg
Views:	84
Size:	109.2 KB
ID:	23181
I also discovered we had been collecting and toting around enough sand from everywhere we’ve traveled from Powell to Baja to the California desert, and places beyond, filling up every nook and behind every panel to create our own desert oasis. I first vacuumed and then put on the respirator mask, set up a box fan inside the rig and got out the big air compressor with a blower nozzle and opened er up on every square inch....whoa! It just kept billowing out from behind every panel!
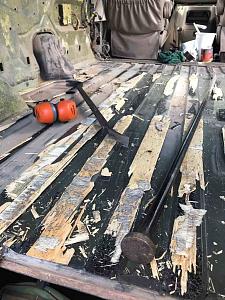
The biggest challenge was pulling up the ply that SMB put down using a caulking adhesive generously applied to each floor rib.....I needed to bust out the big breaker bar to gain enough leverage. I was hoping to be able to pop each of the 3 pieces out intact to be able to reuse it, but no such luck!
Click image for larger version

Name:	IMG_3360.jpg
Views:	85
Size:	103.0 KB
ID:	23182
Click image for larger version

Name:	IMG_3362.jpg
Views:	81
Size:	109.4 KB
ID:	23183
The right tools for the job....
Click image for larger version

Name:	IMG_3363.jpg
Views:	79
Size:	117.8 KB
ID:	23184
Click image for larger version

Name:	IMG_3365.jpg
Views:	75
Size:	115.2 KB
ID:	23185
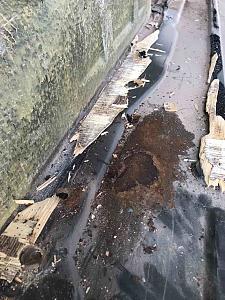
Ugh!! Luckily the only rust spot to be found....a peculiar spot, just beside the drivers rear wheel well. Although there’s so many holes going through the floor for everything from 12V electrical to plumbing to stereo cables, I’m surprised the whole floor wasn’t rusted out. And look there’s a hole right next to the rust where the rear bench seat used to bolt through, just left wide open....[emoji848]
Click image for larger version

Name:	IMG_3364.jpg
Views:	91
Size:	115.1 KB
ID:	23186
__________________
'03 Ford E350 7.3L Diesel
(de)SMB'd Custom RB-50
Quigley 4X4 w/Deavers & Agile Offroad's R.I.P. package
CCV High Profile Pop Top
REF is offline   Reply With Quote
Old 10-08-2018, 06:25 AM   #4
Senior Member
 
86Scotty's Avatar
 
Join Date: Jul 2011
Location: TN
Posts: 10,220
Memories........Actually, they didn't use any caulk in mine. The plywood was just sitting there covinering a pristine floor, after a lot of cleaning of course.
86Scotty is offline   Reply With Quote
Old 10-08-2018, 08:57 AM   #5
REF
Senior Member
 
REF's Avatar
 
Join Date: Jan 2009
Location: Boulder, CO.
Posts: 2,550
Send a message via MSN to REF
My big fat interior (re)build

It’s not my intention to start yet another thread bashing SMB’s build quality, there’s plenty of those to go around already, but rather provide another “inside” perspective.
It is amazing that through the years we’ve slowly discovered that there was no set standard from build to build coming from SMB. I can understand a few differences in how things are assembled or changes in materials used through the years, especially when it comes to location of the build.
But as we’ve learned, it varies greatly from one build to the next- how and where the plumbing and electrical is routed, amount and location of insulation used, to use adhesive or not on the plywood floor, plugging unused holes or just leave them open to the elements.
One thing’s for sure, they do love their fabric covered panels!
Anyway....a little cross thread reference, as it was related.....

Quote:
Originally Posted by saline View Post
I enjoyed my 2004 SMB very much but by the time I sold it I had re done so many things on it due to poor craftsmanship and materials. Screws that went into nothing, basically no insulation, plumbing routed through exterior walls that always froze, MDF cabinets that fell apart and a penthouse top that had to be rebuilt. I fixed it all and learned a lot in the process. One of them being that they charge a lot of money for the quality of work they do/did on interiors.

I have since built my own.

Kinda like this?....this is how I found my plumbing, the water line ran in a big loop BEHIND the insulation, right up against the outside wall! 🤦🏻*♂️
Click image for larger version

Name:	IMG_3343.jpg
Views:	126
Size:	108.2 KB
ID:	23187
__________________
'03 Ford E350 7.3L Diesel
(de)SMB'd Custom RB-50
Quigley 4X4 w/Deavers & Agile Offroad's R.I.P. package
CCV High Profile Pop Top
REF is offline   Reply With Quote
Old 10-08-2018, 09:22 AM   #6
Senior Member
 
pjpvi's Avatar
 
Join Date: Apr 2007
Location: SF Bay Area, CA
Posts: 1,288
Thanks for documenting this project. I've considered a similar interior remodel for many of the same reasons you are doing yours (except I have a 6.0, not a 7.3). I look forward to watching it come together!
__________________
Phil

- 2005 EB50 6.0PSD - SMB 4x4
pjpvi is offline   Reply With Quote
Old 10-08-2018, 09:33 AM   #7
Member
 
Join Date: Jan 2014
Location: Orange County, CA
Posts: 37
Oooh...can’t wait to see how it comes out!
lavolpe79 is offline   Reply With Quote
Old 10-08-2018, 09:53 AM   #8
Senior Member
 
Join Date: Apr 2007
Location: Western Colorado
Posts: 1,228
Sheesh! You're getting it done! You'll be happier with your own end product I have no doubt.
__________________
Desert Solitaire
2003 7.3L EB 4x4
Timberline 4x4 conversion
saline is offline   Reply With Quote
Old 10-08-2018, 10:20 AM   #9
Senior Member
 
arctictraveller's Avatar
 
Join Date: Mar 2013
Posts: 4,232
::
__________________
Arctic Traveller
KC6TNI
2001 GTRV
Advanced 4wd
Agile Ride improvement package
arctictraveller is offline   Reply With Quote
Old 10-08-2018, 11:52 AM   #10
Senior Member
 
gnty's Avatar
 
Join Date: Jul 2010
Location: Southern Alberta
Posts: 428
Found much of the same when gutting my 50 interior. Non of mine was salvageable or wanted to save it after looking how it was installed. Good luck with your build can’t wait what you do. , I’ll have to start a thread for my de-smb as well.
__________________
2005 E350 EB 4x4 6.0 Super Camper HT
2005 E350 RB Passenger 4x4 6.0
1995 Bigfoot 20' Class C 4x4 7.3
gnty is offline   Reply With Quote
Reply

Thread Tools
Display Modes

Posting Rules
You may not post new threads
You may not post replies
You may not post attachments
You may not edit your posts

BB code is On
Smilies are On
[IMG] code is On
HTML code is Off
Trackbacks are Off
Pingbacks are Off
Refbacks are Off

» Featured Campgrounds

Reviews provided by

Powered by vBadvanced CMPS v3.2.3
Disclaimer:

This website is not affiliated with or endorsed by Sportsmobile SIP or any of its affiliates. This is an independent, unofficial site.


All times are GMT -6. The time now is 08:02 PM.


Powered by vBulletin® Version 3.8.8 Beta 4
Copyright ©2000 - 2024, vBulletin Solutions, Inc.