I just finished installing a new heater blower motor. I've not done one before so this might not be the best way but it worked for me. This was done on my 1999 Ford E-250 van. I don't know how this translates to other years models.
I suspected that my blower had gone bad. Here's the electrical schematic that might help if you need to troubleshoot. Notice the blower motor resistor in the drawing.

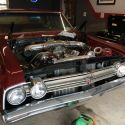
The blower motor is located in the engine compartment behind the battery. On the left side when facing the front of the van.

Here's the view behind the battery. The blower motor is on the left. On the right you can see the plastic electrical connection into the blower motor resistor.

Need to remove the battery. Disconnect the cables then look at the back of the battery.
There is a bolt to the battery hold down. 5/16" bolt head.

How it looks removed.

Lift out the battery.
You can get a better view of the blower motor and resistor.

Next remove the battery tray. 1/2" bolt heads.


The view without the battery tray. Now I know where the windshield washer fluid reservoir is located.

The blower motor is attached to the blower assembly. Unplug the electrical connection to the blower motor

There is a rubber hose called the blower motor housing tube. Disconnect the tube from the blower assembly.

It's not required that you remove the blower motor resistor to replace the blower motor but I wanted to check mine. Here's the reason why. You can see debris among the resistance coils that has come off the trees and gotten into the vent system. I was getting some smoke within the cab while running the fan. This is the reason why. The coils where getting hot enough to cause this to smoke.

The blower motor resistor looks corroded enough that it probably needs replacing.

I'm not going to replace it at this time because I plan to make an upgrade to the blower system later in my RV build.
To the left of the blower motor is the A/C system suction accumulator/drier. This cylinder has to be moved a bit before the blower motor can be removed.

There are three bolts that hold the cylinder in place. They are all on the left side and are 5/16" head.


There are four screws that hold the motor blower in place. 5/16" head. Remove the screws and pop the blower motor from the blower assembly. Move the suction accumulator/drier a couple inches towards the front of the engine compartment and the blower motor with the attached wheel will just fit through.

Here's all the pieces.

Once I got the blower motor out I found that it wouldn't spin. "Well there's your problem!"
Went to the local Advance Auto and bought a replacement blower motor. $36.99. Part #35266 Limited Lifetime Replacement. And when the guy behind the counter asks "What kind of motor?" he doesn't mean 'blower".

I'm going to reuse the blower motor wheel. It's held in place by this one retaining clip.

I went to the Mcmaster-Carr web page for a more official sounding name for this type of a clip. They call it a "Self-Locking External Retaining Ring".
There is something about the previous photograph that I just can't put my finger on.
The retaining clip came off without much trouble. Just grabbed it with pliers and it pulled right off.
Notice the flat spot on motor shaft.

To remove the wheel from the shaft I placed my hands on each side and gently worked it back and forth till it came free.


Remove the blower motor housing tube from the old blower motor.

I Cleaned it up and treat it with Armor All before reusing.

Install the blower motor housing tube on the new blower motor. Notice that the new blower motor has a external electrical socket. The old one had an internal socket.

The old blower motor had a foam gasket where it mated to the blower assembly. It couldn't be reused so I had to come up with something. Since this was at the end of the day and I'd be finishing up the install in the morning I decide to make a gasket out of silicone.

First clean off the metal surface so I'd get good adhesion.

Put a layer of silicone on the metal face and use a putty knife to smooth it out and give it a somewhat even thickness.

Let it set up overnight. Next day it's like a rubbery gasket.

Use a utility knife to cut out the holes around the rim.

The new blower motor came with a new retainer clip. Line up the wheel with the flat spot on the motor shaft and slide it on. To seat the clip I placed it on the end of the shaft.

Then with the same 5/16" socket and extension I had used to remove the screws, place it on the clip and gently tap down with a small hammer.

That's pretty much it. Just put everything back in the reverse order of it's removal.


There are little nibs on the blower assembly to help with lining up the blower motor.


One more hint. Hook up the battery and try out the new fan before you screw the battery hold down into place. I had a hell of a time getting that long bolt to seat correctly into it's base. Hate to find out there was a problem and I'd just have to take it out again.

That's it. All additions and corrections welcomed.


 Linear Mode