|
|
 03-18-2008, 02:36 PM
|
#1
|
|
Senior Member
Join Date: Apr 2007
Location: Reno, NV
Posts: 282
|
Yeah, it's the two day before recharge that has me getting close to getting off my butt and do the solar. Haven't found a good deal on a solar panel that will work though. I think I could squeeze by on a solid 64W, but if I'm gonna do it would probably go for something more like 120W. If you want to team up on some solar panel options research, that'd be great.
__________________
2006 RB50 6.0 Diesel
Flatplate water heater (mounted INSIDE), portable butane stove (no propane)
SMB 4WD
Amsoil
|

|

|
|
03-28-2008, 11:46 AM
|
#2
|
|
Member
Join Date: Apr 2007
Location: Touring the west coast - Bend, OR currently!
Posts: 59
|
Hey Ken,
I'm actually going to go with a small generator first and then hopefully add solar later assuming i can justify the $$. I find that i like to camp in shady areas quite a bit and obviously that just wouldn't work too well with solar!
I've researched solar quite a bit though and a few of the panels i was looking at were these unisolar ones http://store.solar-electric.com/unus64wathfi.html
They're supposed to be quite rugged and supposedly will still put out a little charge even when partially shaded.
The other way i had been thinking of going was with a larger panel from http://www.sunelec.com/. They offer some pretty smoking deals on panels but the only problem is they're 24 volt panels so they would require a MPPT charge controller which may negate some of the savings on the panel.
I also wanted to thank everyone for the tips on camping. Overnight "stealth" camping at kirkwood is definitely doable and the sno parks are definitely a good option as it's only $25 for a season pass for them and they do allow overnight in vehicle camping. I didn't actually test out the sno parks, maybe next season!
|
|
|
|
|
03-31-2008, 10:22 AM
|
#3
|
|
Senior Member
Join Date: Apr 2007
Location: Reno, NV
Posts: 282
|
I also looked at the Unisolar panels, but at 20 lbs for 64 watts, they're almost as heavy and large as a 130W panel. Thus, I'm now leaning towards the KC-130. I still need to get off my butt and figure out what my real loads would be living in the van full time. If I need more than 130 (and that's 130W in ideal conditions), then perhaps I'll do two 130s, or something like a 200 but orient it lengthwise. I've got about 3 months to figure it all out...
__________________
2006 RB50 6.0 Diesel
Flatplate water heater (mounted INSIDE), portable butane stove (no propane)
SMB 4WD
Amsoil
|
|
|
|
|
03-31-2008, 11:04 AM
|
#4
|
|
Senior Member
Join Date: Apr 2007
Location: Parker, CO
Posts: 7,644
|
Since this is turning into a discusson of solar I split them from a where to camp discussion so everyone can benefit.
__________________
it was good to be back
|
|
|
|
|
04-09-2008, 12:59 PM
|
#5
|
|
Senior Member
Join Date: Apr 2007
Location: Reno, NV
Posts: 282
|
OK, I finally bit the bullet and ordered a KC 130TM. The TM has a junction box and may be a bit thicker, while the GT has flying leads but may not be as solid for a vehicle (the leads, not the panel).
My reasons for the 130 over the Unisolar are that the Unisolar is still in a frame and weighs 20 lbs for 64W, whereas the Kyocera weights 26 lbs for 130W. I'm VERY frugal on my energy usage, and think I'd actually be able to live full-time with just 130W. Thus, a single Kyocera made the most sense.
I ordered from www.backwoodssolar.com. The prices I found out there were:
backwoodssolar.com: $620 including shipping and tax to CA (may have $8 extra shipping fee, hard to tell)
affordable-solar.com: $599, but $58 in shipping and a $15 unbox fee for a single panel
solarhome.org: $610 with a $42 for shipping
There were some other interesting options and thoughts I went through with which I won't bore everyone.
*Am planning on mounting using aluminum angle bolted to roof with angle and pop rivets into the panels ala the Badgers.
*Since I do not have a rack on top currently, am thinking of doing it lengthwise starting at the font to minimize air resistance; could always put another next to it if I need two.
Am open to suggestions on the following:
A. Mounting methods
B. REALLY close up pics of others' mounting methods
C. Strategies for not adding leaks (Jage? Comments?)
D. Thoughts on minimizing wind drag by mounting lengthwise
__________________
2006 RB50 6.0 Diesel
Flatplate water heater (mounted INSIDE), portable butane stove (no propane)
SMB 4WD
Amsoil
|
|
|
|
|
04-09-2008, 03:25 PM
|
#6
|
|
Senior Member
Join Date: May 2007
Posts: 477
|
Nice pick.
I have one KC 130 GT with a 20amp controller(ready for more panels). It's mounted parallel with the length of the penthouse, middle.
The one panel is not enough to charge my 8D AGM battery but it does stretch it out... I guess it would charge it a bit if it was completly dead with 0 drain.
I've had it for 2 years with no maintenance required (no cleaning needed).
No Issues with the GT connectors.
I did add a relay in so that when I'm docked at home port or charging via generator; it disconnects the Solar controller.
I used a small power transformer that if it gets power from 110V from the house or generator, flips the relay to shut off/ disconnect the Solar Controller charging the big battery.
Flips back to "on" by default for the Solar Controller when I disconnect the house charge.
I'm thinking of adding a smaller KC 60 since I'm worried about the weight of two KC 130s...
Anyone have (2) mounted KC130's and raise their penthouse via human power?
Quote:
|
Originally Posted by kzemach
OK, I finally bit the bullet and ordered a KC 130TM. The TM has a junction box and may be a bit thicker, while the GT has flying leads but may not be as solid for a vehicle (the leads, not the panel).
My reasons for the 130 over the Unisolar are that the Unisolar is still in a frame and weighs 20 lbs for 64W, whereas the Kyocera weights 26 lbs for 130W. I'm VERY frugal on my energy usage, and think I'd actually be able to live full-time with just 130W. Thus, a single Kyocera made the most sense.
I ordered from www.backwoodssolar.com. The prices I found out there were:
backwoodssolar.com: $620 including shipping and tax to CA (may have $8 extra shipping fee, hard to tell)
affordable-solar.com: $599, but $58 in shipping and a $15 unbox fee for a single panel
solarhome.org: $610 with a $42 for shipping
There were some other interesting options and thoughts I went through with which I won't bore everyone.
*Am planning on mounting using aluminum angle bolted to roof with angle and pop rivets into the panels ala the Badgers.
*Since I do not have a rack on top currently, am thinking of doing it lengthwise starting at the font to minimize air resistance; could always put another next to it if I need two.
Am open to suggestions on the following:
A. Mounting methods
B. REALLY close up pics of others' mounting methods
C. Strategies for not adding leaks (Jage? Comments?)
D. Thoughts on minimizing wind drag by mounting lengthwise |
__________________
96 RB E-350 460v8 4x4 Custom RestoMod
Warn12kWinch,FFloater,LSlip,Pwtrx Locker 4.10 305x70x16 ToyoMTs,Eagle Alloys,Stove,4CF Ppane Fridge, Air CompTank,Supersprings, Bilstein Shocks,Deavers,CastIron Diff Case, Bullet Proof ReBuilt Transmission, Tubulator DeRale Trans Pan Cover, SSExhaust, KyoceraSolar, Tripplite UPS, 8D AGM, TivoHD, 24in HDLED
95 FJ80 ARB/Kaymar/Emu
2005 AMG CL65 691hp 875tq
|
|
|
|
|
04-10-2008, 01:53 AM
|
#7
|
|
Senior Member
Join Date: Jan 2008
Location: Clovis, CA
Posts: 200
|
Solar
Make sure you check out the Bluesky 2000 Controller. SMB started using it after I read about how satisfied SMB customers were with it. Many customers exchanged their Mark IV for the Bluesky 2000 and are glad they did.
Also, I had just finished a tilt designed before I was.....It is amazing how much more efficient a solar panel is when it is tilted towards the sun. You'll probably never need the additional panel if you have tilt mounts. I used ballmounts on each corner so it could tilt fore/aft and side-to-side. I'm not sure if SMB will continue to offer it as I designed it per a customers request, but they should. Maybe the new owner of this rig can post photos. It was the first build and I know it can be improved on, you'll get the intent of the ballmounts once you see photos.
John K.
|
|
|
|
|
04-16-2008, 04:47 PM
|
#8
|
|
Senior Member
Join Date: Aug 2007
Location: Tucson
Posts: 185
|
Quote:
|
Originally Posted by kzemach
Am open to suggestions on the following:
A. Mounting methods
B. REALLY close up pics of others' mounting methods
C. Strategies for not adding leaks (Jage? Comments?)
D. Thoughts on minimizing wind drag by mounting lengthwise
|
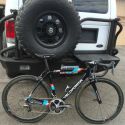
Here are some more pictures of my mega solar system.
I used two pieces of angled aluminum down the sides. There is a great benefit to mounting this way in that you don't have to put a hole in the top inside of the tent material. Even if it does leak, it hopefully won't get inside.
I'm assuming that with mine mounted slightly back from the front edge the wind will go up and over rather than into the panels.
With my added weight I had to move the spring chains 4 links to still be able to lift the top.
If you do mount panels this way it would be best to mount a panel or two to the angle iron first and get everything squared up. Then mount on the top. The top is anything but square and I only got mostly close to keeping everything even on the install.


The result. BlueSky rarely has anything other to say than 14v. We shall see if the solar can keep up with the Arizona heat.

|
|
|
|
|
04-16-2008, 06:27 PM
|
#9
|
|
Senior Member
Join Date: Apr 2007
Location: Reno, NV
Posts: 282
|
Quote:
|
Originally Posted by John Kalmbach
Make sure you check out the Bluesky 2000 Controller. SMB started using it after I read about how satisfied SMB customers were with it. Many customers exchanged their Mark IV for the Bluesky 2000 and are glad they did.
Also, I had just finished a tilt designed before I was.....It is amazing how much more efficient a solar panel is when it is tilted towards the sun. You'll probably never need the additional panel if you have tilt mounts. I used ballmounts on each corner so it could tilt fore/aft and side-to-side. I'm not sure if SMB will continue to offer it as I designed it per a customers request, but they should. Maybe the new owner of this rig can post photos. It was the first build and I know it can be improved on, you'll get the intent of the ballmounts once you see photos.
John K.
|
John, thanks for the input. I'm not in any huge rush to install this, but if the chance comes up where I quit the current job and get on the road, then I'll be ready.
Had pretty much figured that a 130W panel would really only be ~100W if not tilted. Then I figure DC-DC conversion plus charging inefficiencies are 80% and getting the energy back out of the battery at 90% efficiency....
Input w/o tilt:
6 hours x 100W
3 hours x 50W
TOTAL USABLE INPUT: 750Wh*.8*.9 = 540Wh
Input w/ tilt:
6 hours x 130W
3 hours x 70W
TOTAL INPUT: 990Wh*.8*.9 = 713Wh
My usage:
6 hours of laptop x 30W
3 hours of lights x 10W
Intermittent water pump ~ 30Wh
TOTAL USE EXCEPT FRIDGE: 240Wh
Thus, with no margin for error (or more importantly, cold weather or use of the diesel heater), the fridge has only this much overhead to run 24/7:
w/o tilt: 12.5W draw
w/tilt: 20W draw
Neither of those seem high enough to run the fridge, although w/tilt is getting close I think; I still haven't gotten around to measuring it, but then again I'm banking on a lot of computing day to day. If no computer usage, then no problem.
Panion: Thanks for the close-ups. So let me get this straight: you pre-attached the angle to one of the panels to get the angles parallel. Then you started to attach the angles, removed the original panel to finish getting the angles attached, and then reattached the panels. Looks like you used bolts instead of pop rivets ala the Badgers; thus do you only have four bolts per panel, one at each corner, holding them on to the angle, or are those actually self-tapping screws with washers into the solar panel frame?
__________________
2006 RB50 6.0 Diesel
Flatplate water heater (mounted INSIDE), portable butane stove (no propane)
SMB 4WD
Amsoil
|
|
|
|
|
04-16-2008, 07:49 PM
|
#10
|
|
Senior Member
Join Date: Apr 2007
Location: Parker, CO
Posts: 7,644
|
Quote:
|
C. Strategies for not adding leaks (Jage? Comments?)
|
Well firstly I wouldn't ever put additional holes inside the canvas section. As long as the holes are outside (there is a rim with the PH up) you should be fine.
Take care not to drill into the canvas folds.
If you absolutely cannot resist putting holes inside the canvas area:
1. lots of butyl
2. 4.5" fender washers with 1/4" holes (should match the bolt)
3. consider there really isn't any backing to bear down on- you're tightening against interior unless you are taking down a whole section which I gather is difficult.
__________________
it was good to be back
|
|
|
|
|
|
| Thread Tools |
|
|
| Display Modes |
 Linear Mode Linear Mode
|
 Posting Rules
|
You may not post new threads
You may not post replies
You may not post attachments
You may not edit your posts
HTML code is Off
|
|
|
|
 » Recent Threads
 |
|
|
|
|
|
|
|
|
|
|
|
|
|
|
|
|
|
|
|
|
|
|
|
|
|
|
|
|
|
|
|
|
|