|
|
 07-04-2017, 10:04 PM
|
#41
|
|
Senior Member
Join Date: May 2015
Location: San Clemente, CA
Posts: 552
|
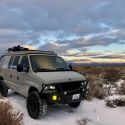
Don't want to steal too much of his thunder while he's off watching the firework show, but here is a teaser of what we got ourselves into this weekend.
|

|

|
|
07-05-2017, 09:55 AM
|
#42
|
|
Senior Member
Join Date: May 2017
Location: San Clemente, CA
Posts: 428
|
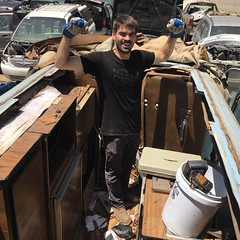
Big weekend for the van! As you can guess from bemerritt's photo we went to a junkyard and got a huge haul of awesome stuff... but I want to start from the beginning.
Took a week long business trip to Boston/Atlanta and missed out on the 1995 van with the top which I was bummed about. On top of that when I got in the van to drive it to work last wednesday is fired right up but wouldn't shift out of park. I posted about this elseweher, but in the end was able to fix it myself. It turned out to be the shift interlock solenoid which has a little plastic ramp that allows the shifter to release out of the solenoid switch. The plastic ramp somehow popped of teh solenoid so the shifter was stuck, which I think was caused due to the bushings wearing out.
All in all paid $6 for new bushings on amazon and reassembled the solenoid switch and have been good since! I also ordered a new solenoid on amazon for $40 that I now have as a backup in case it goes out again. pictures below of teh tiny plastic ramp that disabled my vehicle, and the bushing replacement.
|
|
|
|
|
07-05-2017, 10:31 AM
|
#43
|
|
Senior Member
Join Date: May 2017
Location: San Clemente, CA
Posts: 428
|
Now to the fun part. We hit a junkyard in Oceanside on saturday with the intention of grabbing a tri fold electric bed/bench seat from I think a 1993. Ended up coming home with the folding bench seat, 2 captain chairs (from the same van), 3 windows, and a poptop off of a 1979 SMB! All for $225!!
The bench seat and chairs were in way better shape than we anticipated, all leather with no tears and just need a good cleaning. We will probably end up getting them redone because the wife doesn't like the color. We tested the motors on the bench seat when we got home and they both work which was good. I also grabbed the mounting plates for the captain chairs which are nice because they come in and out super easy with just a big thumb screw.
The poptop was in pretty rough shape, but the fiberglass was solid with no cracks or holes, just needs a good clean up and refinish. Plus when I asked them how much it would cost they said $70 so I couldn't say no. Luckily I had bemerrit with me who just put his on so he knew exactly how to get it off. The lift mechanism is in great shape and super straight. Unfortunately the canvas was pretty unusable, but we grabbed it anyway to use as a template to make a new one if necessary. The fiberglass might need a little modification to fit the top of my van but it will be material removal so it will probably jsut take a little trial and error.
So I have a lot of work ahead of me! Next step is to get the floor sorted out and then mount all the seats. Then I can get after the poptop clean up... I did a little test section on it and it cleaned up really nice. picture below.
|
|
|
|
|
07-10-2017, 05:22 PM
|
#44
|
|
Senior Member
Join Date: May 2017
Location: San Clemente, CA
Posts: 428
|
Another Big weekend for the van! I started by mapping out the bench seat and captain chair locations. Then cut holes in the plywood for the captain seat mounts. The bed/bench seat will be mounted through the plywood. The goal here was to have the bed as far back as possible and then the captain chairs as far back as possible with the bed unfolded.
The mount close to the door actually sat basically flush with the wood which was awesome and the other mount is about 1/2" raised up form the floor. I dont really mind this since the chair behind the driver will almost always be in and the chair behind the passenger will almost always be out.
My original positioning was too far back due to a cross beam underneath the van so I had to cut the holes bigger and move the mounts up by about 3/4".
|
|
|
|
|
07-10-2017, 05:30 PM
|
#45
|
|
Senior Member
Join Date: May 2017
Location: San Clemente, CA
Posts: 428
|
Before I could mount the bench seat I had to decide on the flooring. I ended up re-using the old floor which I didn't think i would do. It actually cleaned up incredibly well and in all reality the floor will mostly be covered so not too important right? There are a couple holes I will have to patch but will probably wait until everything is mounted and see what is still showing.
Next I drilled through the rubber, wood, and floor of the van to mount the bench seat and secure everything in place. I then put the cushions back on the bench seat frame and put it in the bed position to double check the positing... prefect!
The only way to get the captain chair to attach to the mount was to cut the floor and expose the whole thing. I tried slits, and then slots through the rubber to give the rails access but it didnt work. Because of that I didnt cut the floor for the second captain chair behind the passenger because I don't see us using it in the near future. The mount is there and I can cut the floor when the time comes.
|
|
|
|
|
07-10-2017, 05:38 PM
|
#46
|
|
Senior Member
Join Date: Feb 2013
Location: San Francisco/Nevada City
Posts: 3,769
|
Looking good!
|
|
|
|
|
07-10-2017, 05:39 PM
|
#47
|
|
Senior Member
Join Date: May 2017
Location: San Clemente, CA
Posts: 428
|
Overall I am super pumped on the results. The floor looks so much better than I thought it would, and the bed is 100% functional, I just need to wire it up permanently. I also grabbed the switches from the previous van so they are labeled and everything which is cool. The chair behind the driver is as far over as possible based on drilling through the floor so there is plenty of space without the second captain chair in.
Next steps will be mounting the seat belts (which i have from the junkyard). They are kinda gross so I am hoping to only use them temporarily until I find/buy new ones. Also if we do get the chairs and bed reupholstered then I would want teh seatbelts to match the color.
Still lots of work ahead of me. I have the windows and poptop from the big junkyard haul that I still need to install, and then build out the interior. The plan is to get all the major structural stuff done first though and then tackle that side of it.
The first official van trip will be on Jul 21st out to Lake Mojave and I think it is almost ready for that!
|
|
|
|
|
07-10-2017, 05:44 PM
|
#48
|
|
Senior Member
Join Date: May 2017
Location: San Clemente, CA
Posts: 428
|
Last thing I forgot, if anyone knows how to acquire or comes across a poptop canvas I am in need! the one from the 1979 sportsmobile is definitely unusable.
|
|
|
|
|
07-10-2017, 05:52 PM
|
#49
|
|
Senior Member
Join Date: Jul 2013
Location: So Cal
Posts: 4,071
|
Quote:
Originally Posted by BenJJ

The poptop was in pretty rough shape, but the fiberglass was solid with no cracks or holes, just needs a good clean up and refinish. Plus when I asked them how much it would cost they said $70 so I couldn't say no.
|
I'm pretty sure that's a new outdoor record for pop tops........
__________________
2008 E350 RB passenger 4WD SMB penthouse
2013 KTM 350 EXC
2008 KTM 250 XCF-W
2003 Honda Element
|
|
|
|
|
07-10-2017, 06:00 PM
|
#50
|
|
Senior Member
Join Date: Feb 2013
Location: San Francisco/Nevada City
Posts: 3,769
|
Quote:
Originally Posted by boywonder
I'm pretty sure that's a new outdoor record for pop tops........
|
Without a doubt. I got my first one for $140 cause that's what they charged for a pickup camper shell and they figured it was worth the same. I didn't argue. But that's double!
As for new canvas, I'm sure SMB doesn't have new canvas for a 78 top, assuming it's different. But I'd call them. And when that goes nowhere, find a commercial sewer or convertible top repair place and show them the top.
|
|
|
|
|
|
 Posting Rules
|
You may not post new threads
You may not post replies
You may not post attachments
You may not edit your posts
HTML code is Off
|
|
|
|
 » Recent Threads
 |
|
|
|
|
|
|
|
|
|
|
|
|
|
|
|
|
|
|
|
|
|
|
|
|
|
|
|
|
|
|
|
|
|


 Linear Mode