Offroad Light installation
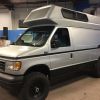
With the Aluminess bumpers installed, it was time to add a few off-road lights. We ordered the front bumper with the two sets of cutouts for the square lights. The rear has the standard rectangular cutout.
The square cutouts cost a little extra, but I think it looks better that the round cutouts with the late model Fords. We were told we got the last bumper with the custom square lights, as Aluminess is too busy to do anymore custom work.

We bought a pair of 4" square flood and a pair of spot lights at the Salt Lake Offroad Expo. We opted for the cheaper $60 lights, rather than the $200 Ridged lights. We will see how well they work. For the rear we just got a pair of $40 4x6 lights off Amazon.
The lights installation was pretty straight forward, just bolting the lights in place and running the wires to the front hood area near the fuse box.

To control the lights, I bought a 6 switch control system by SuiTech, off of Amazon. It is one of the common Chinese systems that are available under several names. It allows a remote switch panel in the cab with a fuse/relay box under the hood. It does simplify the installation as only one wire is ran from under the hood to the cab.
I know this is a cheap system. I would love to get either S-Pod or Switch Pro, but the Suitech is about 1/4 the price. I could not justify the higher cost, just to get the programming and Bluetooth control from the expensive systems. It seems those options are fun to play with, but after the novelty is gone, I would not use it much. I also assume the build quality of S-Pod and Switch Pro is much higher, but we will see if the SuiTech is good enough. I can always spend more money later?
The install was not too bad, but as we all know, there is not a lot of space under the hood of these vans. I mounted the control box on the driver's side towards the rear of the hood area, next to the coolant overflow tank. I ran the power wire under the back edge of the compartment to the battery, and the wires from the lights ran up from under the van on the driver's side.
The cable to the switch panel ran along the back of the hood area and then under the passenger side fender. The cable then was ran through a gasket near the door hinge area into the cab. From there it was ran under the glove box and then through the dash to the coin tray area.


I removed the coin tray, next to the trailer brake controller and placed the switch panel there. I initially surface mounted the panel on a piece of 1/8" ABS cut to fit the opening in the dash. This was okay, but I wanted something that looked more built in.


I ordered some 1/16" ABS and made a wood form to heat-form a recessed cavity in the ABS. This would allow for the switch panel to be recessed into the dash. The form was made from scrap melamine. I also made a wood plug that was the size of the switch panel. This is used to form the cavity for the switch panel.


The rest of the form created a cavity and a frame that was used to hold the ABS sheet firmly while I push the plug into the heated plastic. I heated the ABS at 500 deg for about 10 minutes. The both the form and plug was heated. I quickly removed the form and pushed the heated plug into the ABS sheet and held it in place while cooling. I was happy when everything worked as planned on the first try. I was afraid the plastic would tear or be too thin. It ended up being a nice tight fit for the switch panel.


After forming I cut the ABS to fit in the coin tray area. I needed to do a bit of trimming with a Dremel on the inside of the dash to get clearance for the recessed panel. After fitting the panel I used a couple of button head screws to hold the panel in place.


My last task for the day was to build a cover for the CCV wiring and control panel. I had them mount it in the back corner of the van as a temporary spot until I finish up the van interior. I decided to cover it to protect it from shifting cargo. It was made by bending some clear polycarbonate and using a few strips of sticky back Velcro hooks to hold it in place.

Sent from my iPad using Tapatalk


 2008 GMC 3500 SMB
 AWOL
AWOL


 1997 Ford E350 EB 7.3L

 Linear Mode


