|
|
 04-18-2012, 03:31 PM
|
#1
|
|
Senior Member
Join Date: Dec 2011
Location: Washougal, Wa
Posts: 1,047
|
Aluminess Rear Bumper Install
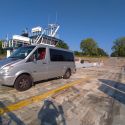
I got the rear bumper out of the box and installed on the back of my van this morning. There were a couple of minor issues during the install that I think are related to the van being a '92. 1992 was the first year of the new body style and I think the bumper mounting bolts are in a different spot up till some changes were made in 1995/96. Only 2 of the 4 mounting holes lined up on the bumper. It was really no big deal because 2 holes lined up perfectly. We bolted the bumper to the van using the 2 holes and got it all level and centered. Then once things were secure we just drilled two new holes in the bumper. Another minor issue was the height of swingarm connection to the top hinge of the rear door was a little low. This was fixed with a slightly longer bolt and a few spacers on the swingarm. Both of the issues were minor and easly fixed.
This is the third Aluminess product I've put on the van and I have been impressed with the quality of each item. The folks at Aluminess are always very helpfull as well. Aluminess still has a $50 off shipping or installation coupon available in the vendor section for SMB Forum members so if you buy something from them take advantage of it.
I'm not sure what kind of bike rack I'm going to end up with but this what the south end of my north bound van looks like today. The spare is on a stock steel rim that I rattle canned to match the color of the bumper. I was toying with the idea of throwing a stock hub cap on it but I kind of like the way it looks without it. I still need to mount some backup lights. I haven't ordered them yet but these are the ones I plan on getting. They will be much brighter than the ones Aluminess sells.
http://www.rallylights.com/detail.aspx?ID=4133

__________________
John
Gnarvan 1992 E350 Clubwagon
Advanced 4WD Systems Conversion
Sotar Legend 12.5' X 22" Cataraft
2003 BMW R1150GS-Adventure
2013 BMW R1200GS-Adventure
|

|

|
|
04-18-2012, 04:21 PM
|
#2
|
|
Senior Member
Join Date: Jan 2012
Posts: 178
|
Re: Aluminess Rear Bumper Install
clean 
|
|
|
|
|
04-18-2012, 04:25 PM
|
#3
|
|
Site Team
Join Date: May 2007
Location: Southern New Mexico
Posts: 10,179
|
Re: Aluminess Rear Bumper Install
Very cool.
Is that a special order bumper box, without a door?
Herb
__________________
SMB-less as of 02/04/2012. Our savings account is richer, but our adventures are poorer.
|
|
|
|
|
04-18-2012, 06:46 PM
|
#4
|
|
Senior Member
Join Date: Dec 2011
Location: Washougal, Wa
Posts: 1,047
|
Re: Aluminess Rear Bumper Install
Quote:
|
Originally Posted by BroncoHauler
Very cool. Is that a special order bumper box, without a door? Herb
|
It's Aluminess's Jerry Can Box. Stock item but fairly new. The 3 MFC's fit in nice and snug. A little to snug because they wouldn't fit with the Easy pour 2 handle straps I bought and installed on them. I had to remove the straps to get the MFC's to fit.
Jerry Can box link
http://www.aluminess.com/img/fuel-box_lg.jpg
http://www.aluminess.com/boxes.htm
Easy pour 2 handle strap link
http://www.jagmte.com/index.php?route=p ... duct_id=49
__________________
John
Gnarvan 1992 E350 Clubwagon
Advanced 4WD Systems Conversion
Sotar Legend 12.5' X 22" Cataraft
2003 BMW R1150GS-Adventure
2013 BMW R1200GS-Adventure
|
|
|
|
|
04-18-2012, 08:17 PM
|
#5
|
|
Senior Member
Join Date: Dec 2011
Location: Washougal, Wa
Posts: 1,047
|
Re: Aluminess Rear Bumper Install
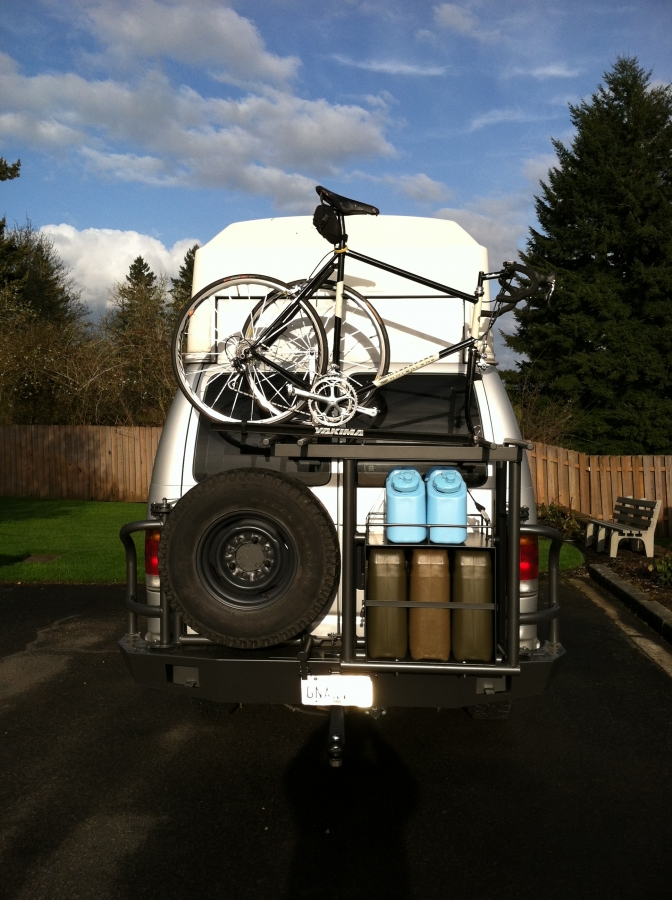
Update to show a bike on the bike rack.
I added a Yakima steelhead to the Aluminess rack. The attached picture is a shot of a 66cm Waterford 2200 on the rack. The seat is below the roofline but the handlebars stick out a little to far to the side for my tastes. The bike is one of the favored possessions from back in the day when I was a pace line junkie. The feel of steel is real. 
__________________
John
Gnarvan 1992 E350 Clubwagon
Advanced 4WD Systems Conversion
Sotar Legend 12.5' X 22" Cataraft
2003 BMW R1150GS-Adventure
2013 BMW R1200GS-Adventure
|
|
|
|
|
04-18-2012, 08:35 PM
|
#6
|
|
Member
Join Date: Oct 2010
Location: mile high
Posts: 82
|
Re: Aluminess Rear Bumper Install
i had 3 waterford built paramount mtn bikes back in the day, one with a custom brandy wine paint job by a friend of a friend who was painter at the factory (in from WI originally). i sold my last one when i moved out of the country for a stint a while back, it was serial #3 team issue. probably should have kept that sucker.
|
|
|
|
|
04-18-2012, 09:21 PM
|
#7
|
|
Senior Member
Join Date: Jul 2011
Location: Flagstaff, AZ
Posts: 2,001
|
Re: Aluminess Rear Bumper Install
Nice bumper! I didn't want to deal with thru-axel wheels so I went with the 1UpUSA rack. A nice feature is that it has a burly aluminum tray that can handle the overhang over the spare tire. The tray is 55" long and it mounts flat with a universal type bracket. So, it can slide in either direction to minimize how much bar or wheel sticks out on either side.
The downside is the bikes are rather high over the roofline and subject to tree branches but that may not be as big an issue on your rig. And for a heavy full suspension bike I use a small step ladder to get it on and off.
I've also heard a report from a forum member wth a similar fork mount setup that the fork dropouts were getting hammered. I presume because these style racks were not intended (designed?) to be mounted sideways to the direction of vehicle travel. I suppose that would really only be a factor with a lot of offroad driving. That's anecdotal info. I've always gone with fork mounts on roof racks and never had a problem.
__________________
2005 E350 RB 6.0 PSD for extended fun
1989 Landcruiser FJ62 for local fun
2011 VW TDI Golf for hwy fun
|
|
|
|
|
04-18-2012, 10:47 PM
|
#8
|
|
Senior Member
Join Date: May 2011
Posts: 1,005
|
Re: Aluminess Rear Bumper Install
I hate to tell you this, but the issue with the holes probably wasn't due to your van being a 92, but the frame rails drooping outwards.
Once you remove the stock rear bumper, the rails tilt outward and the holes don't line up. (this is worse with the xl storage box which requires a crossmember be cut out)
What you do is install two of the bolts, and I cut a piece of 7/16 threaded rod long enough to fit across the frame rails, and then put nuts on it and large thick washers, and I tightened the nuts until the frame rails are parallel to each other again, and voila, the top holes line up. Torque the bumper bolts and then remove the threaded cross rod.
I think it is too much of a coincedence (I too only had 2 holes line up until I corrected the issue) to be anything else.
I have pictures somewhere if you are interested.
__________________
Sportsmobile-less.
"A job worth doing is worth doing at least twice."
|
|
|
|
|
04-18-2012, 10:57 PM
|
#9
|
|
Senior Member
Join Date: Feb 2012
Location: Up In The Mountains
Posts: 427
|
Re: Aluminess Rear Bumper Install
I agree that the bumper mount holes are the same from 92 on. Now that you have a great bumper installed your frame shouldnt move any more at all! Looks GREAT!

__________________
2003 Ford E-350SD 4x4
V10 / 4R100 / NV271
Front Axle - 1 Ton Spec Dana 60/King Pin/Open Knuckle/High Steer
Rear Axle - 1 Ton Spec Dana 60/Full Floating
Eaton E-Lockers Front And Rear/4:10 Gears
ARB Differential Covers - Nodular Iron With Dipstick And Drain Plug
Leaf Spring Suspension Front And Rear
46 Gal Transfer-Flow Fuel Tank
ExtremeAire Magnum Air Compressor
Reunel Rear Bumper
On And On ...
|
|
|
|
|
04-19-2012, 06:50 AM
|
#10
|
|
Senior Member
Join Date: Dec 2011
Location: Washougal, Wa
Posts: 1,047
|
Re: Aluminess Rear Bumper Install
Quote:
|
Originally Posted by coguzzi
i had 3 waterford built paramount mtn bikes back in the day, one with a custom brandy wine paint job by a friend of a friend who was painter at the factory (in from WI originally). i sold my last one when i moved out of the country for a stint a while back, it was serial #3 team issue. probably should have kept that sucker.
|
That bike sounds like a keeper for sure. I doubt if I'll ever get rid of my Waterford. They are sweet machines.
__________________
John
Gnarvan 1992 E350 Clubwagon
Advanced 4WD Systems Conversion
Sotar Legend 12.5' X 22" Cataraft
2003 BMW R1150GS-Adventure
2013 BMW R1200GS-Adventure
|
|
|
|
|
|
 Posting Rules
|
You may not post new threads
You may not post replies
You may not post attachments
You may not edit your posts
HTML code is Off
|
|
|
|
 » Recent Threads
 |
|
|
|
|
|
|
|
|
|
|
|
|
|
|
|
|
|
|
|
|
|
|
|
|
|
|
|
|
|
|
|
|
|


 Linear Mode