Journey with Confidence RV GPS App RV Trip Planner RV LIFE Campground Reviews RV Maintenance Take a Speed Test Free 7 Day Trial ×


Reply
 
Thread Tools Display Modes
 
Old 02-13-2011, 12:12 AM   #11
Senior Member
 
rockbender's Avatar
 
Join Date: Sep 2010
Location: Bend, OR
Posts: 800
Re: Dookie

While I haven't made any substantial breakthroughs, I continue to slowly move in forward progression. I'm ok with that.

What I started with at the beginning of the day was a manky dirty top with a little body filler in some low spots on the glass that needed a whole lot of sanding before leveling things out.

After some major scrubbing, leveling the reworked section, and giving the entire surface a full scuff I got a layer of primer on the top this afternoon.

My original schedule of being able to cut the top has been postponed for a few days but will hopefully still be on the next week's work plan.

__________________
Josh
2009 Express AWD, CCV Top & 50-ish home build. Daily driver/camper/kid hauler
rockbender is offline   Reply With Quote
Old 02-13-2011, 12:26 AM   #12
Senior Member
 
Join Date: Feb 2010
Location: PNW
Posts: 402
Re: Dookie

Very nice old Ford rockbender.
Good drivetrain in it.
Enjoy the build-up.
__________________
Two wheels or four, its all good. :-)
'10 E-350 EB V-10 QuadVan 4x4, SMB penthouse top, Van Specialties interior
maxacceleration is offline   Reply With Quote
Old 02-13-2011, 08:34 PM   #13
Senior Member
 
UJOINT's Avatar
 
Join Date: Feb 2009
Location: AVL NC
Posts: 1,008
Re: Dookie

Love the van, it's sweeeeeeeeeet!!!!
__________________
Chris Steuber
02 E350 7.3 (V4)
17 Focus RS, 90 SHO, 49 CJ2A, 89 LSC, 20 T250 AWD
ujointoffroad.com
UJOINT is offline   Reply With Quote
Old 02-14-2011, 11:19 PM   #14
Senior Member
 
rockbender's Avatar
 
Join Date: Sep 2010
Location: Bend, OR
Posts: 800
Re: Dookie

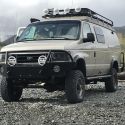
Thanks, Chris. The front end has pretty much totally been revamped - I'd be surprised if any of the parts are stock Pathfinder conversion pieces. Whoever did the work did a pretty nice job in my opinion.

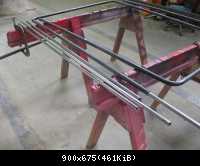
I went to work on the lift support tubes today. I'm not sure if they were tweaked during removal of the top or if/when the vehicle was in an accident, but lets just say they weren't exactly straight

A little bit of clamping action got them straight enough for my liking

Since they were off, I figured I might as well reinforce them with 3/4" tubing on the inside.

I upgraded the pivot bolt to 5/16" from 1/4" since the hole was a bit wallowed out anyway, but opted to leave the ends with 1/4" bolts (replaced with Grade 8's).

Note in the photo above the hole diameter in the framework in comparison with the 1/4" bolt that goes in it. I'm not quite sure why this hole is so big for a 1/4" bolt so i decided to rivet a thin plate washer to the inside minimizing movement. Hopefully this will not interfere with the spring.

Can anyone verify what the spring is held in place with? There are two holes that are about 3/4" in diameter that some sort of pin must go through to anchor the fixed end of the spring. This pipe should be more than sufficient and provide good bearing/shear on the rails.

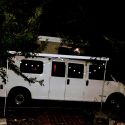
Finally, put a color coat on the top. I'm using a oil based marine paint so time will tell on durability but I think it will serve its purpose just fine for what I'm doing. I'll do one more coat in a couple days and call it good.

I've got pretty much zero painting experience other than walls in a house, but I left the sanded texture from the primer unsanded and like the way the paint is laying on it so far.

Troysmith and I went for a short drive yesterday and it reminded me how noisy the van is between the diesel engine, gutted interior, and non existent door and window seals. I'll be excited to get the top in so I can start working on interior items though I know the electrical will take a big chunk of time before much finish work gets to start. Regardless, its still super fun to drive and a fun project thus far in its early stages.
__________________
Josh
2009 Express AWD, CCV Top & 50-ish home build. Daily driver/camper/kid hauler
rockbender is offline   Reply With Quote
Old 02-18-2011, 10:38 PM   #15
Member
 
Join Date: May 2010
Posts: 76
Re: Dookie

So, my husband says to let him know if you need parts. He has a parts van sitting in the yard....


Sandi
__________________
2006 Ford RB E-350 Cargo Van
5.4L V8
Sandi is offline   Reply With Quote
Old 02-19-2011, 01:52 AM   #16
Senior Member
 
rockbender's Avatar
 
Join Date: Sep 2010
Location: Bend, OR
Posts: 800
Re: Dookie

Thanks Sandi! I'll absolutely let you know if I am in need of anything. Although who expect a 26 year old van to need parts and repairs, right?

I made some more progress this week and am continuing to take advantage of some shop space available to me. The penthouse top got a second color coat of paint as well as a new perimeter seal. I wasn't sure quite where to look for the seal, so I ended up just getting it through SMB Indiana. I must say that everyone I have talked to there has been very helpful and accommodating - truly nice folks to work with.

I also made the jump and cut the roof out of the van. Measure once cut twice? Lets hope not!


There are other threads that cover adjusting the springs on the penthouse, but most discuss using a come-a-long. I used a small chain hoist that made the process super easy.


The van had some rusty gutter syndrome as many of these older vans do. I removed as much of the rotten sealant and rust as I could and then applied a new sealant so that the penthouse would have a nice smooth bearing to sit on. The sealant doesn't color match the paint, but at this point I'll probably just leave it the way it is since it is mostly out of sight. Hopefully the top will be going on very soon!
__________________
Josh
2009 Express AWD, CCV Top & 50-ish home build. Daily driver/camper/kid hauler
rockbender is offline   Reply With Quote
Old 02-19-2011, 09:27 AM   #17
Senior Member
 
jage's Avatar
 
Join Date: Apr 2007
Location: Parker, CO
Posts: 7,644
Re: Dookie

My support tubes have never been exactly straight. I choose to believe it's a feature.
__________________
it was good to be back
jage is offline   Reply With Quote
Old 02-19-2011, 09:45 AM   #18
Senior Member
 
TroySmith80's Avatar
 
Join Date: Oct 2010
Location: Bend, OR
Posts: 219
Re: Dookie

Awesome! Exciting :-)

I got a "real" offer on my van yesterday, a little lower than i want to accept quite yet though.


Quote:
Originally Posted by rockbender
I also made the jump and cut the roof out of the van. Measure once cut twice? Lets hope not!
__________________
For Sale: 1992 E-350 EB 4x4 High-Top
TroySmith80 is offline   Reply With Quote
Old 02-20-2011, 11:22 AM   #19
Senior Member
 
rockbender's Avatar
 
Join Date: Sep 2010
Location: Bend, OR
Posts: 800
Re: Dookie

Jage - I was quite puzzled by the 'not straight' feature of the support bars. More specifically that they form more of a wide 'A' rather than being parallel. Before I evaluated my other parts to determine the actual opening width in the roof, I could have sworn that it should have been a few inches narrower than it is. My only guess is that by design the 'sprung' bars provide a bit of lateral support that might not exist if all the bars ran parallel.

More big steps the past few days. Did I mention how fortunate I am to have some great facilities and tools to work with for the time being?


The top is now in place and goes up and down!


The top does not quite sit down in the rain gutters like it should. I need to do some trouble shooting and figure out why this is, but I'm guessing that I have some support bar interference that needs to be resolved with a little shimming one way or the other. The old bars were bearing directly on the interior plywood on the ceiling, so I put a thin sheet of HDPE to give it a wear surface and something nicer to move on.

The next step will be to figure out how to get the tent attached down. There is a little trim strip that goes around the base of the tent that I need to find a pneumatic stapler to attach it with - not sure if my forearms are up to squeezing out a bazillion staples from an Arrow staple gun, nor am I sure that it would bury them deep enough. Any recommendations on a budget upholstery stapler? I'll likely need it for trimming out the interior and it seems like a good reason to go tool shopping.

Troy - hopefully you'll get somebody hooked in and they'll pay what it is worth. Your rig is definitely clean and the Suby motor is such a huge bonus! Sorry I haven't been giving you notice on the exciting steps. I've got a sick wife and kiddo this week, so I'm popping in whenever I can for a few hours work (sometimes late at night). It will be a long time before things get trimmed out so just give me a call/text if there is anything you'd like to check out!

The new paint on the top is creating new projects. The few little rust spots and oxidation on the paint stick out like a sore thumb now so some exterior detailing and touch up will be in order this spring. One more thing to add to the list!
__________________
Josh
2009 Express AWD, CCV Top & 50-ish home build. Daily driver/camper/kid hauler
rockbender is offline   Reply With Quote
Old 03-04-2011, 04:09 PM   #20
Senior Member
 
rockbender's Avatar
 
Join Date: Sep 2010
Location: Bend, OR
Posts: 800
Re: Dookie

In the above post I mentioned I was having issues with the penthouse seating appropriately. After some thought I realized that I never trimmed the back of the plastic rivets that hold the bottom seal on and they were indeed keeping the top from sitting down all the way. Ten minutes with some side cutters and it is now all better.

I'm not sure if I'm missing the parts or if the early tops did not have this feature, but I do not have any helper springs. I can get the top up, but it would be much easier with a little spring assist. It is on my to-do-later list.

The other evening I was looking at the floor and decided to pull up the carpet to see what kind of subfloor was under there. What I found was 3/4" ply that was in reasonable but not excellent condition with no other layers. Additionally, the rear piece was only 4' wide and did not go wall to wall.

Rather than second guess it, I decided to tear it out and start with new. I put down two layers of lightweight closed cell foam (sill seal) to fill the void in the floor body channels and then cut 1/2" foam to go over that. The foam is little less dense than I had hoped, but I'm going to try not to over analyze things too much.


I plan to use 3/8" ply over the top of the foam, but have not yet installed it as I've decided that I should probably put a layer of sealer/paint/etc. on both sides to moisture proof the plywood a bit.

I'm hoping that the new floor provides good thermal insulation as well as added noise reduction while travelling. I haven't chosen a finish floor product yet, but plan to install that after the cabinets are in anyway so I have a bit more time to think about it.
__________________
Josh
2009 Express AWD, CCV Top & 50-ish home build. Daily driver/camper/kid hauler
rockbender is offline   Reply With Quote
Reply


Posting Rules
You may not post new threads
You may not post replies
You may not post attachments
You may not edit your posts

BB code is On
Smilies are On
[IMG] code is On
HTML code is Off
Trackbacks are Off
Pingbacks are Off
Refbacks are Off

» Sportsmobile Registry

Behemoth

Besags

Esme

Amy V
Add your Sportsmobile
» Featured Campgrounds

Reviews provided by

Powered by vBadvanced CMPS v3.2.3
Disclaimer:

This website is not affiliated with or endorsed by Sportsmobile SIP or any of its affiliates. This is an independent, unofficial site.


All times are GMT -6. The time now is 11:10 PM.


Powered by vBulletin® Version 3.8.8 Beta 4
Copyright ©2000 - 2024, vBulletin Solutions, Inc.