Journey with Confidence RV GPS App RV Trip Planner RV LIFE Campground Reviews RV Maintenance Take a Speed Test Free 7 Day Trial ×


Reply
 
Thread Tools Display Modes
 
Old 07-06-2011, 05:46 PM   #1
Senior Member
 
SheepShagger's Avatar
 
Join Date: Apr 2009
Posts: 453
Onboard Air & Water

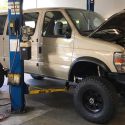
Time has finally come for onboard air and water, not wanting to take up interior space I started looking under the van for options. I didn't like outside the frame rails at the back since there is so much dirt and stones thrown up from the tires in there, my drivers side has batteries so that only left the rear area. Just behind the axle I have reserved for a 2nd diesel tank so that only left the spare tire area. This was really the last location I wanted to use as it's a lot of weight to hang behind the axle, but it was the only area available.
So after cutting out the spare tire chassis member, (that was a job all on it's own) I set about designing a way to hold Air tank/ 2 compressors / Water tank & water pump. Initially I wanted to use UJoint skidplate kit, but I really didn't want to cut out the remaining chassis member and weld in a new one, so that kind-a ruled out that kit.
So in the end I decided to make my own from stock I could get locally and tools I had available. If I had access to a decent bending machine, my design would have been different, but I don't.

I use 2"x3" steel box section as frame rail extensions, and 3/4" box section for the support braces. The 2x3 were notched so the 3/4 box section actually goes inside the 2x3's, and they are also welded inside. (just for extra strength as I guess all the parts will be ~250). Once the cross member were welded, I capped the 3x2's to stop and crap getting inside.


There is some kind-a reason to the vertical cross braces, they hold the tank and compressor.


All mounted up. I new I could fit a bigger tank, but I decided to pick a 2.5gal 200psi tank as it gave me more volume that a 3 or 3.5tank at 150psi, and the compressors are rated for 200psi.


Now I have the exact size, I can order up the water tank, I can make a 16gal fit easily with a pump, and just make a 20gal fit with pump, but think pluming will be a real pain with the 20gal. I would have preferred to mount the water tank further forward wherethe compressors & air tank are, but there is a body cross-member there that limits the height, you can just see it in the above picture.

Since the water tank will be ~150lbs I decided to brace the extension that's not really supported. Below you can see some angle I bolted to the tow hitch to brace it.


Now I'm just waiting for the tank and pump to come so I can mount them up. After that, there will be an aluminum skid plate bolted to the whole frame so protect it all from debris. In the very first pic you will see some tabs welded to the frame, they will be drilled and tapped to hold the skidplate in place.

SheepShagger is offline   Reply With Quote
Old 07-06-2011, 06:52 PM   #2
Senior Member
 
jage's Avatar
 
Join Date: Apr 2007
Location: Parker, CO
Posts: 7,644
Re: Onboard Air & Water

That's the way to OBA...


Looks great.
__________________
it was good to be back
jage is offline   Reply With Quote
Old 07-18-2011, 08:07 AM   #3
Senior Member
 
SheepShagger's Avatar
 
Join Date: Apr 2009
Posts: 453
Re: Onboard Air & Water

Thanks Jage

Made some more progress over the weekend.
Added water tank, pump and all wiring.


All mounted up


For the fill, I couldn't bring myself to cut holes in the body and didn't want a fill inside the van, so I decided in placing a boat fresh water deck fill on the bumper.


And a side shot, the whole system doesn't hang as low as the spare tire did, which is good as I've managed to scrape that up a few times.


Still need to add the skid plate, but my local metal suppler shut up shop during this, so that will have to wait.
SheepShagger is offline   Reply With Quote
Old 07-18-2011, 08:25 AM   #4
Site Team
 
BroncoHauler's Avatar
 
Join Date: May 2007
Location: Southern New Mexico
Posts: 10,179
Re: Onboard Air & Water

Very nicely done.

I wouldn't wait too long for the skid plate, since it looks like your rear tires could easily kick some rocks up into your watertank, possible cracking or puncturing it.

Or you could add some mudflaps behind your tires to minimize the danger.


Herb
__________________
SMB-less as of 02/04/2012. Our savings account is richer, but our adventures are poorer.
BroncoHauler is offline   Reply With Quote
Old 10-30-2011, 08:34 AM   #5
Senior Member
 
SheepShagger's Avatar
 
Join Date: Apr 2009
Posts: 453
Re: Onboard Air & Water

The gravity water fill I did iabove, can be a bit of a pain if not parked perfectly since it's only a few inches higher than the tank.
After messing around, I decided I wanted a different kind of fill, one that I could connect directly to a hose. Picked up a "city water fill" valve from an RV store and set about making it fit in the rear door jam. Really only had to trim one side off to make it fit in the jam. Since I pulled the rear door speakers there was no need for the rubber accordion thing that holds wire and fit's between the door and the jam, so I pulled that and re-used the hole it once fit it. So now I have a water fill hidden in the rear door jam and I didn't even need to drill a hole. BTW, removing the rear light gives you all the access you need to the other side of this for all the pluming.

SheepShagger is offline   Reply With Quote
Old 12-10-2011, 10:03 AM   #6
Junior Member
 
Join Date: Dec 2011
Posts: 3
Re: Onboard Air & Water

Great write up sheepshagger. I think i might consider doing something like this for my build.
thanks!
gregwoods is offline   Reply With Quote
Old 08-23-2015, 01:45 AM   #7
Senior Member
 
MadScience's Avatar
 
Join Date: Jul 2011
Location: SF Peninsula
Posts: 809
Re: Onboard Air & Water

To bump an old thread, it looks like the initial install of the deck fill in the bumper led to a similar problem that I just ran into. If the hose has to go over a frame rail, then the rear bumper really isn't quite high enough to act as a gravity fill point.

I just put a setup like this together, and am close enough to a trip where I'll want to use it as a gravity fill, that I'll probably just extend it upward inside a pipe header for now. However that's clearly not the really right solution. -- Neither is, at least for me, the vertical mount in the doors. Hmm...
__________________

'99 EB ex ENG KSWB news van, low rent 4x4 conversion (mostly fixed by now), home built interior.
MadScience is offline   Reply With Quote
Old 08-23-2015, 04:43 AM   #8
JWA
Senior Member
 
Join Date: Jan 2011
Location: Reynoldsburg, Ohio
Posts: 3,774
Send a message via Yahoo to JWA
Re: Onboard Air & Water

This does seem to be an older thread but its nice to see it even now---very nice design and execution too!

I wonder how the water tank is vented when filling?

And after in use these past few years how's it all holding up---any re-designs in the future?
JWA is offline   Reply With Quote
Old 08-23-2015, 07:53 AM   #9
Senior Member
 
boywonder's Avatar
 
Join Date: Jul 2013
Location: So Cal
Posts: 4,072
Re: Onboard Air & Water

Yes, very timely resurrection of this thread....
__________________
2008 E350 RB passenger 4WD SMB penthouse
2013 KTM 350 EXC
2008 KTM 250 XCF-W
2003 Honda Element
boywonder is offline   Reply With Quote
Old 12-11-2015, 11:34 PM   #10
Senior Member
 
B350's Avatar
 
Join Date: Apr 2015
Location: Minneapolis, MN
Posts: 186
SheepShagger,
How is you Viair system working? Which model compressor did you go with? Did you end up buying the whole fancy kit? And how long does it take to fill your tires from say 30 to 65 or 80 psi?
Thanks
__________________
'99 E350 EB 7.3L, 2WD, WeldTec lift, CCV Mid Top
B350 is offline   Reply With Quote
Reply


Posting Rules
You may not post new threads
You may not post replies
You may not post attachments
You may not edit your posts

BB code is On
Smilies are On
[IMG] code is On
HTML code is Off
Trackbacks are Off
Pingbacks are Off
Refbacks are Off

» Sportsmobile Registry

KLUDR

vanderpooch

VanBo

Mike Ponce
Add your Sportsmobile
» Featured Campgrounds

Reviews provided by

Powered by vBadvanced CMPS v3.2.3
Disclaimer:

This website is not affiliated with or endorsed by Sportsmobile SIP or any of its affiliates. This is an independent, unofficial site.


All times are GMT -6. The time now is 12:12 AM.


Powered by vBulletin® Version 3.8.8 Beta 4
Copyright ©2000 - 2024, vBulletin Solutions, Inc.