Journey with Confidence RV GPS App RV Trip Planner RV LIFE Campground Reviews RV Maintenance Take a Speed Test Free 7 Day Trial ×


Reply
 
Thread Tools Display Modes
 
Old 12-07-2018, 12:33 PM   #1
Senior Member
 
Join Date: Jul 2013
Posts: 103
SMB Penthouse rebuild, install

So I bought a used Sportsmobile Penthouse top. This is my winter project and I plan to document the rebuild here specifically as well as add to my build thread over here: https://expeditionportal.com/forum/t...ersion.147902/

This top was removed for installation of a new CCV top and was advertised by MSD here: http://www.sportsmobileforum.com/for...ing-22849.html I responded within 2 hours...

I had considered different top options in the past, all of the new ones are super expensive, and most require drop offs, flights, hotel rooms, etc. (if being installed) which costs even more. Additionally some reports regarding their experiences with some of the tops have left me not wanting to take the risk/$.
I have strongly considered building my own poptop but without much experience with any of the tops and their mechanical aspects I found little motivation to start.
I also looked at a few whole vans with decent pop tops for removal and van resell but that seemed like a riskier "investment".
Being a DIY'er I thought buying a used one and refurbishing it was the cheapest way to add value to my van, add another separate sleeping area, and learn about how a Sportsmobile top works and ultimately benefit (and improve) their mistakes.
Being cheap, not wanting to pay MSD to crate the thing, and thinking I could beat the V10 mpg odds (and a snowstorm) I decided to spend my Thanksgiving days off driving to Loveland Co. to actually pick it up.
That story.
First, as I was leaving Rock Springs WY. on the way there I blew a spark plug. Knowing that this is a known problem I immediately knew what happened (or did I?). I pulled off at the last Rock Springs exit which was only a mile or so ahead. The exit is desolate, mostly abandoned gas stations. As I pulled over and looked around I saw "Pats Automotive" (which looked nearly abandoned as well), and there were two guys milling around out front. I approached one of them and asked, "what are the chances of getting service on Thanksgiving day?", he laughed.
After telling him what I had he said he has done it, it would be around $500 cash, I considered my lack of options then agreed. Turns out Oreillys was open (for another hour) and had the heli-coil kit.
When Pat returned with the parts we pulled the van into the nice warm shop as it started to snow outside. I already had the cover off, and Pats 22 year old son dove in with a flashlight. He returned with a coilpack and a spark plug stuck in the boot, the coil pack had a broken flange. The spark plug was broken, one piece, the ceramic could spin separately from the metal. Something else, a bit unusual, there were no threads on the plug!
Tyler grabbed a scope and stuck it in the hole, sure enough, the threads were good, top of the piston looks good.
The spark plug literally unscrewed then blew out! Even the threads right at the top were good, not even a hint of threads on the plug.
I had heard that the later V10's had changed the design and this was no longer a problem, I never would have guessed that it unscrewed but to not blow out the threads at 1/2 or 1/4 insertion is a real testament to thread strength. It was likely caused by not tightening, it was the middle plug on the driver side. After that I decided to check them all, Pats son took the front and I took the rear pulling coilpacks and checking plug torque. Most were good to a half turn from tight. Pat paced around talking on the phone and smoking cigarettes the whole time.
After buttoning things up and clearing a coilpack code with their Snap-on diagnostics tool, Pat asked if we could settle up with the $500 bill, "I wont charge you for the parts" as he smiled, a coilpack and a sparkplug. I reluctantly gave him the money and was back on the road in less than 3 hours. I'm grateful it didn't happen 20 miles later in the blowing snowstorm I hit on Elk Mountain. In reflection, I could have done this in the Oreillys parking lot, they might have even had the scope to borrow to check the threads, but I didn't know it would be so easy when I agreed to Pats help.

I met Mark at CCV around 9:30a the next morning. Mark seems like a great guy, he stayed in communication with me and was very hospitable. He gave me a quick tour of CCV, although I admit, my head was literally in the clouds, I had a head cold and couldn't think about much of anything other than, "what kind of adventures await on the drive home?, how much is it going to cost over and above the regular expenses?". I wish I could have had more time to hang out/have a beer with Mark under different circumstances, maybe another time.
It was a very windy day in Fort Collins, I pulled over for gas and as I opened the door it got ripped out of my hand by a wind gust and bent backwards. I was able to shut the door but now it wont open more than 2" before binding between the door and fender occurs. I have been using the cargo side door for ingress/egress but need to stop driving it or fix it because its really hard to remember I cant go that way, especially going out, every time I open it I do more damage. I hope I don't have to buy a new/used door as finding a black one might be rather difficult causing me to do a full door repaint.
To top it off, I don't advise the V10, 3.73 gears, and 33" tires for pulling a 2500lb or heavier trailer unless you like 7-8MPG. The van is fine without the trailer or pulling the trailer in town but that combo with winds, hills, and trying to stay at speed means it "hunts" for gear. Kinda blew my 10mpg estimates.
Its hard to say if this top is "worth it" at this point. I really shouldn't pin the incident costs on the top as those things could have happened anywhere at anytime but its hard not to at this point. Knowing what I know now I would have paid the $750-$1000 for crating and shipping.
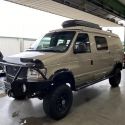
This is a full length RB top, in other words it goes all the way to the windshield and has latches above the front doors to keep the leading edge down. The canvas stops behind the cab as all other SMB tops. As Mark told me it is from the Indiana Sportsmobile shop and that is identified by being a smooth top rather than "ribbed". The ribbed tops came from Fiberine for SMB Texas, West. Indiana tops came from somewhere else.
My rough plans at this point is to fill the holes in the top, install a Maxxair fan, solar panel, maybe a rear basket/rack, and Raptor line the top before installing.

__________________
Pinnacle Campers LLC, Boise Idaho
https://pinnaclecampers.com/
Brian94ht is offline   Reply With Quote
Old 12-07-2018, 01:49 PM   #2
Senior Member
 
gahamby's Avatar
 
Join Date: Sep 2017
Location: VIRGINIA
Posts: 633
Garage
Talk about a guy who knows how to have a good time!
Better luck with the top!
__________________
'07 GMC 2500 6.0
gahamby is offline   Reply With Quote
Old 12-07-2018, 02:50 PM   #3
Senior Member
 
Twoxentrix's Avatar
 
Join Date: Mar 2015
Location: Maryland
Posts: 3,378
Garage
When the top is completed, installed, and functional the whole experience will make for many fun campfire stories. Best of luck on your project.
__________________
TwoXentrix
"AWOL"
Twoxentrix is offline   Reply With Quote
Old 12-10-2018, 09:54 AM   #4
Senior Member
 
Join Date: Jul 2013
Posts: 103
Thanks gahamby and Twoxentrix for your comments, and I agree, I look forward to reaping the rewards next summer with a fresh poptop.
In keeping with the nature of this thread, I did the unthinkable yesterday!
Since it got up to a whopping 40 degrees I decided to rig up my softwalls outside, get out the garden hose (which had ice in it) and completely clean my canvas walls and windows.
I had no idea how I was going to do this before I started doing it. The rigging worked fantastic.


The walls are inside out so I can focus on the exterior all from the inside.
I started by using a hand broom to get all the loose dirt and debris.
Then I hosed it down and started to scrub with Oxyclean powder dissolved in warm water and a bristle brush. Most of the online recommendations I saw were to use non detergent dish soap.
This gave me a good opportunity to do an overall evaluation of the softwalls condition.
There was some goo, along the bottom edge (shown at top), maybe from sitting in its own butyl rubber. I tried covering the old butyl with tape as Boywonder had done but it was to late, the tape wouldnt stick. I also found this spot on the seam that had some waxy orange substance. I found that "Goo Gone" and a small tooth brush was great for removing this and the areas of butyl. You can maybe see the swirl marks in it (pic2), saturate, scrub, wipe with towel, repeat.


One of the screens is cut/torn, one of the windows has a small hole and one is "rusted". I think the rust will come off and Im thinking I might just clear vinyl patch the hole.

Although since im considering replacing this panel (below), I might make some other alterations as well. This is the front lower, its heavily stained on the inside and the worst damage on the softwalls. I thought this was from leaving the top closed while wet but now I think it was from an actual leak, more on this later. There is also a bungee ring loop that is rotted/destroyed.
__________________
Pinnacle Campers LLC, Boise Idaho
https://pinnaclecampers.com/
Brian94ht is offline   Reply With Quote
Old 12-16-2018, 08:42 AM   #5
Senior Member
 
Join Date: Jul 2013
Posts: 103
Disassembly-
The top had flexible solar panels that were adhered with silicone. The panels had already been removed so I took off the silicone residue with a wire brush in an electric drill.

There were also some plugs in the large holes, like those rubber expansion stoppers, and duct tape covering holes. I think these holes were from the original solar (or a previous) panel. I also removed the Yakima roof rails, I was surprised they are plastic, and explains the stress cracks in the gelcoat. The plastic isnt very good at distributing the point loads of the feet. Extruded aluminum would be better, although maybe not at the ends like this.


The roof rails were attached with through bolts on the OSB plywood core strips, and they are outside of the canvas perimeter.
So I popped the top and braced it up. Both of the cross bars looked bent, and the driver side frame/track is bent.
Using the come along method (thanks larrie ?) I relieved the tension on the springs. The cable tensioner was just used as my hook. 3 easy steps!


Its literally 1970's garage door technology!
At this point I got inside the top to disassemble the headliner and drop the canvas.
Looking for the screws for the push blocks under the pull down handles.

The top side of the push block is water stained.

Above the push block is a piece of rough cut sheet metal that looks like the "cut out" of an opening of a van roof. On the sides are two strips of steel (left over from the frame/tracks fabrication) with plastic edge trim. These provide the glides that the bolts with teflon washers in the the crossbars slide on to keep the top centered left/right.

But the bolts in my front crossbars are missing. Check out the residue formed on the bottom of the steel plate from water pooling above and causing rust at the smaller hole.

....and the sweet "low slop" conduit clamp mounting on the cross bars. Maybe it needs this much play to make it fit and work correctly?

The rear was a similar setup. Except for the bolt/guides are in the cross bars. These bars slide so no conduit clamps here.

After looking at the top of the rear push block I think I know why the front bolt guides were missing. The rears interferred with the topside of the panel. Every time it opened and closed this bolt head was digging a trough or dado into the wood panel on both sides. It must have worked like shit since day one!

My headliner panels are stained and rotten in numerous places. As most have found the canvas is held up with the headliner so I pulled all the panels and removed the canvas.
I removed the vintage lighting, twisted together wires with electrical tape isnt my preference.

I also disassembled the frame. Looking down the bent cross bar below. This is the only direction mine are bent. They were just flexing the other direction from the weight of the top and went back to straight when the weight of the top was taken off.

The classic bent grade 8 bolts at the cross bars.

Scratches in the track from to long of bolt

Here is the bottom of both tracks in the same location. The ends of the sliding crossbars have hit/scratched here numerous times.

The bent frame rail. I clamped it to my table and pulled from the lower part of the table leg with the come along. Tweaked the flanges straight at the bend with a large crescent wrench.


Now that the top is turned over you can see the sheet ABS strips that were stapled in at the bearing points with the top up. The front ones are deformed from the weight.

I assume most Texas and West ribbed tops have a different configuration for attaching the tops to the crossbars. Those tops have 12 throughbolts where this top only has 3, only at the hold downs. Less to leak!

Can anyone point me to a gallery that has pics of pop top disassembly, top/crossbar fastening details, and more importantly details of the interior upholstery covering the springs, tracks and edges of the opening?
__________________
Pinnacle Campers LLC, Boise Idaho
https://pinnaclecampers.com/
Brian94ht is offline   Reply With Quote
Old 12-16-2018, 09:31 AM   #6
Senior Member
 
gahamby's Avatar
 
Join Date: Sep 2017
Location: VIRGINIA
Posts: 633
Garage
http://www.sportsmobileforum.com/for...tml#post241783

If you aren't following this one already, check it out.
__________________
'07 GMC 2500 6.0
gahamby is offline   Reply With Quote
Old 12-17-2018, 04:37 PM   #7
Senior Member
 
Join Date: Jul 2013
Posts: 103
Quote:
Originally Posted by gahamby View Post
http://www.sportsmobileforum.com/for...tml#post241783

If you aren't following this one already, check it out.
I am following that one, thanks!
__________________
Pinnacle Campers LLC, Boise Idaho
https://pinnaclecampers.com/
Brian94ht is offline   Reply With Quote
Old 12-18-2018, 04:34 AM   #8
Senior Member
 
marret's Avatar
 
Join Date: Nov 2016
Location: FL and VA
Posts: 1,951
Garage
Wow. Well done. Very interesting. Thanks for posting.
__________________
Chris
2008 GMC 3500 Quigley Weldtec 4x4 Savana SMB
marret is offline   Reply With Quote
Old 12-18-2018, 09:43 AM   #9
Site Team
 
BroncoHauler's Avatar
 
Join Date: May 2007
Location: Southern New Mexico
Posts: 10,178
So many zombie penthouses being brought back to life. I love it and it really shows the skills and dedication of the owners.


Herb
__________________
SMB-less as of 02/04/2012. Our savings account is richer, but our adventures are poorer.
BroncoHauler is offline   Reply With Quote
Old 12-18-2018, 12:00 PM   #10
Member
 
michal740's Avatar
 
Join Date: Jul 2018
Location: Albuquerque,NM
Posts: 47
Quote:
Originally Posted by Brian94ht View Post
I am following that one, thanks!
Good luck with the rebuild. Let me know if you need any info.
__________________
2001 E350,Denver fleet 4x4,5.4V8
michal740 is offline   Reply With Quote
Reply

Thread Tools
Display Modes

Posting Rules
You may not post new threads
You may not post replies
You may not post attachments
You may not edit your posts

BB code is On
Smilies are On
[IMG] code is On
HTML code is Off
Trackbacks are Off
Pingbacks are Off
Refbacks are Off

» Featured Campgrounds

Reviews provided by

Powered by vBadvanced CMPS v3.2.3
Disclaimer:

This website is not affiliated with or endorsed by Sportsmobile SIP or any of its affiliates. This is an independent, unofficial site.


All times are GMT -6. The time now is 08:01 AM.


Powered by vBulletin® Version 3.8.8 Beta 4
Copyright ©2000 - 2024, vBulletin Solutions, Inc.