Journey with Confidence RV GPS App RV Trip Planner RV LIFE Campground Reviews RV Maintenance Take a Speed Test Free 7 Day Trial ×


Reply
 
Thread Tools Display Modes
 
Old 03-04-2018, 04:07 PM   #21
Senior Member
 
TomsBeast's Avatar
 
Join Date: Nov 2012
Location: Brentwood, CA
Posts: 1,051
Quote:
Originally Posted by ShuttlePilot View Post
...One thing I noticed when I manipulated the Sulastic through the full range of motion with a jack is that the elastmer is progressive not linear. When driving I didn't feel any banging or thump of it hitting a bump stop.

- Eric
Hmmm... From watching the video, I would think you'd need it to be 'off the stop' to get any benefit. I would expect the shackle to just be passive after it bottoms out, no worse than what you had before.

__________________
1995 E350 7.3 Diesel, 4x4 high roof camper, UJOR 4" lift
TomsBeast is offline   Reply With Quote
Old 03-04-2018, 05:14 PM   #22
Senior Member
 
carringb's Avatar
 
Join Date: Jan 2009
Location: Corvallis, OR
Posts: 5,300
FWIW - When you reach the travel limiter on the Sulastic, you don't feel that, it just feels like you're riding on OEM shackles.
__________________
2000 E450 dually V10 wagon
carringb is offline   Reply With Quote
Old 03-05-2018, 12:43 PM   #23
Senior Member
 
ShuttlePilot's Avatar
 
Join Date: Aug 2012
Posts: 633
Thanks for the interest in using sulastics on the front. I'm getting questions on fitment so I'll try to cover how I went about installing the Sulastic shackles on the front. This isn't necessarily the only way to do this it's just the way I did it and some of it was based on changes I made prior to considering these. A further disclaimer is that Sulastic designed these for a 1998-04 Ford F350 pickup truck. These are the only Shackle Sulastic offers for a front Axle aside from a weird 5" lifted version. You get the idea by now that these weren't a direct bolt in for me.

This is the Sulastic Link. (Corrected link and part I installed)
http://sulastic.com/truck-shackle-suspension-sc-15

Here is the specs on my particular van. I don't know how much difference there is in SMBs over the years so if your going to do this your van may be different.

- 2005 Ford E350
- SMB installed 4x4 in 2006 with Dynatrack Axle
- Deaver Springs installed in 2010
- Replaced Deaver Springs Eye bushings with Energy Suspension Urethane Bushings two years ago. Here is a post about that #15
http://www.sportsmobileforum.com/for...n-19108-2.html
- Agile Off Road tuned Fox Shocks custom length for Deavers
- 2* Caster Shims bolted into the spring pack (this will be an issue and discussed later


So on the bench here is a comparison of what is SMB and Sulastic. The immediate visible differences are that the Bolt, Sleeve diameters are different and the Sulastic is 2" longer bolt to bolt in the uncompressed position. So my first concerns were these:

- The SMB shackle bolts are smaller. This was an issue when I was converting the spring bushings to Urethane. The 5/8" bolt/sleeve combo is the easily obtainable 2000 era F350 parts size. The smaller SMB used are, lets say confusing.
- Will the 1-2" longer shackle increase my pinon/ Ujoint Joint angle to far. Causing vibration or worse. (remember those 2*caster shims I mentioned)
- How much increase in caster angle will this cause. This is desireable but will it be to much with the shims or not enough without them. (I'm already thinking at this point of removing them)
- Will the increase of ride height be to much and noticeable.
- Will the weight difference between an SMB and an F350 be close enough not to just bottom out the elestomer of the Sulastic or not move it at all.
- Dose the spring rate of the Sulastic (it is a elastomer spring, with pre-load) and the spring rate of the Deavers work together well.


Wile E. Coyote blue print. This is the necessary dimensions of Bushings I will need to come up with for the Sulastics to work for me.

I have an array of bushings and sleeves from my previous spring upgrade to chose from but none of them are the necessary inside diameter and outside diameter on the same bushing. So I bought another set from Energy and went about modifying bushings to work. I could have turned down a bushing with the correct inside diameter on a lathe but I don't have a lathe. So, I went the more dicey route of drilling out bushings that had the correct outside diameter. With some experimenting I found this particular 7/8 wood bit would cut a straight hole without gouging. The crude fixture was needed and after a few I was able to get this job done pretty easily.


And a finished set of bushings. Note the washer on the right. Sulastic makes the shackle slightly larger to accommodate differences in width. The included washers are needed to make up this difference. In my case 1 is needed. I'm glad to have accomplished this conversion of bushings as I now am the same bolt/sleeve size as the 2000's era F350. At this point if the Sulastic went horribly bad my contingency plan is to install the F350 Shackles. So at this point it's a matter of bolting them in.

This is good place to stop but there is more. Part two will cover; the revenge of the caster shims, were my concerns accurate, and final driving impressions. Thanks again for the interest.
- Eric
__________________
2005 SMB RB 4x4 6.0 PSD
A rocket on the pad is safe,
but it's not what rockets are built for.
ShuttlePilot is offline   Reply With Quote
Old 03-05-2018, 01:03 PM   #24
Senior Member
 
ShuttlePilot's Avatar
 
Join Date: Aug 2012
Posts: 633
Had to fix the post. If you saw it with the two pictures the same it's now fixed.
__________________
2005 SMB RB 4x4 6.0 PSD
A rocket on the pad is safe,
but it's not what rockets are built for.
ShuttlePilot is offline   Reply With Quote
Old 03-05-2018, 01:09 PM   #25
Senior Member
 
arctictraveller's Avatar
 
Join Date: Mar 2013
Posts: 4,244
..............
__________________
Arctic Traveller
KC6TNI
2001 GTRV
Advanced 4wd
Agile Ride improvement package
arctictraveller is offline   Reply With Quote
Old 03-05-2018, 02:30 PM   #26
Senior Member
 
TomsBeast's Avatar
 
Join Date: Nov 2012
Location: Brentwood, CA
Posts: 1,051
What a fantastic thread!
__________________
1995 E350 7.3 Diesel, 4x4 high roof camper, UJOR 4" lift
TomsBeast is offline   Reply With Quote
Old 03-10-2018, 10:55 AM   #27
Senior Member
 
ShuttlePilot's Avatar
 
Join Date: Aug 2012
Posts: 633
So with part 2 we'll pick up with what am I hoping for with these. I've done a lot of upgrades to the suspension since owning the van in Deaver springs, Agile shocks, ball joints, new bushings etc. After all that the areas that I've still felt there could be improvement is steering wander on the highway (too twitchy), hitting the bump stops a lot off highway (too little up travel), and though the suspension is more compliant there is still a lot of harshness transmitted into the cab.

The goal to try the sulastic is mainly a solution to that last part of harshness. I'll elaborate on the before Sulastic behavior here. The sensation from the front seat was two fold. A hard repeated shuddering when on a road that is slightly torn up, a washboard dirt road would be the extreme example. And, a punch you in the kidneys hit when going over a single large bump or drop hitting the bump stop. I've ridden in my friends mostly stock 2000 F350 4x4 with solid front axle/lief spring like mine in the same conditions and there is a similarity to the ride quality but no where as extreme as my van. I realize these are different vehicles but not as different as a Toyota Tacoma and the van.


About a year ago in an attempt to address the wander/twitchy highway driving I installed 2 degree caster shims. (see above) This was a bit of a chore to do in the driveway as you must drop the front axle and carefully unbolt the lief springs to install the shims. Bolt everything back together as accurate as possible because this will effect steering and unlike a multi-link coil-over suspension I can't just turn a wrench to align everything after the fact. This improved the straight line steering immensely except that I must have reassembled crooked as the van then pulled to the right. I worked over everything several times by unbolting and repositioning with a hammer after that and got it better, but never was quite right.


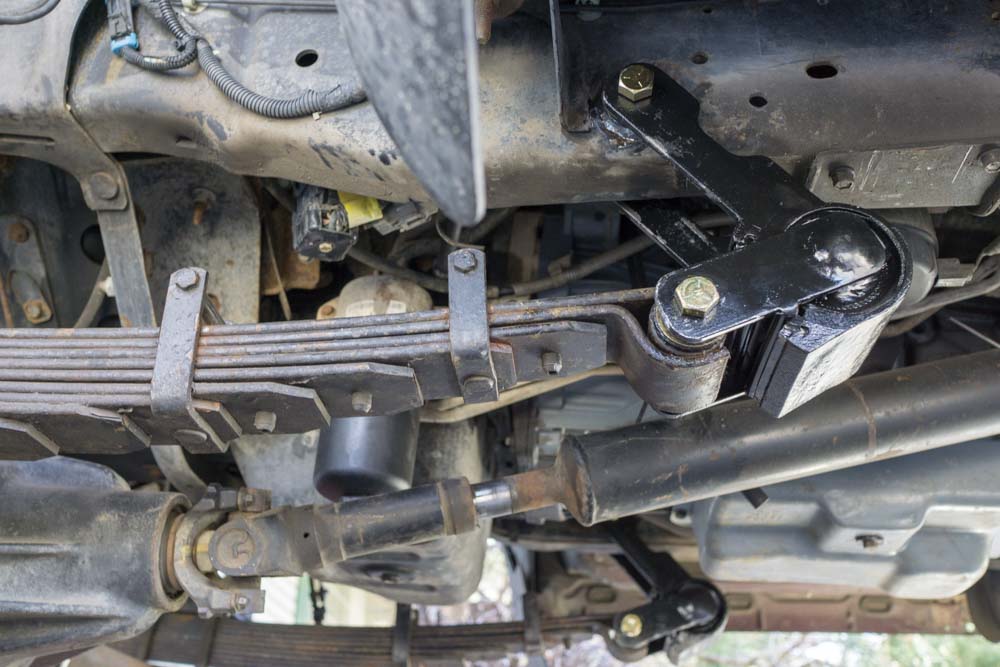
Ok, that's the back story. At this point I have the Sulastic Shackles on, remember they are two inches longer, with the shims still in, and going for a test drive. The picture above shows how the caster angle is getting pretty steep. At full axle droop I'm seeing a tiny bit of splines at the slip yoke. The first drive was very promising with ride quality but the front shaft is starting to vibrate a lot (hubs locked but not in 4x4 at transfer case), the steering clearly has too much caster, the pull to the right is back, and I now have my answer. Must remove shims and try to straighten out the alignment of the springs.


After a day or two of taking the entire front end apart, removing the caster shims and spending a quality amount of time measuring the alignment of the springs. I discovered I was off by 3/16" when I installed the shims a year before. One axle perch was 3/16" further forward. So when resembling without the shims, hoping for the last time, I made sure to be dead equal, left and right.

In the above picture you can see no shim and the 1" (ish) increase in right height, now 3 1/2" up travel, the Sulastic provided. I like this . The reduction in caster angle made a decent amount of improvement in pinion angle, more than I realized. All looked real good at this point. On the first drive I knew this was the best set up, best it's ever been. However there was still a wicked ujoint vibration in the steering wheel. Took the front shaft the the local re builder (AKA the bearded man yoda of driveshafts) who replaced the lower Ujoint and said,"the balance of that end of the shaft is horrible". After balancing and reinstall not a hint of vibration.


This is where I'm at for now. The Sulastic shackle project improved the three areas I was looking for. The big one was what they advertise in ride quality over "washboard like" conditions. The other benefits of gaining an inch of ride height to the bump stops and hitting a sweet spot of caster angle weren't planned but worked out. Forcing me to correct my spring misalignment was also a good thing. Now my only concern is will the Sulastic shackles hold up over time. My backup plan was to just install the F350 shackles. Now I think a 6.5-7" shackle would be the sweet spot for alignment. I could probably make some up if needed.

So here is the fun part. I have ideas as to how these are working but I was hoping to find more info on the internet of them in real world conditions. In the spirit of Wernher Von Braun who said, "one live test is worth a thousand expert opinions". I rigged up a way to mount my rear dash cam under the van to capture what I was looking to see. Just a head up, this is an industrial documentation video not a #VanLife with pretty people type of video.


So with that I will stop here. Part three will be my theories of how this is all working and a review of what it's like after diving in more conditions.

- Eric
__________________
2005 SMB RB 4x4 6.0 PSD
A rocket on the pad is safe,
but it's not what rockets are built for.
ShuttlePilot is offline   Reply With Quote
Old 03-10-2018, 01:25 PM   #28
Senior Member
 
Twoxentrix's Avatar
 
Join Date: Mar 2015
Location: Maryland
Posts: 3,382
Garage
Appreciate you taking the time to share this presentation - well done & educational. Looking forward to the final chapter, your real life experience with these will impact my decision to pursue...or not.
__________________
TwoXentrix
"AWOL"
Twoxentrix is offline   Reply With Quote
Old 03-10-2018, 10:48 PM   #29
Senior Member
 
TomsBeast's Avatar
 
Join Date: Nov 2012
Location: Brentwood, CA
Posts: 1,051
Nice work, great documentation, That 'suspension cam' footage really shows the details of what's going on under there, what a great tool!

Congratulations on fixing the annoying front driveshaft vibrations. It's been my experience that many modified driveshafts are done by 'hacks', Gaunt's Machine Works in Concord, CA is a first-hand example of what I speak

The video seems to show the smaller jiggles and bumps being soaked up by the torsional compliance in your new shackles.

It seems to show that every time the spring pack moves (but doesn't flex) the knee action in the sulastic shackle 'gives', and soaks up the movement, that would otherwise be transmitted to the frame (if you had a the conventional shackle in place). Is that what you see, too?

That one big dip hit hard (where you slo-mo'ed), it looks to me like the sulastic shackle's bottomed out at max travel, then the leaf pack took over and flexed, until the suspension ran out of travel and it clobbered the Ford bump stop.

When you slowed down the vid, it was very interesting to watch the sequence of events, first the shackle goes through all it knee action range of motion and bottoms out against it's built in hard stop (as designed), then the leaf spring pack moves or arches (as it should), the shackle and leafs acting together as a two-stage spring system. Then the hit of the bump rubber stop, the harsher third stage, all in slo-mo.

Before I redid my front suspension, mine too would hit the ford bumps. But I htink I have less of a lift than your van. After adding more crossmember clearance, relocating the power steering cooler, relocating the front axle's vent fitting, adding new taller and softer/gradual urethane bumpstops, mine now has more uptravel and a gentler 'hit' of the bump stops. I noticed a marked improvement, hitting the bumpstops isn't harsh at all now, on mine.

The big question is this "how did the ride feel from the driver's seat? Improved?" Less harsh I'll bet, especially the high frequency bumps.
__________________
1995 E350 7.3 Diesel, 4x4 high roof camper, UJOR 4" lift
TomsBeast is offline   Reply With Quote
Old 03-11-2018, 09:37 AM   #30
Senior Member
 
pjpvi's Avatar
 
Join Date: Apr 2007
Location: SF Bay Area, CA
Posts: 1,289
Great work and thanks for sharing. Now I want to see a video on Death Valley washboard roads! That's the true test for me ...
__________________
Phil

- 2005 EB50 6.0PSD - SMB 4x4
pjpvi is offline   Reply With Quote
Reply


Posting Rules
You may not post new threads
You may not post replies
You may not post attachments
You may not edit your posts

BB code is On
Smilies are On
[IMG] code is On
HTML code is Off
Trackbacks are Off
Pingbacks are Off
Refbacks are Off

» Featured Campgrounds

Reviews provided by

Powered by vBadvanced CMPS v3.2.3
Disclaimer:

This website is not affiliated with or endorsed by Sportsmobile SIP or any of its affiliates. This is an independent, unofficial site.


All times are GMT -6. The time now is 04:11 AM.


Powered by vBulletin® Version 3.8.8 Beta 4
Copyright ©2000 - 2024, vBulletin Solutions, Inc.