|
|
 05-31-2018, 08:27 AM
|
#31
|
|
Senior Member
Join Date: Jan 2011
Location: Reynoldsburg, Ohio
Posts: 3,774
|
Quote:
Originally Posted by shadetreevanman

Last night I ordered 6 tubes of SikaFlex 252 adhesive and a Milwaukee 12v caulking gun. Can’t be getting cramps from caulking the length of the van. This top was originally screwed down around the perimeter using an aluminum and vinyl strip to hide the screws. Some of the tops I see on the freeway don’t use those strips, which leads me to believe they are held on by adhesive only. I like the look of no screw strip better. In the VW Vanagon world they use the SikaFlex 252 without any screws. Any concerns? On this install I’ll be able to lay a bead to set the top on, then come back from the inside and make sure there’s a good amount of product tying the roof to the van. Anyone have any experience with this?
|
Being in the auto glass biz and setting/installing a lot of bonded windshields I live & die by my Milwaukee caulking guns. Love 'em so much I use one, have another for a back up and 12 more back at the house for even more back up!  (Old school Milwaukee, not the M12 M18 stuff in that tool.)
Most likely the tops you're seeing without the strip and screws have an under flange that gives a huge amount of contact area for adhesives. If your top doesn't have that feature you might be better advised looking for an alternative.
While the adhesive might be enough to hold the top on I myself like and would use some sort of mechanical fastening "just because......" Installed correctly you should be able to disguise or partially hide any mechanical fasteners. I'm with ya on appearance but don't let that be your main deciding factor when attaching your top.
You could create your own under flange (2" x 2" aluminum channel for example) attaching it to the top with screws. Before the top is finally secured in place the screws could be filled over with a fiberglass gel filler, sanded smooth and the top painted to match.
Just out of curiosty what's your plan for the existing rear heat & A/C system? I have a raised roof E350 which I've already removed that unit to be replaced with a heat-only system mounted in the raised roof above what will become the headliner.
|

|

|
|
05-31-2018, 08:30 AM
|
#32
|
|
Senior Member
Join Date: Jul 2011
Location: TN
Posts: 10,241
|
I kind of agree. It might hold fine but I wouldn't want to find out it doesn't the hard way.

|
|
|
|
|
05-31-2018, 03:13 PM
|
#33
|
|
Senior Member
Join Date: Jun 2017
Location: Riverside, CA
Posts: 385
|
I tend to agree but hate the crude vinyl insert strips available.
I am going to add bulkheads inside to box in my storage areas front and rear. Front bulkhead will be just behind front seats. Rear bulkhead will be somewhere above rear seat. What may be a good solution is to glass in brackets that would bolt the bulkheads to the top and then I could bracket the bulkhead to the remaining roof/crossmembers of the van. The bulkhead will provide some needed rigidity as well.
My buddy has added a high top to his van. As he plans to build a lifting mechanism for it, he glassed in brackets front and rear for latches and has an angle iron frame the perimeter of the opening he cut that the latches bolt to. The edges of the top has weatherstripping between body and high top. At 75 mph on the freeway his top doesn’t flutter or leak. We recently visited Yosemite with it raining there and all the way home. His interior stayed dry.
The bulkhead tie down I’m thinking of would be just as substantial as his method, with the added strength and sealing of the SikaFlex.
__________________
Tim Potts
2012 Chevrolet Express 3500 6.0
|
|
|
|
|
05-31-2018, 03:20 PM
|
#34
|
|
Senior Member
Join Date: Jun 2017
Location: Riverside, CA
Posts: 385
|
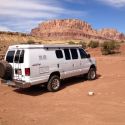
AC solution? I took this picture of the van I took the top off of. It had rear air too. Resolution isnt great, but hopefully it is useable. They built a plenum that ran along the old roofline with the original roof vents in it. They incorporated the old headliner to have a smooth transition from the windows and build a wooden box on top of it. It looked pretty good wrapped in trunk liner. I plan on doing something similar.
__________________
Tim Potts
2012 Chevrolet Express 3500 6.0
|
|
|
|
|
05-31-2018, 04:08 PM
|
#35
|
|
Senior Member
Join Date: Jan 2011
Location: Reynoldsburg, Ohio
Posts: 3,774
|
Since you won't be retaining the taller rear doors and its lintel are there any plans to add a "roll cage" similar to what should have been in place on the donor van? Even if we assume you'll keep the B & C pillars intact removing the middle roof ribs reduces body strength.
The A/C system in place now is factory original and functions very, very well--assuming its properly charged and coolant level at recommended level. The converter of my '05 re-used the original headliner with integral lighting and A/C venting. That headliner has a ductwork formed into the actual headliner, the vertical duct leading out of the top of the A/C & heater unit exhausting into that duct work and vents. You're correct that the heat found its way into the cabin at the floor though ducts and vents attached to the Club Wagon interior side panels.
The arrangement you show isn't horrible---the side draft air flow would work adequately since cold air "sinks". The factory headliner produces a downward air flow which initially seems a bit more efficient but I don't think the side draft is less effective in cooling.
I have a few photos that might help show how my headliner was used right down to the unique and clever way used to utilize factory clips and such holding it up. Their solution allows somewhat easy removal, very much like encountered on a production E-Series. For images of the roll cage-like upper support structure DOT requires for a raised roof van check here: https://imgur.com/a/kbyVF
I don't want to bore you with details or my opinions but please ask any questions you may have.
|
|
|
|
|
05-31-2018, 11:48 PM
|
#36
|
|
Senior Member
Join Date: Jun 2017
Location: Riverside, CA
Posts: 385
|
Quote:
Originally Posted by JWA
Since you won't be retaining the taller rear doors and its lintel are there any plans to add a "roll cage" similar to what should have been in place on the donor van? ...
|
In regards to the strength around the rear doors, I would wager the stock door lintel is way stronger than the tall door lintel from the donor van. The tall door lintel is a 2" piece of sheet metal folded a couple of times, (seen in picture attached), with no surrounding sheet metal. I could have bent it over with my hand. The stock rear roof of my van will stay intact above and about 36" forward of the rear doors.
Interesting thoughts on the rollcage. I appreciate your challenge to my own thoughts. But at this time I have no plans to add one. Let me walk through the thoughts behind my decision.
The donor van, which I would think was modified by a professional upfitter, did not have a roll cage. Nor do any of the many high tops I've crawled in and around over the years. I recently met a local to me E350 owner who has just recently had Fiberine install his new 24" high top, no roll cage on that one either.
I would think a pop top van would require a roll cage before a fixed high top would. There is some inherent strength in the glue/screw method of a fixed roof that just can't be replicated with a pop top secured by 4-6 single point latches.
I think my buddies method of a 2" x 2" angle iron frame welded into the shape of the cut opening and bolted to every crossmember it passes regains a little of the strength lost by cutting the hole in the first place.
In my case I'm cutting a smaller hole than a PH Sportsmobile, or the typical high top, or even my buddies van, as my roof will stay intact above the rear bed area. I have no need for an upper bed so that sheetmetal will remain unmolested. In my van all the upper areas will be storage only, with the bulkheads mentioned in an earlier post adding additional strength. My retrofit will undoubtedly be stronger than any of the high tops I've seen professional upfitters install.
As seen in the second photo, the donor van upfitter did not strengthen the cutout opening at all. Look at the amount of roof left and with the tall door option, that's a pathetic amount of metal from the front seats back. My van will not be cut anywhere near as invasive as that.
I find it odd, the donor van's tall door option looked factory. Meaning full metal doors, lintel nicely tied into factory roof, paint looked factory. But there's no strengthening added for all the metal removed. Somebody put a lot of faith in the strength of the fiberglass roof.
Quote:
Originally Posted by JWA
...the side draft air flow would work adequately since cold air "sinks". The factory headliner produces a downward air flow which initially seems a bit more efficient but I don't think the side draft is less effective in cooling.
|
Yeah, I agree with you the outlets are not in an optimum position if I copy the donor van side plenum. What I do like is its a clean and simple design. I think I can help the design out by turning a few of the outlets to blow upwards into the high roof area to help move that warmer air and mix it.
__________________
Tim Potts
2012 Chevrolet Express 3500 6.0
|
|
|
|
|
06-01-2018, 03:30 AM
|
#37
|
|
Senior Member
Join Date: Jan 2011
Location: Reynoldsburg, Ohio
Posts: 3,774
|
Quote:
Originally Posted by shadetreevanman
In regards to the strength around the rear doors, I would wager the stock door lintel is way stronger than the tall door lintel from the donor van.
I find it odd, the donor van's tall door option looked factory. Meaning full metal doors, lintel nicely tied into factory roof, paint looked factory. But there's no strengthening added for all the metal removed. Somebody put a lot of faith in the strength of the fiberglass roof.
|
You're 100% correct in the stock C Pillar and lintel being much stronger than the taller door option. Its odd your experience with the raised fiberglass roof addition hasn't seen more of the upper roll cages---all along I've thought those were a DOT requirement.
I have a 2000 E250 regular body with raised roof and tall doors, lintel being exactly as you describe. When new-to-me it had the roll cage in place but like a fool I removed it not considering how important it is. If I park on an uneven spot the rear doors slightly rack, enough that they won't open.
I'll look forward to your finished roof install----that extra height inside is soo worth the effort. 
Quote:
Originally Posted by shadetreevanman
Yeah, I agree with you the outlets are not in an optimum position if I copy the donor van side plenum. What I do like is its a clean and simple design. I think I can help the design out by turning a few of the outlets to blow upwards into the high roof area to help move that warmer air and mix it.
|
I'll also be looking forward to your solution on air flow. I wish I could go with a clean and simple design but am far, far too anal.  I applaud your approach to all this.
The heater installation and ducting has been tried once before with good success on that 2000 E250---plenty of heat from full-on downward firing roof vents. Along with increased insulation and a coolant booster pump the factory air temps of 110* at the vents should be easy to maintain.
Thanks for sharing ShadeTree!
|
|
|
|
|
06-01-2018, 09:27 AM
|
#38
|
|
Senior Member
Join Date: Jun 2017
Location: Riverside, CA
Posts: 385
|
Thanks JWA, you have helped with your comments. You've reminded me that overall strength and safety trumps aesthetics. You've convinced me to glue and screw the top on, aesthetics be damned!
When I'm planning a project, I'm constantly searching for and evaluating how others achieved their goals. And why they made the choices they did. I'm reminded of the homebuilt camper I saw that had interior cabinets made of 3/4" plywood, but they built it over a 2"x4" skeleton, which severely cut into his storage, and didn't look very elegant. While it was assuredly stronger built that way, it looked overbuilt.
Or my roof donor van that had all the AC Plenum and other trim out pieces built out of MDF. MDF doesn't retain its integrity in moisture and/or vibration rich environments and crumbled as I went to remove it. Seems like a lot of effort expended for a product that wouldn't last. The cost difference, MDF vs what I'm using, finish grade Maple plywood, is initially minimal.
To your comments regarding the AC/Heat vents. The factory rear AC/Heater utilized the roof vents for AC and the floor vents for Heat. Both sets of vents will be relocated into the drivers wall, but the Heater vents are located just above the rear wheelwell in front of the rear seat, (pic in earlier post) and the AC vents will be in the new plenum built along the original roof line (pic of donor van in earlier post). Perhaps I misread your comment? Or were you writing about those lower Heat vents all along?
We're leaving tonight for a weekend of camping. Anyone visiting this weekends Temecula Balloon and Wine Festival swing by the campsites and look me up. I'll have the beer iced down.
Each time we have camped in this van we sorely miss having the height our old pop top VW van provided. Now, knowing the solution is sitting in our back yard, it'll probably be worse. 
Thanks again for following along.
__________________
Tim Potts
2012 Chevrolet Express 3500 6.0
|
|
|
|
|
06-01-2018, 10:45 AM
|
#39
|
|
Senior Member
Join Date: Jun 2017
Location: Riverside, CA
Posts: 385
|
Fleabagmatt has messaged me regarding further details of my original bed platform. In messages it doesn't look like I can post pictures unless I use an offsite host. I'll just insert the pics here so Matt can see them.
The front storage was for shoes, clothes, etc, while the back storage held our table, rug, chairs etc. If I was building it again I would raise the bed platform height from this 12" to 15". I wanted to make sure I had room to sit up in bed. Turns out I wasted some valuable storage space and still could have sat up.
Back to our regularly scheduled programming... the MaxxFan just arrived. Can fans be considered sexy? I love a good design. It makes me want to cancel my camping trip and get to work.
__________________
Tim Potts
2012 Chevrolet Express 3500 6.0
|
|
|
|
|
06-17-2018, 10:14 PM
|
#40
|
|
Senior Member
Join Date: May 2014
Location: Scottsdale, AZ
Posts: 225
|
Quote:
Originally Posted by shadetreevanman
My first project was to put a 2 suspension lift on it
Also from the Vanagon I pulled the 10' awning with LED lighting.
|
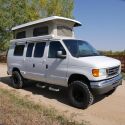
About to go down the same road of an "enhanced 2wd" van. Can I ask what you did specifically for suspension?
Also, whats the awning/light combo? Looks super cool and functional!
|
|
|
|
|
|
 Posting Rules
|
You may not post new threads
You may not post replies
You may not post attachments
You may not edit your posts
HTML code is Off
|
|
|
|
 » Recent Threads
 |
|
|
|
|
|
|
|
|
|
|
|
|
|
|
|
|
|
|
|
|
|
|
|
|
|
|
|
|
|
|
|
|
|


 Linear Mode