|
|
 07-05-2018, 11:07 AM
|
#51
|
|
Senior Member
Join Date: Dec 2014
Location: Riverside Ca.
Posts: 740
|
Quote:
Originally Posted by BigRed4x4

How much do they want to the 18" tops? Where can they be picked up?
|
I am going to Sacramento in mid August for work, If I can get one in my luggage bag I will bring one up! 
No if you want one, I can bring one out half way for fuel cost!
Actually if your serious I can bring one I will just opt out of my flight but you will have to pick up the cost of fuel about $200.00 round trip bringing the price to $800.00 including Jerry Brown tax fuel ransome!
|

|

|
|
07-05-2018, 10:41 PM
|
#52
|
|
Senior Member
Join Date: Jun 2017
Location: Riverside, CA
Posts: 385
|
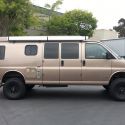
Heres a picture of the EB top my buddy Casey bought from Vanimal. The RB tops look to be the same profile.
__________________
Tim Potts
2012 Chevrolet Express 3500 6.0
|
|
|
|
|
07-06-2018, 09:21 AM
|
#53
|
|
Senior Member
Join Date: Dec 2014
Location: Riverside Ca.
Posts: 740
|
Thanks Shadetree for the pic! I have your hinges, please give me awhile as I have alot of projects. Not just van or Scout or jeep. Wife wants the 4th bathroom finished in the rec room so the world comes to a screeching halt! If I can hold them till you want/need them back they are on top of my roll away and will not get lost!
|
|
|
|
|
07-30-2018, 11:52 PM
|
#54
|
|
Senior Member
Join Date: Mar 2013
Posts: 105
|
I did the same thing that you are attempting to do with that top you picked up. I glassed in the rear high door cut out with fiberglass over a piece of 3/4" plywood that I installed inside for backing and strength. I had to add another piece of ply on the outside to get things to flush up. Super strong when I was completed with the fiberglass. For fiberglass I used 3 layers of 6 oz. cloth and a two part epoxy resin. It is much better to work with than polyurethane as it does not smell at all and it cures well in the sun. You need to really rough up the gel coat to get a good bond to it when blending in the fiberglass.
As far as installing the top I just used sika flex as you were planning to do. I installed the top a year ago and drive 40 miles round trip each day to work. No problems. I am also installing bulkheads and upper cabinets that will be attached to the fiberglass top using polyurethane construction adhesive PL 400. It will be glued to the top and to the shelves base that are bolted to the original van roof. If you want pics I can post some as I am in the middle of the project now and things are exposed.
__________________
2006 RB E250 Ford High top, Diesel 6.0 Bullet Proofed (ouch $) 4" Camburg Eng. Lift, Method Wheels, 33" Toyo AT, RB50 interior (homebuilt)
|
|
|
|
|
07-31-2018, 06:50 PM
|
#55
|
|
Senior Member
Join Date: Jun 2017
Location: Riverside, CA
Posts: 385
|
Thanks for sharing your experience. In the Vanagon world, their high tops dont have flanges and are glued down too. I think the bulkheads will add a great deal of holding strength.
Unfortunately, between many family obligations and this heat SoCal is experiencing, I havent got a lot done. Heres a progress picture. Still need to flip it over and add glass on the backside, finish the solar mounts, and get the glassed in areas ready for paint. Im kicking around painting the solar frame and mounts with black bedliner so at first glance it will look like a roof rack, instead of the aluminum it is now.
The deadline for our next camping trip is over a month away but I need to get this top ready to mount... ahh, summertime projects are fun.
__________________
Tim Potts
2012 Chevrolet Express 3500 6.0
|
|
|
|
|
07-31-2018, 07:53 PM
|
#56
|
|
Senior Member
Join Date: Mar 2013
Posts: 105
|
Pics of my ongoing install of the interior reinforcement and insulation.
I added 3/4 plywood below the fiberglass cross bracing on my top. I plan to carry some heavier items on the rack so I thought I would give the roof some more support.
I’m using 1/2” foam insulation between the plywood gussets everywhere to help with heat and sound. That’s what the shiny foil is in the pics.
I think if you vulkum caulk the bulkheads that there is some “give” when it’s loaded or flexing. That stuff dries like super strong but still flexes.
My fiberglass job in the back of the shell/top isn’t finished yet. Make sure you overlap the edges of the cutout area. Otherwise it will crack through there at the seam/edge.
My personal feeling is that the screws holding down the top are not necessary. I doesn’t seem likely that the body and top could flex or distort enough to tear the polyurethane Vulcum caulking in normal (or off road) driving conditions. If you roll the van in a crash it could rip the top off...but you have bigger problems in that situation than the top. Just my 2 cents...take it for what it’s worth.
__________________
2006 RB E250 Ford High top, Diesel 6.0 Bullet Proofed (ouch $) 4" Camburg Eng. Lift, Method Wheels, 33" Toyo AT, RB50 interior (homebuilt)
|
|
|
|
|
10-27-2018, 05:50 PM
|
#57
|
|
Senior Member
Join Date: Oct 2018
Location: Richmond VA
Posts: 317
|
You're Shadetreetim from Samba? I read your posts on there and just found this one. So this is where you vanished to!
We recently decided to move from on from our longtime camper Vanagon to something else and found a highroof Dodge that we'll be building out. Just looking around for inspiration. Keep up the good work.
|
|
|
|
|
12-09-2018, 11:23 PM
|
#58
|
|
Senior Member
Join Date: Jun 2017
Location: Riverside, CA
Posts: 385
|
Hey Campism, yes you found me... Sorry it's taken so long to reply, I haven't revisited this thread in a while as I haven't had anything to report. Looks like you have a good project there too.
Our lives have been busy, some of it using the van to camp in and the past two weekends to pull a trailer in community parades. Fun stuff. But I also set a deadline for myself to install the top onto the van on the 22nd. A deadline helps me prioritize my time, and on the 22nd my buddies plan on working on their vans, so it made sense to use that same day when they'll be around to help.
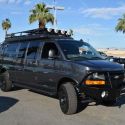
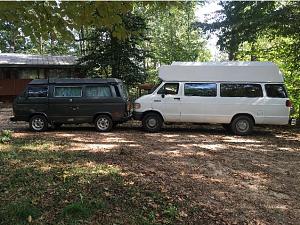
As evidenced by the picture of the vans at Lake Havasu this Thanksgiving, I have the only van in my group without a hightop. The white hightop is the top Vanimal sold.
As we get closer I've picked up a few LED lights to add to the top.The interior will get LED puck lights throughout, with the wiring ran between the inner and outer shells. Wiring for the vent fan is ran as well. I've purchased a fuse block to put behind one of the bulkheads in the hightop. Instead of running multiple circuits down to the fuseblock in the cabinet by the door, I'll run one set of cables to feed the new fuseblock.
The roof is nearly ready to paint. A little more sanding and we'll be ready.
__________________
Tim Potts
2012 Chevrolet Express 3500 6.0
|
|
|
|
|
12-24-2018, 12:13 PM
|
#59
|
|
Senior Member
Join Date: Jun 2017
Location: Riverside, CA
Posts: 385
|
The past two weeks have been a flurry of activity. I've battled the flu and tried to get the top ready for install this Saturday. Because the Vanagon peeps use it on their Pop Tops with good success, I used Interlux Brightside Polyurthane Paint on the high top using the roll and tip method. Roll and tip refers to the fact you roll on the paint and lightly drag a dry brush across it to eliminate the bubbles. Watching many YouTube videos the results looked great. My results were not quite as good. Initial mistake, for the first coat I used a full size foam roller. It was hard to get a consistent thin layer of paint with the compound curves and multiple brackets, etc on this top. As I was rolling and tipping it seemed as if it was going great. The problems started as it started to sag in the heavier applications. The top was fine, it flowed out glossy and smooth. On the sides though, the sags became too obvious. To compound the problem, this Polyurethane drys slowly, especially where it sagged. I waited a week to color sand and apply the next coat. In the thickest sagging areas, a week wasn't enough...
But I had a deadline I needed to make and I needed to get a better coat of paint on. This time I used a narrower foam roller and had better control of the amount of paint that went on. Results were much better but the results are just okay. Overall its shiny! Fortunately white paint has so much glare its hard to see the imperfections. It best described as good from far, but far from good.
But if I miss my deadline it will be a month before I can get help to put the top on, so we are going to live with it. I can always sand it down once its installed on the van and spray the sides in the future.
Moving inside I cut the headliner back using a multi tool.
__________________
Tim Potts
2012 Chevrolet Express 3500 6.0
|
|
|
|
|
12-24-2018, 12:19 PM
|
#60
|
|
Senior Member
Join Date: Jun 2017
Location: Riverside, CA
Posts: 385
|
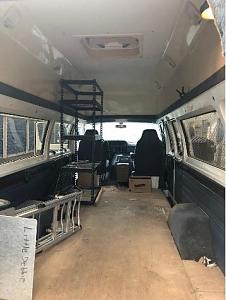
Early Sunday morning I hitched up the trailer and took off for my friends house. It didn't take long to lay out the cuts and use a nibbler to cut the sheet metal. At the cross members a jig saw made quick work of it. This is a big opening. Exciting times. The advantage of the nibbler, besides speed, is it makes very little mess. A few paint chips is all it left.
__________________
Tim Potts
2012 Chevrolet Express 3500 6.0
|
|
|
|
|
|
| Thread Tools |
|
|
| Display Modes |
 Linear Mode Linear Mode
|
 Posting Rules
|
You may not post new threads
You may not post replies
You may not post attachments
You may not edit your posts
HTML code is Off
|
|
|
|
 » Recent Threads
 |
|
|
|
|
|
|
|
|
|
|
|
|
|
|
|
|
|
|
|
|
|
|
|
|
|
|
|
|
|
|
|
|
|