|
|
 09-13-2015, 06:14 PM
|
#21
|
|
Junior Member
Join Date: Jun 2015
Posts: 29
|
Re: Womens Studio and Home on Wheels
Quote:
|
Originally Posted by boywonder
|
Thank you!
|

|

|
|
09-15-2015, 09:49 AM
|
#22
|
|
Junior Member
Join Date: Jun 2015
Posts: 29
|
Re: Womens Studio and Home on Wheels
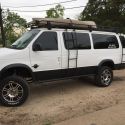
I cut my roof off, for the most part. I took a video of the whole process and eventually I will edit it and make into a sped up version of the whole roof process just for something cool to look back on, and maybe share it. unfortunately because I did video tape the whole process I didn't really take any pictures. But I have a few. First we drilled the holes in the corners just so we could tell where the corners of the frame were. Then I marked a giant square on top of the van using the holes as a guide. I did this with that chalk line stuff. This was wiped away almost entirely within 20 minutes of working and was of no use anyways. I used an air chisel to cut the roof. Which was really easy after I got the hang of it, unfortunately it took about a third of the roof to get the hang of it. So the last 2/3 of it were great. I cut almost the whole roof off. I left the whole section Above the drives and passenger section but other than that around the edges I left about 2 inches of actual top, which leaves the whole outer frame exposed. My brother really sucked at using the air chisel so it being Friday night, he left and went to go to a party, so I cut most the roof off by myself. I now spend my Friday nights alone, using power tools, what has my life come too? After cutting the rectangle around the roof the next day we went from underneath and cut the frame supports. These were very rough cuts, because it was a small space and awkward angle. To clean up all the edges tomorrow I will be using an angle grinder with a metal cutting blade. I cut it so close to the frame for two reasons. I wanted the frame exposed because its flat and I plan on bolting down boards to it in a rectangle around the whole open space, and also the metal roof strip that is still left around the outside is not big enough to cover the frame but big enough to be flattened and pounded down to meet the edge of the frame, sealing it off. I hope this all makes sense, Im not a words person and Im not good at explaining things. I had thought about leaving the back support beam across the back but my brother said I should just cut it out and build a flat wooden bean across and make a shelf and it would do the same thing. Here is a mediocre picture of the roof off so far.
Also, on the right side door with the butterfly painting I lined the rim around the window white. I painted (mostly) the back doors of the van light blue, the same color as the background of my mural. But the back doors are plain light blue and around the windows and such white trimmed. But this isn't completely done yet. For the butterflies on the right side door I just free hand drew on the van with pencil and painted over it, but as i wanted the left door to be a perfect mirror, I placed newsprint paper over it and tranced the butterfly Then i cut out a stencil of it, flipped it over and traced it back onto the left door. Then painted the black parts of the butterfly and filled in the color. Im pretty happy with how similar the shape is.
|
|
|
|
|
09-15-2015, 11:41 AM
|
#23
|
|
Senior Member
Join Date: Oct 2010
Location: Sacramento Delta, CA
Posts: 1,024
|
Re: Womens Studio and Home on Wheels
Brothers are great.
But marriage really raises your game.
At least I am less of a bum since my wife married me.
Just a word to the wise woman, if it weren't for women lowering their standards (at least within reason), none of us guys would be married.
Good job on your van. Don't give up. Remember, a focus on efficient and solid function in people and things will render a usuably beautiful form.
__________________
2002 E350 ext.; 160K; 7.3L; 4R100 (w/4x4 deep pan & filter); 4x4 conv. w/2007 F250/F350 coil frnt axle (oppos. dual Bilstein press. shocks cured DW) diff chg from 3.55 to 3.73 (bad!); BW1356 t.c. (bad!); LT265/70R17/E Michelin LTX M/S2; Engel MT60 Combi Fridge-Freezer; 4 BP 380J pv panels; Auragen 5kw AC gen. in top alt. position; Webasto Dual-Top; Voyager top. 1995 5.8L EB Bronco, bone stock.
|
|
|
|
|
09-15-2015, 01:06 PM
|
#24
|
|
Senior Member
Join Date: Nov 2012
Location: boise idaho
Posts: 2,625
|
Re: Womens Studio and Home on Wheels
Quote:
|
Originally Posted by E350
...if it weren't for women lowering their standards (at least within reason), none of us guys would be married.
|
^^^ aint that the truth??
i saw a saying the other day:
Quote:
|
the only really happy folk are married women and single men.
|
i aint buying it. i love being married. well at least 90% of the time anyway 
Quote:
|
Originally Posted by caroline5757
I now spend my Friday nights alone, using power tools, what has my life come too?
|
^^^ careful, saying things like that in the right place will get a line formed to ask you out...
congrats on having the courage to cut into your van like that. i am truly impressed. Your artwork looks great too!
__________________
"understeer is when you hit the wall with the front of your car, oversteer is when you hit the wall with the rear of your car, horsepower is how hard your car hits the wall, and torque is how far your car moves the wall."
|
|
|
|
|
09-15-2015, 05:45 PM
|
#25
|
|
Junior Member
Join Date: Jun 2015
Posts: 29
|
Re: Womens Studio and Home on Wheels
Hahaha e350 thanks for your encouragement! But I disagree with you and agree with Shenrie about your quote. Not all women want to be in a relationship or be married. I can promise you that! And thank you too shenrie! It was a little nerve racking at first cutting the whole roof off my van, because there really is nooo going back now, but I'm confident my design and planning for the roof will work out. And if not, I can take it all off and try again.
|
|
|
|
|
09-15-2015, 08:33 PM
|
#26
|
|
Senior Member
Join Date: Jul 2013
Location: So Cal
Posts: 4,070
|
Re: Womens Studio and Home on Wheels
Quote:
|
Originally Posted by caroline5757
I now spend my Friday nights alone, using power tools, what has my life come too?
|
It just doesn't get any better than that! 
seriously.......it's perhaps a good thing that you started at the B pillar for the roof cut, otherwise the van may become a bit too flexy.......the air chisel was my weapon of choice for the roof-ectomy on my van as well.
I ended up cutting a small sunroof sized hole first to warm up/practice with the chisel before going big.
__________________
2008 E350 RB passenger 4WD SMB penthouse
2013 KTM 350 EXC
2008 KTM 250 XCF-W
2003 Honda Element
|
|
|
|
|
09-16-2015, 09:11 AM
|
#27
|
|
Senior Member
Join Date: Sep 2009
Location: SE Washington
Posts: 1,028
|
Re: Womens Studio and Home on Wheels
This would be easier to read with some paragraph breaks.
Quote:
|
Originally Posted by caroline5757
I cut my roof off, for the most part. I took a video of the whole process and eventually I will edit it and make into a sped up version of the whole roof process just for something cool to look back on, and maybe share it. unfortunately because I did video tape the whole process I didn't really take any pictures. But I have a few. First we drilled the holes in the corners just so we could tell where the corners of the frame were. Then I marked a giant square on top of the van using the holes as a guide. I did this with that chalk line stuff. This was wiped away almost entirely within 20 minutes of working and was of no use anyways. I used an air chisel to cut the roof. Which was really easy after I got the hang of it, unfortunately it took about a third of the roof to get the hang of it. So the last 2/3 of it were great. I cut almost the whole roof off. I left the whole section Above the drives and passenger section but other than that around the edges I left about 2 inches of actual top, which leaves the whole outer frame exposed. My brother really sucked at using the air chisel so it being Friday night, he left and went to go to a party, so I cut most the roof off by myself. I now spend my Friday nights alone, using power tools, what has my life come too? After cutting the rectangle around the roof the next day we went from underneath and cut the frame supports. These were very rough cuts, because it was a small space and awkward angle. To clean up all the edges tomorrow I will be using an angle grinder with a metal cutting blade. I cut it so close to the frame for two reasons. I wanted the frame exposed because its flat and I plan on bolting down boards to it in a rectangle around the whole open space, and also the metal roof strip that is still left around the outside is not big enough to cover the frame but big enough to be flattened and pounded down to meet the edge of the frame, sealing it off. I hope this all makes sense, Im not a words person and Im not good at explaining things. I had thought about leaving the back support beam across the back but my brother said I should just cut it out and build a flat wooden bean across and make a shelf and it would do the same thing. Here is a mediocre picture of the roof off so far.
Also, on the right side door with the butterfly painting I lined the rim around the window white. I painted (mostly) the back doors of the van light blue, the same color as the background of my mural. But the back doors are plain light blue and around the windows and such white trimmed. But this isn't completely done yet. For the butterflies on the right side door I just free hand drew on the van with pencil and painted over it, but as i wanted the left door to be a perfect mirror, I placed newsprint paper over it and tranced the butterfly Then i cut out a stencil of it, flipped it over and traced it back onto the left door. Then painted the black parts of the butterfly and filled in the color. Im pretty happy with how similar the shape is.
|
__________________
---------------------
2009 E250 RB 5.4L "SilVan"
|
|
|
|
|
07-10-2016, 07:19 PM
|
#28
|
|
Junior Member
Join Date: Jun 2015
Posts: 29
|
So I took 7 months off from working on my van, because I got an opportunity to live on a 35 ft sail boat in the caribbean. I can now say I've lived in a very small space with nothing but the necessities.
But more importantly I've made some good progress on my van. I don't know how to put pictures into the post but ill try to attach them.
I bolted down board to the metal frame in a perfect square.
then I put up the back supports. Two 2x4s which are screwed and glued to the back piece of wood (which is bolted to the frame) and then the 2x4s them selves are bolted to the frame.
Then I put in the horizontal support beam that the back shelf and the vertical support rests on. Then I put the shelf on top of it, drilled a hole through a metal plate put it in between the shelf and board and bolted them together. The metal plate is screwed to the side wooden boards as shown in the pictures.
Then i put op the vertical support beams, you can see the top flat part that the frame will sit on. (The top frame is built). Despite the back boards being cut at all sorts of weird angles and bolted to the weirdly angled frame the flat cut that the frame will sit on is perrrrrfectly level. Maybe the most impressive part of it all, I've managed to maintain perfectly manicured nails while nannying for 3 kids and working on this project everyday 
Oh and on that note, bolting this all to the frame was easy for me because I have really long fingernails and very small hands so fitting my hands in the little holes in the frame was simple. If someone else (cough cough, a man) were to do this they would probably have to cut holes in the frame to get there hands inside to put the nut on and tighten it down. the roof will stand high enough for someone to very comfortably stand in (if your 5'4"). I think when its all said and done it should be 70.5"
The support beams look a little wonky in the last picture, but thats just the weird angle, I had to stand on my step stool to take it. The back part of the shelf still needs L brackets on the back 2x4s and needs to be screwed down to the back but its progress.
|
|
|
|
|
07-10-2016, 10:02 PM
|
#29
|
|
Senior Member
Join Date: Mar 2013
Posts: 4,244
|
Welcome back, Living on a boat is good practice for a minimalist life style. Looking forward to your progress.
__________________
Arctic Traveller
KC6TNI
2001 GTRV
Advanced 4wd
Agile Ride improvement package
|
|
|
|
|
07-17-2016, 10:37 PM
|
#30
|
|
Senior Member
Join Date: Feb 2016
Location: PDX
Posts: 118
|
As the brother of a similarly ambitious sister, im interested to see where this project goes 
Word to the wise when building that wood structure... use lots of glue! gorilla glue would be my choice. Glue EVERYTHING!
|
|
|
|
|
|
| Thread Tools |
|
|
| Display Modes |
 Linear Mode Linear Mode
|
 Posting Rules
|
You may not post new threads
You may not post replies
You may not post attachments
You may not edit your posts
HTML code is Off
|
|
|
|
 » Recent Threads
 |
|
|
|
|
|
|
|
|
|
|
|
|
|
|
|
|
|
|
|
|
|
|
|
|
|
|
|
|
|
|
|
|
|


 watchtower, white whale, land yacht, big pig...
 SilVan