|
|
 03-19-2017, 03:39 PM
|
#11
|
|
Member
Join Date: May 2016
Location: Texas
Posts: 53
|
7.3 Refresh
Like Hogasm said, use a 2" black ABS pipe cap and hose clampto plug off resonator hole. You can put a 4" exhaust on if you want but the most restriction will always be at turbo outlet. I went with very slightly modified factory intake (which is still better flow than other kits-and lower intake temps than kits and other mods), WW2, high flow outlet, delete pedestal,double wrapped bellowed up pipes, turbo blanket, straight pipe to Walker BTM straight thru muffler($60). There's NO proven benefit to the fuel banjo bolts, send them back if possible. Do a Hutch mod/pre-filter and you won't have tons of trapped air or cackle anymore. Check your GPR and replace with one that has a 100% duty cycle like Stancor(which is enormous) or a Western Plow relay(same size). Hope that helps!
|

|

|
|
03-23-2017, 09:45 AM
|
#12
|
|
Senior Member
Join Date: Sep 2015
Location: Sandy, Utah
Posts: 418
|
Quote:
Originally Posted by VOODOO7.3

Like Hogasm said, use a 2" black ABS pipe cap and hose clampto plug off resonator hole. You can put a 4" exhaust on if you want but the most restriction will always be at turbo outlet. I went with very slightly modified factory intake (which is still better flow than other kits-and lower intake temps than kits and other mods), WW2, high flow outlet, delete pedestal,double wrapped bellowed up pipes, turbo blanket, straight pipe to Walker BTM straight thru muffler($60). There's NO proven benefit to the fuel banjo bolts, send them back if possible. Do a Hutch mod/pre-filter and you won't have tons of trapped air or cackle anymore. Check your GPR and replace with one that has a 100% duty cycle like Stancor(which is enormous) or a Western Plow relay(same size). Hope that helps!
|
Thanks for the tips, bummed about the wasted money on the banjo bolts, I was suspicious if I would even need them staying stock, I have only installed the rears, I haven't even looked to see if I can access the fronts. I was considering that Stancor GPR and then kinda forgot to order it so thanks for reminding me, I will defiantly pick that up. What turbo blanket did you use and anything specific to wrap the pipes, how many rolls did it take? You said you slightly modified your stock intake, can you give me more details on that? I'm still deciding whether to make a custom intake with extra 4" pipe I will have or buy a used stock one if I can even find one and modify it, cost will probably be similar I am guessing.
|
|
|
|
|
03-23-2017, 09:54 AM
|
#13
|
|
Senior Member
Join Date: Sep 2015
Location: Sandy, Utah
Posts: 418
|
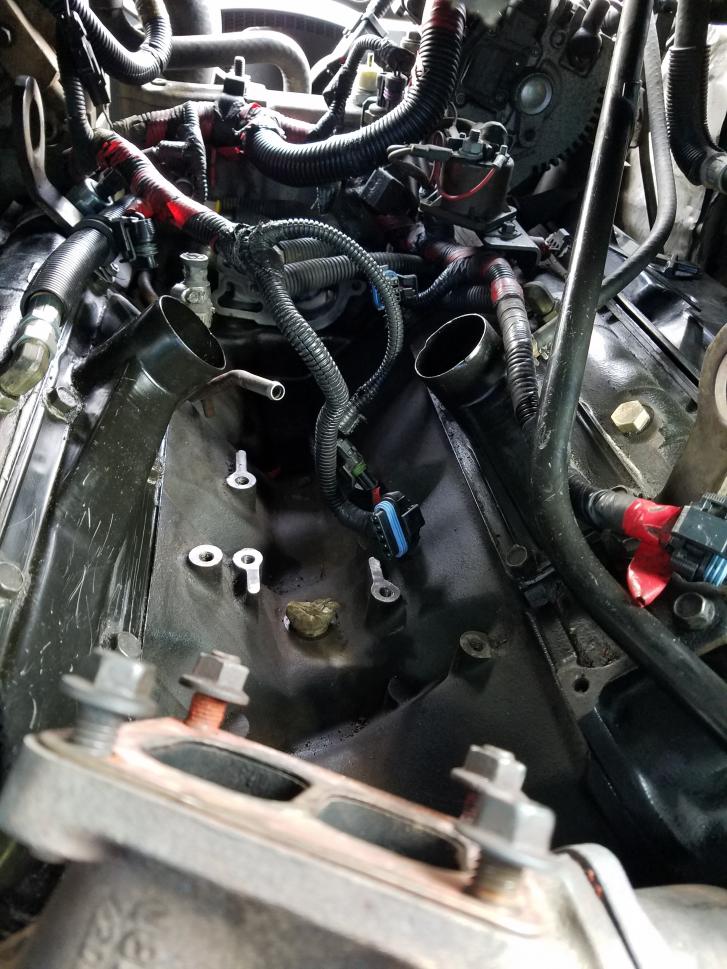 Valley cleaned and cleared to get HPOP out
 Drivers side injectors/glow plugs being replaced (started with the easy side)
 Old 208k mile injector replaced as preventative maintenance
 Old glow plug
|
|
|
|
|
03-23-2017, 10:04 AM
|
#14
|
|
Senior Member
Join Date: Nov 2014
Location: Parker, CO
Posts: 478
|
Keep the pics coming! Nice to see some quality pics of the old parts for comparison's sake. Could you post a couple side by side of old to new?
Thanks!
__________________
New Van: 2000 Ford E350 SMB RB42
Old Van(sold): 1995 Dodge B3500 SMB RB33
|
|
|
|
|
03-24-2017, 07:57 AM
|
#15
|
|
Member
Join Date: Mar 2017
Location: NH
Posts: 45
|
What exactly makes the drivers side easier than the passenger side? I am currently doing the exact same job on my van but started on the right side, and found it to be not all that much fun. Planning on tackling the left side tonight into tomorrow and am curious what I have in store for myself.
Are you able to get those front most VC bolts out from the dog house?
I appreciate the help.
Check out my thread on Expo talking about this same job.
7.3 Diesel what should be replaced - Expedition Portal
|
|
|
|
|
03-24-2017, 10:49 AM
|
#16
|
|
Member
Join Date: Mar 2017
Location: NH
Posts: 45
|
I thought I already asked but I guess not.
What makes the drivers side easier versus the passenger? I am currently doing this exact same job on my 95 7.3 E350 and have not really been enjoying it.
Are you able to reach the front VC bolt from the dog house?
|
|
|
|
|
03-24-2017, 10:57 AM
|
#17
|
|
Senior Member
Join Date: Sep 2015
Location: Sandy, Utah
Posts: 418
|
Quote:
Originally Posted by Gtbensley
I thought I already asked but I guess not.
What makes the drivers side easier versus the passenger? I am currently doing this exact same job on my 95 7.3 E350 and have not really been enjoying it.
Are you able to reach the front VC bolt from the dog house?
|
Yea I feel you, its been a learning process as I have never attempted anything like this or even worked on a diesel vehicle but its turning out to not be too bad overall, just some awkward contortion going on to reach some bolts. The front VC bolt on both sides I got to from under the hood, the rest from the dog house. The drivers side injectors come out easily as there is more room, you will need a pry bar to get them out they are pretty sealed, I pryed from the center channel since its all cleared out, if you haven't taken at least the fuel pump and bowl out as well as the turbo I would recommend it, its not all that difficult. that will give you the necessary clearance. The passengers side is a little more difficult (I haven't done them yet, probably this weekend) because the number 3 and possibly 5 injectors won't come out because the firewall is too close on that side (there is more room on the drivers side). still a fairly easy fix though, just take the 4 bolts off the top of the solenoid on top of the injector and then you will have enough clearance to get them out/install in the same manner. Hope this helps, I wasn't sure how I was going to do it and didn't want to have to tilt the whole engine or put a big dent like some have and have talked to a couple people that have done it this way instead, much easier. Hope that helps
|
|
|
|
|
03-24-2017, 11:02 AM
|
#18
|
|
Member
Join Date: Mar 2017
Location: NH
Posts: 45
|
Thanks for the response!
I have not pulled the turbo or fuel bowl, and was not planning on doing so. Thinking that might just open a whole new can of worms for me. Think its possible leaking them in?
To do the passenger side I pulled the alternator to reach that front VC bolt and took those two solenoids from the injects. All four on the drivers side pull out without the solenoids being removed? That would be great as I dont like disturbing more then I need to.
It looks like your injectors show some build up of oil on the bottom of them as well. My whole point of this repair is because I had lots of blue smoke on start ups when cold and figured the O-rings are shot. Mine had a bit more oily build up showing as a ring on the bottom of the injectors.
|
|
|
|
|
03-24-2017, 03:09 PM
|
#19
|
|
Senior Member
Join Date: Sep 2015
Location: Sandy, Utah
Posts: 418
|
Quote:
Originally Posted by Gtbensley
Thanks for the response!
I have not pulled the turbo or fuel bowl, and was not planning on doing so. Thinking that might just open a whole new can of worms for me. Think its possible leaking them in?
To do the passenger side I pulled the alternator to reach that front VC bolt and took those two solenoids from the injects. All four on the drivers side pull out without the solenoids being removed? That would be great as I dont like disturbing more then I need to.
It looks like your injectors show some build up of oil on the bottom of them as well. My whole point of this repair is because I had lots of blue smoke on start ups when cold and figured the O-rings are shot. Mine had a bit more oily build up showing as a ring on the bottom of the injectors.
|
If you have already done the passengers side with all those parts in you will have no problem with the drivers side leaving them in place. All 4 come out intact, there is plenty of room so it should be fairly smooth sailing. All my wiring looked pretty good but I decided just to swap it all out while I am at it, didn't love spending the extra money but I don't want to have to open it back up for along time. My truck was running alright and not too smokey but I was replacing the HPOP and think I needed new glow plugs so I just decided to do it all at once and put rebuilt injectors in from Riffraff, hopefully they last awhile and I don't regret buying new.
|
|
|
|
|
03-24-2017, 04:02 PM
|
#20
|
|
Member
Join Date: Mar 2017
Location: NH
Posts: 45
|
Awesome, thank you for the insight.
Mine was running well before I tore it down but I figured it was time to replace the o-rings. I thought about just spending the money on injectors but it ran good and passed the contribution and buzz tests.
I am replacing all glow plugs and wiring harnesses. Like you, I have no desire to get back in there anytime soon.
I'll let you know how it goes, I'm starting in on the left side in the morning.
|
|
|
|
|
|
 Posting Rules
|
You may not post new threads
You may not post replies
You may not post attachments
You may not edit your posts
HTML code is Off
|
|
|
|
 » Recent Threads
 |
|
|
|
|
|
|
|
|
|
|
|
|
|
|
|
|
|
|
|
|
|
|
|
|
|
|
|
|
|
|
|
|
|


 1997 Ford E350 EB 7.3L
 Linear Mode