Quote:
|
Originally Posted by Bronco_hauler
Since you can temporarily remove the overhead console, can't you remove it, peel back the fabric and notch the front lip (wood?) to allow the CB and mic to fit?
|
If you imagine the front lip as an L there are 3 problems:
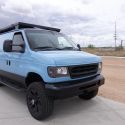
1. The 29 is longer than the foot of the L and would stick out about 4" (where adventureduo's sticks out about 2). With my fantastic fan this would be impossible.
2. The 29 is as tall as the outside vertical part of the L, plus a little. The hole would have to be bigger than the L or the L would have to come away from the ceiling. Since the center section is the main support for the console, it would be difficult and ugly with a radio this big.
3. The console is essentially 3/16" cedar plywood. In the elbow of the L extending back is a 1/2" thick piece of wood that extends back along the foot and is almost as wide as the buttons. Adventureduo's radio is probably resting on it, which is why it's against the ceiling and not the foot of the L. This allows for screwing into the underside of the L, but (being under carpet) would have been difficult to remove.
The only dimension the 29 would actually fit in this console is between the buttons.
Quote:
|
If you can get it to fit, any concerns over being able to hear the speaker or about heat build-up?
|
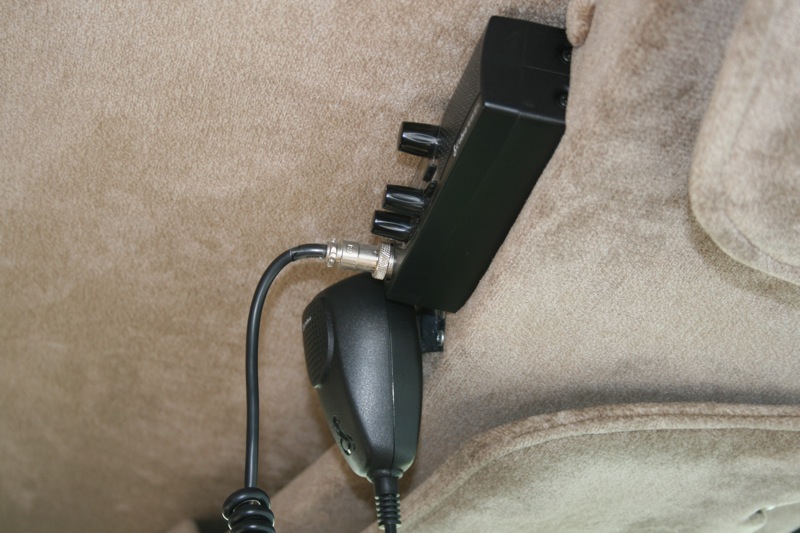
I was concerned about that. Even if there was enough room I would want a speaker hole where the reinforcement board is. At that point I might as well make a whole new console... which is way out of my league.
But I would think that adventureduo's install would be fine. My Jeep TJ has a small CB like that crammed in the stock radio hole sandwiched in with a CD player and I've never had a problem. (although there is also not a diesel running next to it). An external speaker would alleviate any muffled sound issues.
Quote:
|
BTW, how do you remove the overhead console?
|
1. Pull the cloth buttons at either edge. Remove small screws (2) exposing hidden black screws
2. Remove the hidden black screws (2) they are long.
3. Remove the a pillar buttons exposing the screws at the top rear of the a pillar cover. Remove these screws (2)
4. The a-pillar cover supports the console edges. You can probably work it past, but it is easier to remove the grab bars (4x 8mm socket under rubber plugs) and pull the a pillar covers (2x clips into A-pillar)
5. Remove the screws holding both visors (6)
6. Pull the visors, working the spring out of the hole. Be aware that if they have lighted mirrors they will be wired and the wire will prevent complete removal of the console. I cut them and replaced with clips for next time.
7. The visor clips each have one vertical screw in the back. Remove these screws (2) to remove the clips.
8. Remove the front cloth buttons (2)
9. Remove the front screws (2)
10. There are metal clips (2) attached to the console which fit metal L brackets. Pull down to remove metal clips from L brackets.
11. The console should be loose and hanging by the visor holes. At this point you can pull gently and ensure that I didn't forget any screws. As far as I can tell, none of the front button screws (if you have the privacy curtain) are structural.
12. The last bit is to pull the glued fabric from around the visor holes. The visors are mounted in the factory location and the headliner fabric is glued over this, the console fabric is glued over that. Mine came away with gentle pulling, but I took it apart in a haphazard order, so I'm not sure this is the best sequence and possibly should be done after removing the visor clips (#7)
With the exception of the glue which I did not replace, installation is reverse order, the clips on the L brackets won't support the console, but they help if you're putting it back by yourself. Those screws plus the visor screws will support the whole console, making it easy to work towards the outside.
Another note the top screws in my L brackets go into scraps of wood because of the fantastic fan install. I'm not sure what they are mounted to in the SMB install... I'd be leery of removing them.
Quote:
|
Did you also add the Reflectix above the headliner, or was it SMB or the previous owner?
|
Lord knows, there are so many bits of wood, foam and insulation chunks up there it is hard to tell what is going on. The PO did have a predilection for reflectix, but SMB also uses it in the PH top, so I would guess SMB.


 Linear Mode