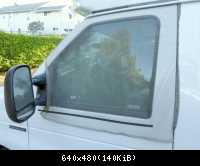
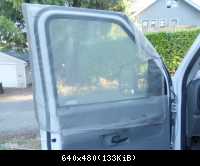
I came up with a pretty simple design for screens that are easy to make, install and stow away. The design is basically a rectangular bag that goes upside down over the top of the door and has inside finished dimensions of 36" W x 30" H with a slit on one side. When not needed they can be folded or rolled up and stuffed in a door pocket. Version 1.0 was essentially a single side of a bag with a little material that wrapped around door edges, but they were hard to install and would not stay in place if the door was opened.
I used mosquito netting (finer than window screen), which is a little more restrictive to air flow, but we have traveled enough to frequently experience very tiny creatures that can get through standard window screen material. If you are lucky to live in Seattle, you have Seattle Fabrics, which has a huge selection of outdoor fabrics.
To finish an edge it takes two folds of about 1/2" each and then stitched near the inside edge of the folded material---that uses 2" of material. So the raw piece of fabric should be 36+2+2" = 40" wide by (30+2)*2 = 64" long. It is helpful to use an iron set at about "polyester temperature" to make the two hem folds and then put pins across the width of the folds to keep the seem together while you sew it. I have a sewing machine, but am NO WHERE NEAR what you would call a seamster! Below are photos of the screen. What looks like a bar in the photos is rubberized magnetic tape that is just strong enough to do the job you should be able to find in any standard fabric store. I prefer it over those strong Neodymium magnets that can damage the screen and paint during installation and removal.
Follow these steps:
1) Hem one of the long sides (it will be the front edge of the screen).
2) Fold the fabric in half with the crease along the 40" width.
3) Hem the side opposite the side hemmed in 1), seaming together both sides of the fabric together (this will be the rear edge)
4) Hem the remaining unhemmed edge, which after 3) is about 72" long and will be the bottom edge).
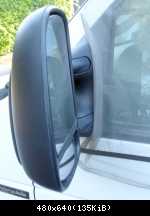
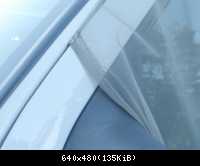
5) Align the edges of the side hemmed in 1) and sew them together without any more hemming for about 10" starting at the crease described in 2) OR BETTER YET you decide exactly where to stop the stitch by putting the bag on one of the doors, studying the photos to see how that edge needs to ride along the rear edge of the side-view mirror.
6) Done! After you sew up the second one you should notice that either one will work on either door!
7) If you really think you need to do it, you could cut the bag on the diagonal above the mirror and somehow seam it, but I like just stopping after step 6!
__________________
2008 E-350 6.0L diesel: Bought new in 2010, 4x2, 4.10 LSD, HD spring-lift all 'round,
Cruiser II Top, 6'7" inside, full-time upper bed w/ kind'a EB50 layout, cozy 4-season rig
Solar: 540 W of Kyrocera w/ Blue Sky 3024iL, 3x100 AmpHr AGM's
Electrical: 4 cf fridge, nuker, water heater, compressor
Propane: stove top, furnace
Travel: https://www.lugnutlife.wordpress.com


 Linear Mode