Jage provided a good overview of how to replace the cords on SMB day/night shades and I used his information to FINALLY replace mine yesterday. As mentioned in an earlier post, I planned to use some stainless steel wire I already purchased from McMaster-Carr. However, reading the other posts regarding this project, I decided to first try some bead wire from at Michaels but couldnt find any that seemed to be what Jage used. I subsequently found what appears to be OEM cord at Fix My Blinds:
http://www.fixmyblinds.com/
I purchased 300 feet (the next shorter option was just too close to what I figured I needed) of 1.4mm Gray RV Day/Night Shade string. It appears identical to the cord used by the manufacturer of our blinds. Since I needed to actually just replace the old-style cord retainers and have not had any problem with cord breakage over the past 12 years, this seemed a satisfactory solution for me.
After replacing the cord in the first couple of blinds, I developed a procedure which let me replace the cord in a blind in about 10 minutes or less. Except for attaching the cord to the spring, this should work for wire or string.
Here is how I did mine:
1. Remove the blinds from the van windows by lifting up the blind and popping it off of the retainer clips.
2. Unscrew and remove the rubber pulls.
3. Remove the end caps.
4. Slide off the bottom rail.
5. Slide the bottom daytime section from middle rail.
6. Slide the cap off of the top rail.
7. Remove the left cord (it obviously doesnt make any difference which one you do first but picking the left one makes it easier to write better directions from here on) from the spring and measure it. Add 6-8 and cut two cords the same length and melt both ends (obviously not needed if you are using wire).
8. Tie or connect one cord to the spring. I initially used two half hitches with my cord but it tended to loosen up. So I used a cow hitch
make a loop, put the loop through the hole in the spring and put the working end and tag end through the loop and pull tight. (This is much like attaching a luggage tag to a piece of luggage.) Cut any excess on the tag end but not too short. Melt the new tag end.
9. Hold the left side of the nighttime section tightly together and poke something through the holes in the left side to line them up. I used a piece of 1/8 brass rod
anything which will go through the holes will work. Thread the working end of the cord down from top through nighttime section.
10. Do the same thing for the right side, connecting the cord to spring and thread the working end through the holes on the right side of the nighttime section.
11. Lay the shade vertically on its top (upside down) and cross each cord over to the other side. Leave the working ends hanging out of the middle rail. Make sure that they stay in the center section of the rail and dont end up in the groves along the sides.
12. On the first couple of blinds that I rethreaded, I then put the cord through the daytime section before sliding the daytime section onto the nighttime section. However, I found that it is much easier to first slide the daytime section back onto the bottom of the nighttime section. You need to thread the rail between the pleats attached directly to the top of the day section; hold the daytime section (upside down) and it will be obvious where you need to insert the daytime section.
13. With the nighttime and daytime blinds back together, put the blinds on the table vertically with the top at the top. Move one end of the blinds over the end of the table. Then slide the daytime section to the right (like you are going to take it back off) until the hole through this section is exposed. Thread the right working end of the cord through the hole. Then slide the daytime section to the left until that hole is exposed. Thread the right working end of the cord through the hole in the daytime section.
14. Side the daytime section back to the center position.
15. Place the blinds upside down vertically again and cross the tags in the bottom rail.
16. Slide the bottom rail back on with threaded holes on the same side as those in the center rail.
17. Replace the rubber pulls in the middle and bottom sections.
18. Thread the working ends of the cord through the small end caps and reinstall the caps (the holes on all of the end caps should be on the bottom); tie a loose knot (like a bow) to keep cords to keep them from being accidentally pulled back into the blinds.
19. Replace top rail and reinstall the remaining caps.
20. Take one of the old cords and use it to tie around entire blind while closed. Dont have the blind too tightly closed since you will need to be able to turn it enough while reinstalling it to clip it in place.
21. Reinstalling the blinds in the van windows was the most frustrating part of the whole project. My way sounds strange but trying to use a screw driver to force the retainer in place didnt work for me since the plastic window frame tended to just bend. So, instead, I first hooked the inside edge of the blind over the obvious hooks and held it in place with my left hand. I then put the back of my head up against the window so I could look up and see the retainer clips close to the window. I then used a pair of 4 channel lock pliers to pull the outside spring clip over the edge of the blind. (Regular pliers might work but the glass was in the way of where I needed the pliers. The bent head of the channel locks worked perfectly. Of course, the fact that I had a 4 set might have been part of the solution.)
22. Put the cord locks on each cord and screw them in place but not too tight yet. Then remove the cord holding the blind together. Make the necessary adjustments and cut off the excess cord. Melt the tag ends.
As mentioned, my problem has been the sun crystallizing the old-style cord locks over the years, resulting in broken cord locks. Since Ive replaced all of those on the side and end doors several times each, the holes for the screws ended up getting larger and I had to resort to larger screws.
But there is a limit to how much oversize I could drill the holes in the new cord locks so when one of the holes for the new cord locks was already enlarged to the point it wouldnt hold the screw, I had to come up with a new solution. I tried a short Molly Jack Nut but it didnt work. There is sheet metal close by the hole and a plastic toggle anchor I tried didnt have enough room to expand. I finally came up with this solution:
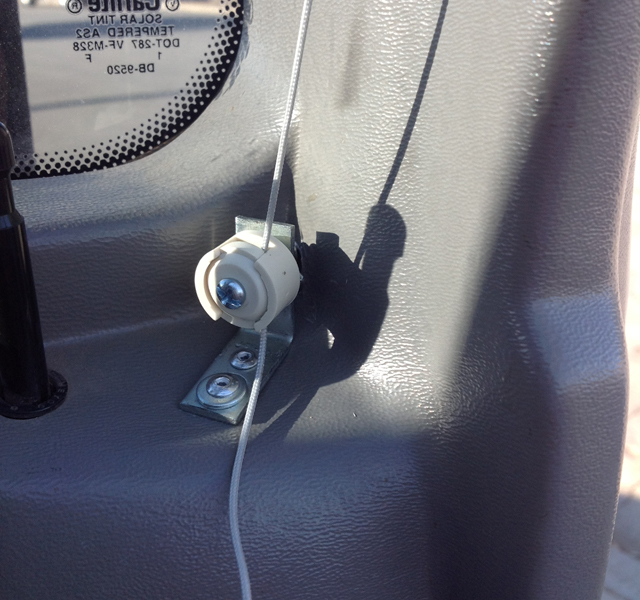
I used a 1 metal angle bracket which I pop-riveted to the window frame. Since I needed to pop rivet the bracket in place and then screw the cord retainer in place, I first installed a Molly Jack Nut to the bracket to screw the cord retainer to and then installed the bracket.


 Sportsmobile (AKA Money Pit)
 Sporty Spice

 Linear Mode