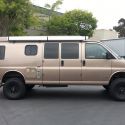
After a holiday trip into Mexico 2015, the 'ole girl was in serious need of nsome attention. I started off chasing the cause of clunks, thunks, rattles, a moaning and groaning power steering unit, a pulsating brake pedal and finally, wheel bearing squeal that got real loud the last 20 miles of a 1500 mile trip, all coming from the 2001 Dana 60 front axle.
I expected to do an extensive front axle rebuild, and also wanted to see if I could improve it's road manners, reduce bump steer and harshness while I was at it. Increase wheel up-travel, by further clearancing the crossmember and relocating the power steering cooler, too. Increase down travel, as my shocks were topping out under full extension, which wasn't terrible, but it bothered me. Oh, and replace those yellow composite headlamps, hoses, serpentine belt, and maybe the 20yr old radiator.
I did plenty of youtube research, reading on this forum, a few calls to Chris at UJOR, and others.
I bought this van 5 years ago, the previous owner had a shop in Idaho do the 4x4 conversion, using UJOR parts or a kit. It's given me good service for the most part, I've put 30k miles on it since I've owned it, but I've used it mildly aggressively, including trips to Death Valley, brine baths while out on the Bonneville Salt Flats (read: not vehicle friendly).
The long list included both sides completely wiped out stub axle needle bearings, both stub axles, a broken Warn manual locking hub, warped front rotors and a caliper that was hanging up, worn sway bar bushings and loose linkage mounting points. Both front and rear pairs of u-joints felt rough too.
Replacing the oem Ford parts, headlamp assys, radiator, unit wheel bearings/hubs, brakes, ball joints, stub axles, u joints, all went pretty smoothly. The power steering pump and relocating the power steering cooler was a little more involved. Tip: If you've never worked on a Dana 60 or 1 ton and larger truck suspensions, get a big hammer, an air chisel, leather gloves and steel toed work boots, because it's heavy duty work.
Things became more involved, well, a LOT more involved when I decided I'd change the steering to what they call 'high steer', add longer shocks on custom shock hoops, and raise the tie rod.
I first when after different bump stops, as the factory ones are a little harsh, hit sooner than they need now that I relocated the power steering cooler and clearanced the crossmember a little more (than the last guy).
I machined some replacement sway bar bushings from delrin, as the old urethane ones had given up the ghost after only 20k miles. It's my own unique and different design, we'll see how it works over the long haul. I designed a different set of spring plates that incorporates a shock mount and landing pad for the new bump stops that came out pretty good. Made up of sandwiched upper (w/hex) and lower (thru hole) 3/8" thick steel plates, and interlocking shock mounting tabs. I had a local shop laser cut the steel plate for me, I mocked it all up tack welding the pieces into place, then finish welded it on the bench. My design eliminates U bolts, replacing them instead with grade 5, 9/16 NF bolts and extra tall nuts, sourced from McMaster-Carr. I gained another 1" of clearance by eliminating the U bolts and cast Ford shock brackets, and gained a well positioned landing pad for the new urethane bump stops.
I really like how the bump stops and spring plates turned out, now to finish up the shock mounts to accommodate longer shocks, that would free up the suspension travel with more down travel (extension), and up travel (compression).
I talked to Chris about reducing bump steer on my van. He couldn't recommend the trackbar for my 4" lift, not enough room. I asked about adding one of his high steer kits, he said it might be tight, depending on my van, but that should give me the result I was looking for.
I was pretty set on getting the drag link (the tie rod that goes from the pitman arm to the passenger side knuckle) closer to level. I've learned with drag cars that this is key. Mess up steering angles and risk having an evil handling POS (ask me how I know!). My van wasn't bad, but it was annoying the way highway bumps had a tendency to steer the van right. Particularly when towing my 32ft trailer.
Getting the drag link level, by using a high steer arm and relocating it to the top of the knuckle, eliminating the factory attachment point, is a common way to achieve that. The problem is, for a late model Dana 60, it requires machining the top of the knuckle with interlocking steps and (4) grade 8 bolts. Your life depends on this joint not failing, after much research, I concluded there's one way to do it. Chris offers both the parts and the machining service, ship him your passenger side knuckle, he returns it with the precision machine work done, and the parts to convert it to high steer .
The first pic shows the 15-20deg angle of the drag link.
The second pic shows the drag link, now with high steer kit, almost level: More beter
I had some issues with fitting the high steer arm and new drag link. At full steering lock to the left, the new drag link hit the spring pack.
After some head scratching, I came up with a fix. I heated up the new high steer arm, 3/4" steel, to a dull cherry red, and bent it upward 7-10 degrees. I now had clearance at full lock to lock
Not out of the woods yet, the at full right lock, and full suspension compression, the higher new drag link might contact the frame. So I used the 'ole hot rodder trick, employing the C-notch
I decided to add a Chassis Unlimited fabricated differential cover at the same time. The angular 1/4" thick steel will keep a medium sized rock from ruining my weekend, and let's face it, look kinda cool.
I really need to give a shout out to the guys at Chassis Unlimited. Unlike the chain 4x4 stores that specialize in the shiny retail stuff, wheels, LED light bars and the like, these knowledgeable guys stock a lot of 4x4 rock crawler builder parts, do their own in-house machinie work and laser cutting. They happen to be local, which turns out is a good thing, because everytime I seem to get caught up in making things, ahem, "better" the new change makes it so this or that now doesn't fit.
The same with raising the tie rod, and making it straight, which adds another 3" of ground clearance. Ditching the factory F350 tie rod set up means buying different tie rod ends, threaded, jam nuts, 1-1/2" x 1/8 wall DOM tubing, and weld-in threaded bungs. Cut to length, weld in the bungs, done.
Case and point, the Tie rod; At full left and right lock, the straight tie rod was goin gto be close with the stock diff cover. With the bulky aftermarket one, there is a big interference. Thinking ahead, I knew about these offset tie rods, for the hardcore offroad builders, so no big deal, right? Not so fast, Skippy! The only only offset tie rods available come with Chevy 1 ton taper, which turns out is a completely different taper from my Ford Dana 60. Chevy Dana 60 has Chevy tapers (different angle), Ford Dana 60 come with big or small Ford tapers. Lord only knows what taper a Dodge Dana 60 knuckle has for a taper, probably, Brown and Sharpe, Jarno, or British Whitworth taper, LOL!
The solution is to buy a $75 Chevy 1 ton reamer (don't quote me but 1-1/2" per foot I think) and ream the Ford knuckles to fit. A bit of a delicate process if you want a good quality tapered hole, were the tie rod end won't loosen over time, as the reamer really wants to 'chatter' and leave behind a hole that looks like a beaver crewed on it. Drill press or milling machine set on very slow, solidly clamping the knuckle in place, and peck at it, retracting the reamer juuuuust as it starts to squeal. Sulfur based cutting oil helps, too, differential fluid works great.
If it weren't for the new raised tie rod, I would have been able to do all of the fabricating so far with the axle housing still under the van.
I also wanted to re-drill & tap the differential vent port to a better location, as the factory location made it so the hose and fitting were dangerously close to the crossmember at full compression. With the diff cover off, and the housing up on the workbench, this task was a piece of cake. The hose nipple is now horizontal, facing the rear of the van, eliminating another thing that interferes with full compression.
But the steering damper needed relocating. Do you see a pattern here? I wanted to stay with the 'get everything up and out of harm's way' theme, and make the install snug and 3" higher than factory. This meant modifying the welded-on Ford factory damper mount on the passenger side of the housing. Not a very picture, below, but you get the idea. Not too tough with the axle housing up on the weld table.
The only thing left was an alignment and a test drive.
Here's the thing about alignment shops: There was a time, when it took a more senior guy in the shop to perform alignments. Particularly non-standard stuff. The equipment was manual, the tech really had to know his stuff, and have a good set of books available to show him where the adjustment points were. These days, with the gray-haired guys all retired, the young guys in the trade walk up to the computerized machine, if the software is newer than the vehicle they are working on, they don't know what to do The service writer sends you on down the road. Worse, living in California, the land-o-litigation, no one wants to touch a rig where the steering has obviously been modified
It's true, I've essentially redesigned the steering, it's not Ford, not even Ford parts. Even though it's simple "WWII Jeep steering" as I like to call it, I figure most alignment shops aren't going to know what to do with it.
No matter, not my first rodeo; The caster isn't adjustable on a leaf spring rig anyway (and I know is has at least 5 degrees by watching the tie rod raise and lower as I cycle the steering left, center, then right) The Dana 60 has fixed camber shims, I assume the original guy set it up right. So the only thing to set is toe in. Easy!
With WWII Jeep steering, the tie rod directly connects the left and right knuckles, so there is no toe change as a result of lifting the vehicle (which makes it easier to adjust toe up on jack stands, wheels off)
Using a tape measure and straight edges, I set the toe just like I would on a race car, loosen the tie rod jam nuts and rotate the tie rod. pics below
To center the steering wheel, I had to set it on it's wheels at ride height before adjusting the drag link's length, same as above.


 .
.

 The service writer sends you on down the road. Worse, living in California, the land-o-litigation, no one wants to touch a rig where the steering has obviously been modified
 Tan Hot Dog
 Linear Mode