|
|
 05-01-2020, 09:11 AM
|
#61
|
|
Member
Join Date: May 2017
Location: Bend, Oregon
Posts: 59
|
Good fix...that was the direction I was headed if my passive scheme didn't work.
__________________
Rick
2018 Sprinter 4x4 RB150S w/PH Lithium Build ("Starr Van")
Pictures of some Starr adventures (starting in 2019): https://rick.samcos.com/galleries/
|

|

|
|
05-10-2020, 04:25 PM
|
#62
|
|
Member
Join Date: May 2017
Location: Bend, Oregon
Posts: 59
|
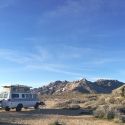
Starr's Sunshade
I decided not to install a fixed sunshade (e.g., Fiamma) on Starr due to reported rattle issues and likely damage from high winds. Instead I configured a DYI solution using a Neso Grande portable shade. The shade is a large (110x110), light weight fabric that stows in a small-ish bag. I decided to attach it to the van at two points by way of large suction cups to the top outside corner of the windshield and the top outside corner of the rear door window. To raise the height of the shade over the van's sliding door, I attached a third cord with 4 clips along that edge -- that cord gets thrown over the van's roof (raised or lowered) & secured to the other side's ladder.
The shade's outboard two corners are each anchored by a single guy cord that can be either staked or weighted down by sand or rocks in a Neso-supplied bag, and these outside corners are raised by two Neso-supplied, collapsible lightweight poles.
The two attachment cords to the van do touch Starr's paint, so I installed two patches of 3M clear film on those areas of paint, and also a protective sleeve on the cord.
Pictures:
 

__________________
Rick
2018 Sprinter 4x4 RB150S w/PH Lithium Build ("Starr Van")
Pictures of some Starr adventures (starting in 2019): https://rick.samcos.com/galleries/
|
|
|
|
|
05-11-2020, 06:27 AM
|
#63
|
|
Senior Member
Join Date: Nov 2015
Location: Vacaville, just east of the San Francisco Bay Area
Posts: 1,063
|
Nice solution. I have something similar, I think I have put it up twice in the 52k+ miles on Flint. It might be different if we stopped and “camped” a lot, but we typically don’t stop during the day until the sun is nearly down.
__________________
Flint - 2016 SMB Sprinter 4x4 144" RB 150S w/ PH
KN6BJX
|
|
|
|
|
10-04-2020, 01:32 PM
|
#64
|
|
Member
Join Date: Nov 2015
Posts: 47
|
I read your post with great interest. The question I have is the photo showing the location of the BMS has a large on/off rotating dial. I'm wondering what the purpose is of this switch.
|
|
|
|
|
10-04-2020, 01:39 PM
|
#65
|
|
Member
Join Date: May 2017
Location: Bend, Oregon
Posts: 59
|
Sorry, don't know which post/picture/dial you are referring to ... post's date/time or direct post link would be helpful.
__________________
Rick
2018 Sprinter 4x4 RB150S w/PH Lithium Build ("Starr Van")
Pictures of some Starr adventures (starting in 2019): https://rick.samcos.com/galleries/
|
|
|
|
|
10-04-2020, 03:02 PM
|
#66
|
|
Member
Join Date: Nov 2015
Posts: 47
|
I just finished reading the whole post and saw the diagram you posted. You 3xplain3d the addition of a shutoff switch for the 2nd alternator and regulator. This is what I was questioning but it is all clear to me now. This past March my AGM battery started failing making it necessary to make a choice. Back in 2014 I asked SMBW about Lithium and it was out of the question, still to new at the time. When i had my 2016 built I asked again about Lithium and was still not being offered. From everything I was reading and hearing Lithium was a game changer but at a price. Like yourself I took the leap to switch to Lithium batteries but how was i going to do it with the current build I had. I started talking with lithium manufacturers and the tech folks at Magnum and Zamp. It was looking like all of my equipment was compatible with lithium even though it did not state it was compatible. Zamp was compatible controller has a setting for it. The big question was the Magnum inverter 2000 watts. Having the remote option for the Magnum allowed me to change the settings for Lithium using the custom feature. I installed two 105ah Lithium batteries replacing the AGM 200ah that was failing. I am getting ready to add a third battery bring my total to 315ah with 200 watts of solar. The hold up is making the bracket for three batteries. What I noticed since changing over is everything runs better on the house battery side of things. I'm already using more power than I had been but this was the plan. I'm looking forward to the addition of the third battery giving more of a buffer.
I really enjoyed your post with great interest.
|
|
|
|
|
10-04-2020, 03:23 PM
|
#67
|
|
Member
Join Date: May 2017
Location: Bend, Oregon
Posts: 59
|
Great...sounds like you have it in hand! My van's "Starr's Guide" (online here: link) goes into details on the exact lithium parameters I've settled on for the alternator, solar controller, and Magnum inverter/charger (&, more importantly IMO, the rationale behind the choices). All this is in the Guide's Appendix and may be of interest to you!
__________________
Rick
2018 Sprinter 4x4 RB150S w/PH Lithium Build ("Starr Van")
Pictures of some Starr adventures (starting in 2019): https://rick.samcos.com/galleries/
|
|
|
|
|
12-01-2020, 12:37 PM
|
#68
|
|
Member
Join Date: May 2017
Location: Bend, Oregon
Posts: 59
|
Rixens/Espar D5 Maintenance
Starr's Rixens/Espar D5 heater has been very reliable -- I've been careful to make sure that it runs hard for 10ish minutes at least once every trip in order to burn out any carbon. But during a November outing, the D5 failed to ignite a few times when it was very cold, ~15°F. We were only at 4000' so I thought that it was either dirty fuel filter or pre-existing carbon around the glow plug/atomizer. Carbon seemed to be the leading candidate since Starr was in the Colorado Rockies in October, with four nights camped above 8,000' and some driving legs up to 13,000'. So the D5 saw some rarified air and I suspected a problem with the system's high altitude kit.
In any case, I obtained the following from esparparts.com: Blower/Burner Seals (20.1820.99.0001)
Fuel Pump Integrated Filter (20.1312.00.0006)
Atomizing Screen w/O-Rings (25.2121.99.0113)
I removed the D5 unit from Starr and found a completely clean fuel filter, a mostly completely clean atomizer & glow plug, and a clean burner chamber. So, why the D5 failed to ignite is a mystery.
After replacing the above parts and reinstalling the unit, I found that I could not reattach the water hoses without a leak. I first tried replacing the existing worm clamps with t-bolt versions but they weren't able tighten the hoses enough either. The existing hoses were vanilla radiator hoses which had stretched too much to fit snugly. I suspected that the hoses' were stretched when fabricated with 90 deg bends right adjacent to their attachment ends. So I ordered the following from hpsperformanceproducts.com: HPS 3/4" (19mm), 5" & 12" Legs, Silicone 90 Degree Elbow Coupler Hose, High Temperature 4-ply Reinforced
HPS 3/4" ID, Silicone 90 Degree Elbow Coupler Hose, High Temp 4-ply Reinforced, Black, 19mm ID
They fixed the leaks and Starr's Rixens/Espar system has been working flawlessly (knock-on-wood).
Lastly, a word of warning -- servicing the D5 unit is not fun. Draining the coolant is messy and reinstalling into very tight quarters is tricky.
__________________
Rick
2018 Sprinter 4x4 RB150S w/PH Lithium Build ("Starr Van")
Pictures of some Starr adventures (starting in 2019): https://rick.samcos.com/galleries/
|
|
|
|
|
12-01-2020, 06:25 PM
|
#69
|
|
Member
Join Date: Jun 2015
Location: SF Bay Area
Posts: 46
|
Definitely not fun. When I serviced mine, I clamped the lines instead of draining which may have made it a bit easier. Will check out those elbow couplers, thanks for posting.
|
|
|
|
|
12-01-2020, 11:27 PM
|
#70
|
|
Member
Join Date: May 2017
Location: Bend, Oregon
Posts: 59
|
I forgot to mention that I strongly recommend the use of t-bolt clamps, rather than worm clamps. Worm clamps are rough on hoses, leaving all their many band indentations in the hose. But, more importantly, a worm clamp's screw assembly gets fouled by the grimy spray often present under the van -- I found them very difficult to loosen and not easily cleaned of embedded grim.
__________________
Rick
2018 Sprinter 4x4 RB150S w/PH Lithium Build ("Starr Van")
Pictures of some Starr adventures (starting in 2019): https://rick.samcos.com/galleries/
|
|
|
|
|
|
 Posting Rules
|
You may not post new threads
You may not post replies
You may not post attachments
You may not edit your posts
HTML code is Off
|
|
|
|
 » Recent Threads
 |
|
|
|
|
|
|
|
|
|
|
|
|
|
|
|
|
|
|
|
|
|
|
|
|
|
|
|
|
|
|
|
|
|


 Linear Mode