|
|
 01-01-2019, 04:15 PM
|
#611
|
|
Senior Member
Join Date: Nov 2015
Location: Vacaville, just east of the San Francisco Bay Area
Posts: 1,062
|
2018 Year-In-Review Stats
2018 Year-In-Review Stats... Still working full time...
33,481 - 20,373 = 13,108 miles and 50 nights spent in 2018 (vs. 14,322 miles and 54 nights in 2017)
The van has been very reliable and we still love it every time we get the chance to climb in and go.
Goal for 2019: Work through the list of to-do's and modifications that I have accumulated and not gotten around to doing. Most likely replace the tires, probably moving up from 265's to 285's.
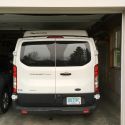
Just like last year, we spent New Year's Eve in Quartzite AZ attending the opening days of the Desert Gardens Rock Show (reference the Geologist On Board sign on the back of Flint - we do Stop For Rocks!)
Here is Laura (holding a piece of oil shale she found) and Flint parked on the sand at Pismo Beach a couple of days ago on our way south to Quartzite, wishing everyone a HAPPY NEW YEAR!

__________________
Flint - 2016 SMB Sprinter 4x4 144" RB 150S w/ PH
KN6BJX
|

|

|
|
01-01-2019, 11:40 PM
|
#612
|
|
Senior Member
Join Date: Jul 2017
Location: Bellingham, WA
Posts: 325
|
That is a great picture! The van is definitely a lifestyle choice worth making. I like your summary of the year, I need to do the same.
__________________
2017 4X4 2500 144" Stone Grey High Top
|
|
|
|
|
01-06-2019, 12:32 PM
|
#613
|
|
Senior Member
Join Date: Nov 2015
Location: Vacaville, just east of the San Francisco Bay Area
Posts: 1,062
|
Aero/Agile 14 Gallon Auxilarry Fuel Tank
There is another thread titled: AeroTanks 20 gallon aux fuel tank, http://www.sportsmobileforum.com/for...ank-20124.html I put an update there several days ago regarding Flint's new 14 gallon tank, after running a half a dozen fills through the tank I thought I'd offer some additional details.
First of all, I really like having the additional capacity. The weight is down low and there is no feeling of it being there when driving, unlike when the two five gallon cans are full and sitting on top of the Aluminess Box in back.
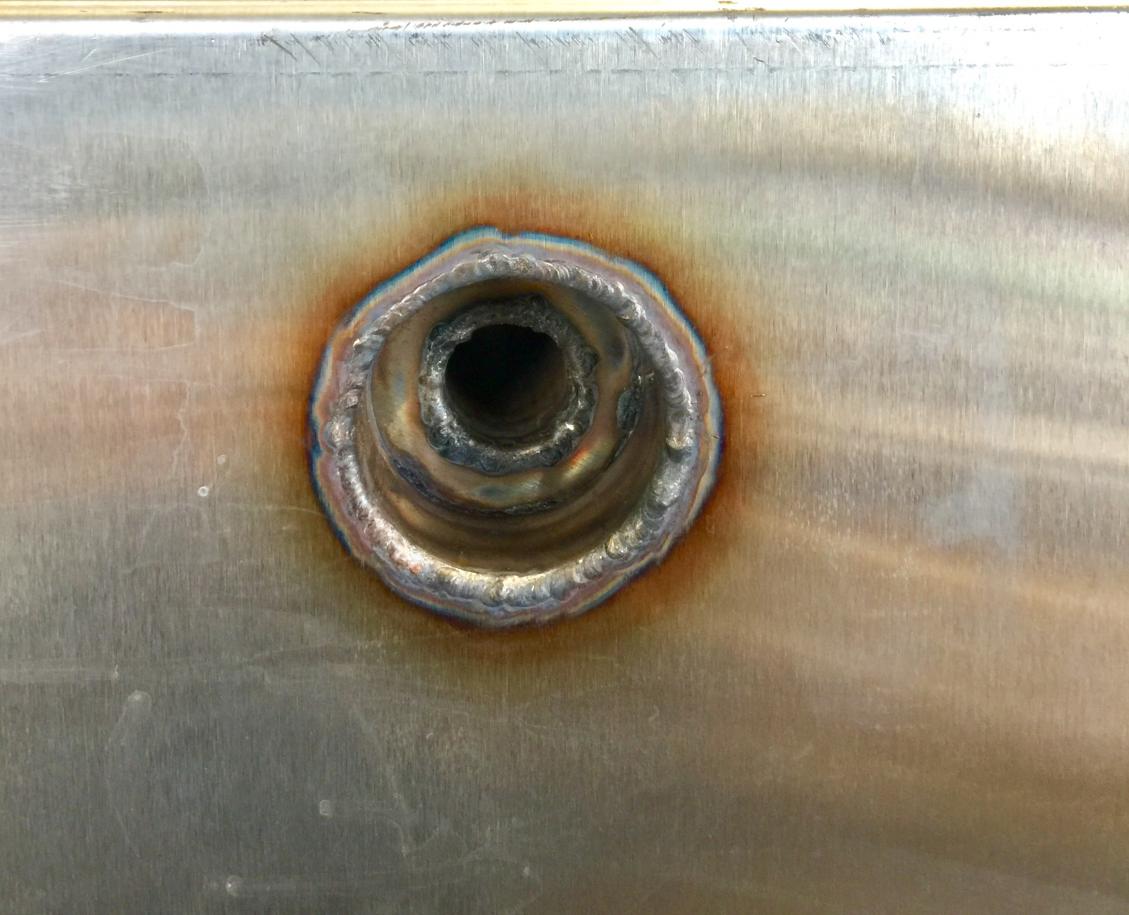
The tank is supported with two through-bolts. In previous versions the nuts for the two bolts protruded below the bottom of the tank, in this generation the bolts are recessed and thus the bottom is smooth. Here is what the mounting hole looks like on top:

And here is what it looks like on the bottom:

Note that the floor area (on the passenger's side, basically adjacent to the sliding door) above the bolts must be clear for the installation to proceed. In our open 50 layout that was not an issue.
The tank fills from the bottom, here is a picture showing the fill tube on the lower right. From here a hose runs to the front of the passenger's side rear wheel well, where the fill nozzle is located:

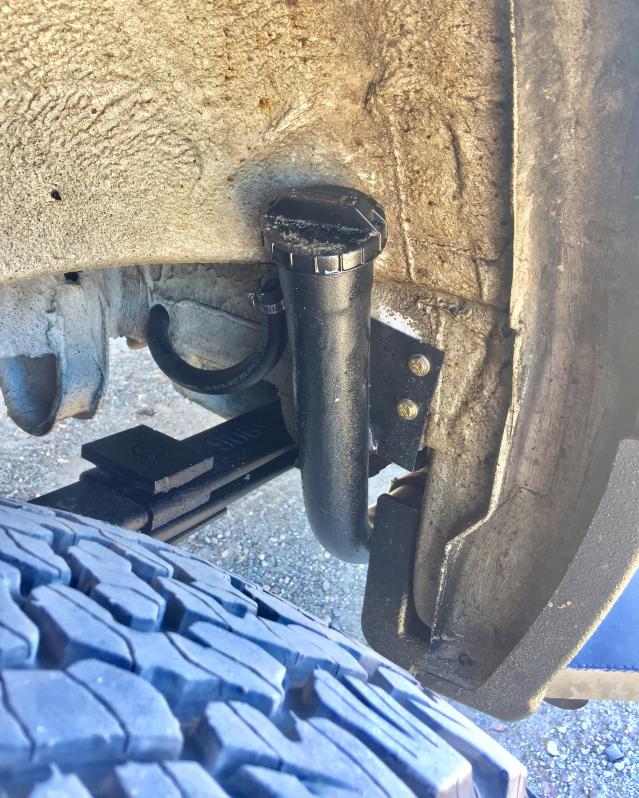
This may look like an awkward location, but filling is straightforward and easy, just remember that it is on the opposite side of the vehicle as the stock fill location. You can see the tank's vent hose located just below the cap, John told me that if there is any difficulty filling the tank to disconnect the vent hose and drain the liquid from it. I have not had this issue, but it will be easy enough to do if required.
The one downside I have noticed is that the MB gauge only registers the addition of the fuel after it senses a "fueling event" - in other words the engine must be shut down and restarted. Agile's installation of the switch and the fuel gauge is on the outboard side of the driver's seat base, which is great for most occasions, but when you are running down the road at night and you transfer fuel a positive way of knowing the transfer is successful is necessary, at least for me. The addition of a second fuel gauge visible to the driver will solve this problem for me, just another item on the to-do list! Here is the control set-up, note that the switch is on a timer to prevent one from forgetting and letting the pump run on and on.

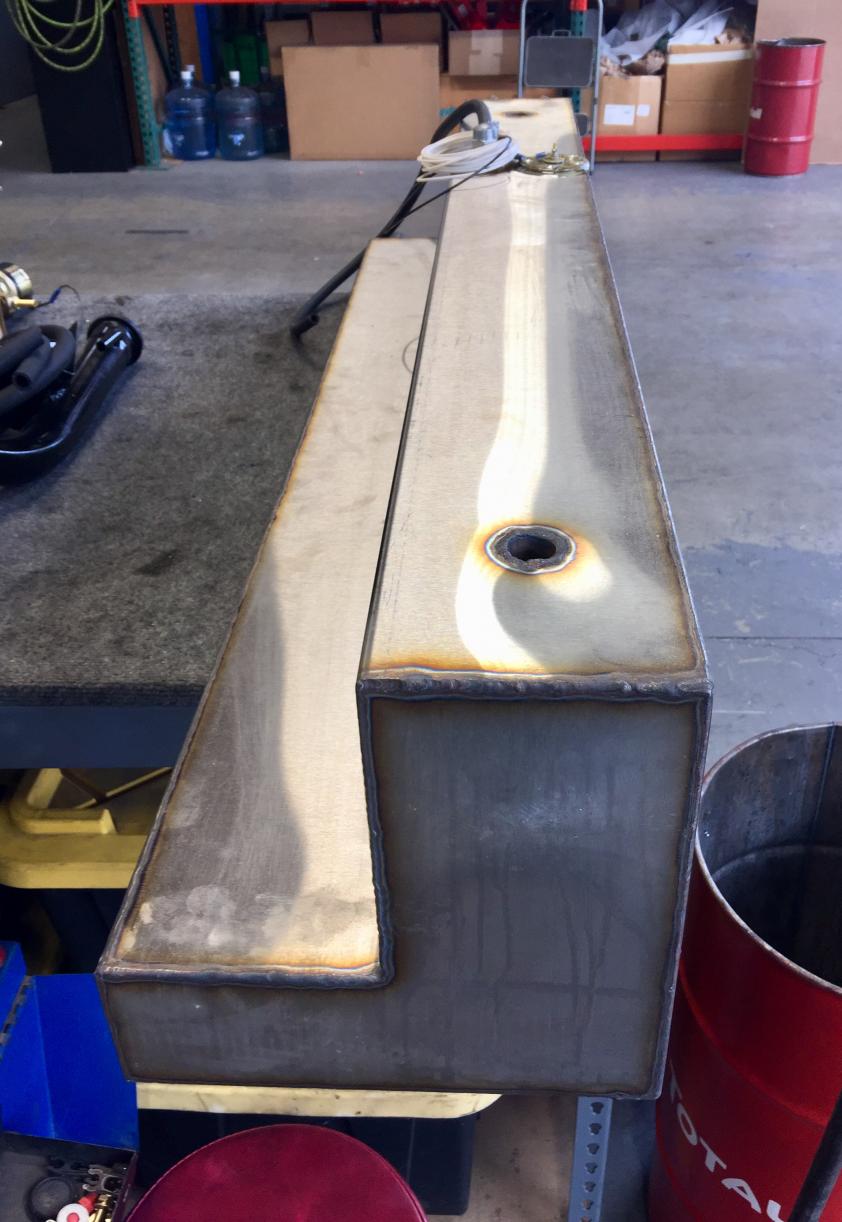
This tank is constructed from 304L stainless steel, aluminum and aluminized steel (standard) are the other options. Aero does not offer this tank on their website, they only sell it through John at Agile Offroad, look for it on Agile's web site.
Here is a picture of the tank and a close-up of the top connections prior to installation, which took about 6 hours. Nice piece of work!
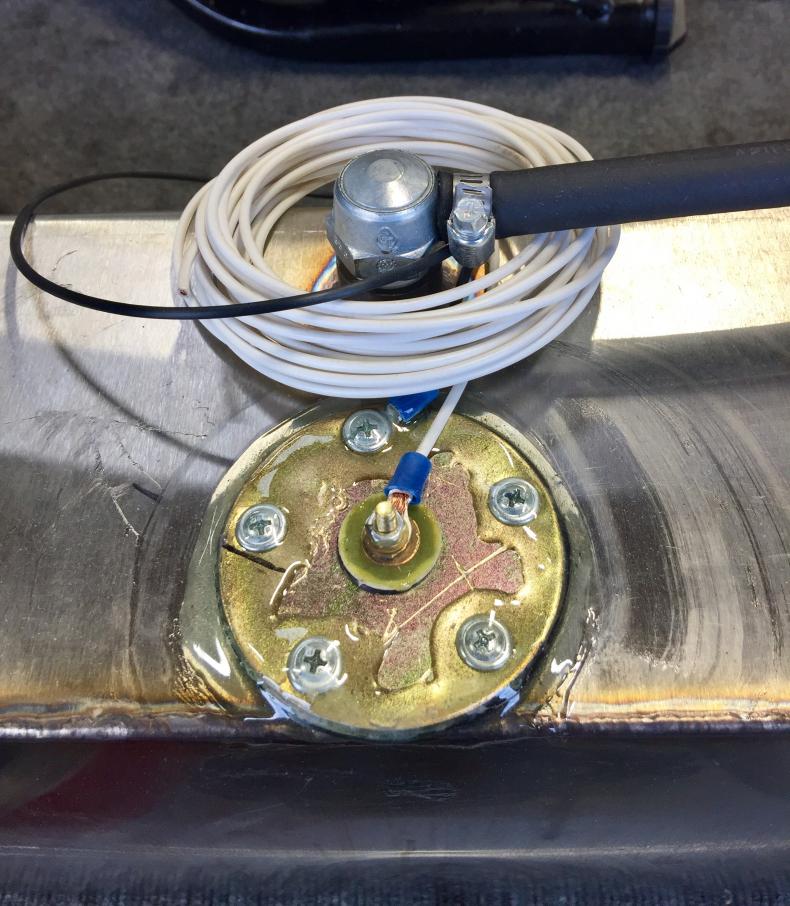
All-in-all, this is looking to be a great addition!
__________________
Flint - 2016 SMB Sprinter 4x4 144" RB 150S w/ PH
KN6BJX
|
|
|
|
|
01-06-2019, 01:14 PM
|
#614
|
|
Site Team
Join Date: May 2007
Location: Southern New Mexico
Posts: 10,179
|
Quote:
Originally Posted by Fitz

...The tank fills from the bottom, here is a picture showing the fill tube on the lower right. From here a hose runs to the front of the passenger's side rear wheel well, where the fill nozzle is located:
|
That tank is a very nice piece of artwork that most people will never see. Do you have any concerns over the fill-neck being compromised by rocks getting thrown up from the rear wheel? Maybe some kind of shield or inner fender might be warranted.
Herb
__________________
SMB-less as of 02/04/2012. Our savings account is richer, but our adventures are poorer.
|
|
|
|
|
01-06-2019, 02:41 PM
|
#615
|
|
Senior Member
Join Date: Nov 2015
Location: Vacaville, just east of the San Francisco Bay Area
Posts: 1,062
|
Quote:
Originally Posted by BroncoHauler
Do you have any concerns over the fill-neck being compromised by rocks getting thrown up from the rear wheel? Maybe some kind of shield or inner fender might be warranted.
Herb
|
Good observation, I will keep my eye on it and see what develops. A metal cover would be easy enough to fab up and install...
__________________
Flint - 2016 SMB Sprinter 4x4 144" RB 150S w/ PH
KN6BJX
|
|
|
|
|
01-06-2019, 04:20 PM
|
#616
|
|
Site Team
Join Date: May 2007
Location: Southern New Mexico
Posts: 10,179
|
Quote:
Originally Posted by Fitz
Good observation, I will keep my eye on it and see what develops. A metal cover would be easy enough to fab up and install...
|
Looking at it again, you could find a section of large diameter radiator hose and cut a small strip out of it, and wrap the remainder around the fill neck and just zip tie it in place. A little redneck, but it should work.
Herb
__________________
SMB-less as of 02/04/2012. Our savings account is richer, but our adventures are poorer.
|
|
|
|
|
02-03-2019, 06:16 PM
|
#617
|
|
Senior Member
Join Date: Nov 2015
Location: Vacaville, just east of the San Francisco Bay Area
Posts: 1,062
|
Engine Battery Charger
We talk a lot about our house batteries and the proper care and feeding of them. But the engine battery, that doesn't get much attention.
Flint doesn't sit around much, but when he does there is always a parasitic draw from all of those electronics. I have thought about it in the past, finally I did something about it.
I thought about a permanent installation with hard wiring, ultimately I decided to follow the K.I.S.S. principle and keep the charger in its bag stored conveniently under the front passenger's seat when not in use. That way it is easily available if needed for something else, a lesson I learned not long ago and that sealed the decision for me.
I looked around a bit and ultimately decided on the CTEK MUS 4.3. Here is the link to CTEK: https://smartercharger.com/
Connecting to the battery is simple with the optional 12 volt plug. Flint gets plugged into shore power when parked, I simply throw the breakers for the house AC plugs, plug in the charger, and then plug it into the 12 volt cigarette lighter. I purposefully place it so it is right in the middle of the floor, that will prevent anyone from forgetting about it when its time to jump in the van and go. Then it's a simple matter to unplug it, put it in its bag, and store it under the seat until it is needed again. I don't plug it in every time, but if I realize Flint has sat for a couple of weeks I like to plug it in.
Pictures make the explanation easy, here they are, left to right looking in the sliding door:


__________________
Flint - 2016 SMB Sprinter 4x4 144" RB 150S w/ PH
KN6BJX
|
|
|
|
|
02-03-2019, 09:25 PM
|
#618
|
|
Junior Member
Join Date: Jan 2014
Location: Ventura, CA
Posts: 19
|
Tim, is your van equipped with an automatic charging relay? If I understand correctly, an ACR will not only allow the house battery to charge when the engine is running, but it also works the other way around so that the starter battery will charge when the house battery is being charged. Please tell me if I’m missing something.
__________________
Mark & Karen
2013 SMB Sprinter RWD RB w/ Penthouse
|
|
|
|
|
02-04-2019, 09:07 AM
|
#619
|
|
Senior Member
Join Date: Nov 2015
Location: Vacaville, just east of the San Francisco Bay Area
Posts: 1,062
|
mkkbven,
The following is an extract from Flint's Operating Manual - written by me specifically for use in Flint, with data gathered from various sources:
Battery Separator
See page 32 ofthe SMB Manual for additional information- The separator is located under the driver’s seat, the seat must be removed for access. The separator monitors both batteries (engine and house)
- The solenoid for the separator will close only when power is present; i.e., when the ignition is hot. When the key is turned off the solenoid will stay closed until one of the battery systems (engine battery or house battery) drops below 12.8 volts. Below this voltage the two batteries are disconnected from each other, thus protecting one battery from being drained by the other
- If the engine battery is low and not enough power is present to start the engine, the separator will join both battery systems together in order to let the house battery “help” the engine battery. To do so:
- Note that the solenoid requires a minimum of 3 volts from the engine battery to operate. If the engine battery is below 3 volts the solenoid will not close and thus the house battery will not be able to assist. In this case an external source of power is required; i.e., connecting a battery charger to the engine battery or getting a jump start from another vehicle
- If 3+ volts are available: Turn the ignition key on. This will send power to the separator solenoid, allowing it to engage, thus joining the two systems together
- Charging the engine battery from the house battery takes time! Turning on the key allows the solenoid to close (assuming 3+ volts is available in the engine battery) and joins the two systems, but then you must wait for the current to flow from the house battery to the engine battery. It can take from 30 to 60 minutes to transfer enough power to the engine battery to start the engine,thus be patient!
An electrician I'm not, even though I pretend to be when the situation forces me to. I will seek out more information, but it is my understanding that the only way my van can put power into the engine battery from the house side is with the key on as described above.
Looking for additional input from those of you with specific knowledge of the subject...
__________________
Flint - 2016 SMB Sprinter 4x4 144" RB 150S w/ PH
KN6BJX
|
|
|
|
|
02-04-2019, 09:51 AM
|
#620
|
|
Senior Member
Join Date: May 2007
Location: Beaverton, OR
Posts: 2,504
|
A lot would depend on what separtor you actually have, your SMB build appears to be past the time they were installing the Sure Power unit, it did have a feature (or "Bug: IMHO) that did function off of they key, it was called start assist. Sportsmobile actually installed them wrong, and even have documented it incorrectly in some of their manuals.
Sportsmobile went to the Blue Sea 7622 (or 7620), which is a much better unit. There are some optional wires that can go to the start circuit, but they would be for start isolation. I don't believe SMB was big on installing the Switch/Indicator, but it is worth the install, as it will give you indication of the state of the unit, and give you manual control. Typical installation without the switch would be to leave the control wire floating, which puts the unit in auto mode. This would monitor both battery and open and close based on the voltages present. Both the Surepower 1315 -200 and the BlueSea 7622 are unidirectional and would allow you to charge the starter from the shore power charger.
Let me know which unit you have, and I would be happy to help you out.
-greg
__________________
-greg
__________________________________________________ ______________
"Goldilocks" 2020 Ford Transit High Roof Extended 3.5 EcoBoost AWD Homebuilt
|
|
|
|
|
|
 Posting Rules
|
You may not post new threads
You may not post replies
You may not post attachments
You may not edit your posts
HTML code is Off
|
|
|
|
 » Recent Threads
 |
|
|
|
|
|
|
|
|
|
|
|
|
|
|
|
|
|
|
|
|
|
|
|
|
|
|
|
|
|
|
|
|
|


 Linear Mode