|
|
 05-19-2019, 07:07 PM
|
#651
|
|
Site Team
Join Date: May 2007
Location: Southern New Mexico
Posts: 10,179
|
Good to hear that it worked as advertised. I considered one of these for my Excursion, but never pulled the trigger on it.
Herb
__________________
SMB-less as of 02/04/2012. Our savings account is richer, but our adventures are poorer.
|

|

|
|
05-22-2019, 09:50 AM
|
#652
|
|
Junior Member
Join Date: Mar 2017
Location: SF Bay Area
Posts: 12
|
This looks like a great option. I've been looking at different hitch based steps to make it easier to access the van from the rear doors and they are actually more expensive than the Spare bumper. Would you say this works well as a step too? It looks like it from the photos but thought it would be worth asking. I don't have the spare tire or boxes.
Thanks!!
Scott
|
|
|
|
|
05-22-2019, 11:08 AM
|
#653
|
|
Senior Member
Join Date: Nov 2015
Location: Vacaville, just east of the San Francisco Bay Area
Posts: 1,062
|
The SpareBumper has anti-slip on the top of it and it works great as a step, it also works equally well as a seat.
__________________
Flint - 2016 SMB Sprinter 4x4 144" RB 150S w/ PH
KN6BJX
|
|
|
|
|
05-22-2019, 06:22 PM
|
#654
|
|
Senior Member
Join Date: Nov 2015
Location: Vacaville, just east of the San Francisco Bay Area
Posts: 1,062
|
Bumper or seat???
Quote:
Originally Posted by Fitz

...it also works equally well as a seat.
|
This picture shows Laura and John Brindle of Agile Offroad, with John demonstrating the versatility of the SpareBumper by using it as a seat!

__________________
Flint - 2016 SMB Sprinter 4x4 144" RB 150S w/ PH
KN6BJX
|
|
|
|
|
05-23-2019, 06:41 AM
|
#655
|
|
Member
Join Date: Apr 2019
Posts: 57
|
Since this thread is long I might be repeating a raised discussion, but has anyone studied the Agile RIP versus Van Compass Stage 6? Whats the conclusion and why? Thanks
|
|
|
|
|
05-23-2019, 06:57 AM
|
#656
|
|
Senior Member
Join Date: Nov 2015
Location: Vacaville, just east of the San Francisco Bay Area
Posts: 1,062
|
Two good companies, each with a different approach, both with many satisfied customers. I have had each do work for me, I count both as friends.
Here is another long thread that speaks to your question, I suggest you read it: https://sprinter-source.com/forum/sh...ad.php?t=61433
__________________
Flint - 2016 SMB Sprinter 4x4 144" RB 150S w/ PH
KN6BJX
|
|
|
|
|
05-27-2019, 10:55 AM
|
#657
|
|
Senior Member
Join Date: Nov 2015
Location: Vacaville, just east of the San Francisco Bay Area
Posts: 1,062
|
Van Compass Front Sway Bar Disconnect
If you haven't seen it yet, Van Compass recently came out with a new front sway bar disconnect kit. According to VC, disconnecting the sway bar will allow for another 3" of articulation - no small thing in a Sprinter!
https://vancompass.com/products/fron...-2500-and-3500
Copied from the VC website: " This system is only compatible on 4x4 Sprinter equipped with our Fox front shock kit." I included this quote here just so there will be no surprises for those of you with Agile RIP kits.
I've had the kit sitting on my workbench for several weeks now, another member here finally got me to raise the priority on the install...
The kit installs on the driver's side, here is the stock configuration with the front tire removed. Note the jack stand under Flint, not shown is the High Lift jack (located out of the picture to the right) inserted in the front receptacle of the VC slider.
 And here is a close up of the stock sway bar link, this is what is removed and replaced:
 I had to apply a bit of leverage to the top of the sway bar to remove the link, no big deal to do and not hard, just not mentioned in the instructions:
 According to the instructions, "In some instances, the lower sway bar end link mounting hole needs to be opened up slightly to fit the larger shank of the tie rod end on the sway bar disconnect." Don't discount this small sentence, this turned out to be one of the most time-consuming parts of the installation. Access is limited, I finally used a combination of my Dremel tool with a flexible shaft attachment and a small round file.
The other part of the installation that consumed a lot of time was the placement of the shock mount pin. Take care when doing this, my initial placement of the 1/2" hole in the lower auxiliary shock mount was a bit off, easily corrected by opening up the hole "just a bit" with the Dremel. Note here that I differed a bit from the instructions on the placement of the pin. You have to allow for access from behind for the nut and the head of the wrench, thus I centered the pin in the bracket, which is 1" from the edge vs. the 1/2" shown in the instructions.
According to the instructions, "In some instances, the lower sway bar end link mounting hole needs to be opened up slightly to fit the larger shank of the tie rod end on the sway bar disconnect." Don't discount this small sentence, this turned out to be one of the most time-consuming parts of the installation. Access is limited, I finally used a combination of my Dremel tool with a flexible shaft attachment and a small round file.
The other part of the installation that consumed a lot of time was the placement of the shock mount pin. Take care when doing this, my initial placement of the 1/2" hole in the lower auxiliary shock mount was a bit off, easily corrected by opening up the hole "just a bit" with the Dremel. Note here that I differed a bit from the instructions on the placement of the pin. You have to allow for access from behind for the nut and the head of the wrench, thus I centered the pin in the bracket, which is 1" from the edge vs. the 1/2" shown in the instructions.
 Here is a close up of the sway bar disconnected for off-road use:
 And here is a close up with the sway bar connected for normal on-road use:
 And finally, here is a picture showing access with the front tire turned all the way to the left. Access is good, this is what you will be dealing with when changing the configuration:
 This installation was NOT the "30 min - 1 hr. installation time" as stated in the instructions. With a lift, with all the right tools, and with the experience of a couple of installations behind you, maybe. It took me most of that time just to get the High Lift jack in place (with the 2" lift the van is too high for my floor jack to be of use), get the jack stand under the frame and get the front tire off - all good practice for the time when you are doing it in the dirt!
I drove the van with the sway bar disconnected just to get a feel for it and there is definitely more movement. I'm anticipating good things and am looking forward to trying it out off-road at the next opportunity!
This installation was NOT the "30 min - 1 hr. installation time" as stated in the instructions. With a lift, with all the right tools, and with the experience of a couple of installations behind you, maybe. It took me most of that time just to get the High Lift jack in place (with the 2" lift the van is too high for my floor jack to be of use), get the jack stand under the frame and get the front tire off - all good practice for the time when you are doing it in the dirt!
I drove the van with the sway bar disconnected just to get a feel for it and there is definitely more movement. I'm anticipating good things and am looking forward to trying it out off-road at the next opportunity!
__________________
Flint - 2016 SMB Sprinter 4x4 144" RB 150S w/ PH
KN6BJX
|
|
|
|
|
06-02-2019, 09:29 PM
|
#658
|
|
Senior Member
Join Date: Nov 2015
Location: Vacaville, just east of the San Francisco Bay Area
Posts: 1,062
|
Another Check Mark on the To-Do List
We didn't attend Overland Expo this year, but when we were there last year we picked up two Delrin "ramps/slides" from Aluminess that are designed to make opening the fully-loaded swing arms easier. Here it is a year later, and I finally got around to installing the slides. Better late than never....
The Aluminess slides weren't tall enough, so I went to TAP Plastics to pick up two additional pieces of Delrin to space them up.
Here is the original Aluminess slide placed for layout:

Here is the slide with the additional Delrin spacer underneath:

And here is the finished installation with both slides in place:

Opening the swingarms was always a chore, something I worried Laura would have trouble with if she had to do it on her own. With the slides in place the closed swingarm is spaced up enough that the entire assembly no longer has to be lifted a bit to relieve the pressure on the latch assembly when opening, a much better situation. After the installation Laura was easily able to open both swingarms, I'll count that as proof of a successful installation!
__________________
Flint - 2016 SMB Sprinter 4x4 144" RB 150S w/ PH
KN6BJX
|
|
|
|
|
06-19-2019, 01:02 PM
|
#659
|
|
Senior Member
Join Date: Apr 2016
Location: Oregon
Posts: 1,186
|
Your Thule Track System
Hi Fitz. Im on the schedule at SMB West for a poptop Install on my E350 in September. Im starting to plan my load carrying components and, as you know, we share the same boat-loading and use approach. When you have a moment, could you comment on these questions?
1 - Did you use Yakima rack components? Looks like the round bars in your pics. Which tower and adapter did you use?
2 - are you still happy with just the two crossbars? Any issues in avoiding crashing into the solar panel while loading?
3 - I know you made a thoughtful decision to place the solar panel in the rear. Have you found that to be useful/necessary over time? SMB will be prewiring my top for future solar. Their default is to install that outlet up front. Would you advise that I change that?
4 - Finally, are you still happy with that overall roof layout? Following your posts, it seems to be working well for you.
Im grateful for your detailed thread. Thanks in advance,
Otter
__________________
"PhoTo" - 2014 Ford E350 5.4L RB - Agile 4x4 - CCV Poptop
|
|
|
|
|
06-19-2019, 10:55 PM
|
#660
|
|
Senior Member
Join Date: Nov 2015
Location: Vacaville, just east of the San Francisco Bay Area
Posts: 1,062
|
Otter:
1 - Did you use Yakima rack components? Looks like the round bars in your pics. Which tower and adapter did you use? - All components are Thule. The load bars are the standard square steel bars, they are stronger than AeroBlade bars. I don't recall the name of the feet, they match the bars and mate up to the standard rail that SMB installed on top of the penthouse.
2 - A re you still happy with just the two crossbars? Any issues in avoiding crashing into the solar panel while loading? - I left a space in the middle to add another bar if need be, but I have never found the need. Two points of contact have been perfect for everything I have carried. A center load bar would be required if I carried something shorter, that has not yet been the case. Like you, the rear bar is placed as far to the rear of the PH top as it can be, this greatly facilitates loading from the rear, just be sure the solar is spaced far enough forward to allow the foot to be mounted directly behind it. The solar panel has never gotten in the way when loading or unloading, the canoe goes up and over the panels with no issue.
3 - I know you made a thoughtful decision to place the solar panel in the rear. Have you found that to be useful/necessary over time? SMB will be prewiring my top for future solar. Their default is to install that outlet up front. Would you advise that I change that? - I am very happy with the solar in the back, I would not change it and I would recommend you do the same. The way I/you load the canoe is up over the back, having the solar panels up front would put them in the way. I sometimes find myself standing on the roof just behind the front load bar when maneuvering the canoe, I never have the need to do so in front of the rear load bar where the solar panels are located.
4 - Finally, are you still happy with that overall roof layout? Following your posts, it seems to be working well for you. - I am very happy with the layout, I wouldn't change a thing.
Other comments:
1. I cut a piece of 1-1/2" PVC that slips over the load bar and fits between the rear feet when I am carrying the canoe. Just detach the bar from one of the feet and slide it on, then reattach the bar to the foot. It acts as a slide/roller when taking the canoe on/off and works really well. I do not use this when carrying ladders, wood, pipe, and etc., in those cases I load from the side and I want the flat surface of both bars to rest the load on.
2. My load bars are 8'-10" from the ground. Make no mistake, this is high! Loading the canoe with two people is easy enough, but my design case is to be able to do it by myself (which I can do), but I can see where that could be an issue in a few years time.
3. Based on #2 above, I am thinking of selling the canoe and moving to something either inflatable or smaller and lighter. Never satisfied! Anybody interested in a classic 1988 17' Grumman Square Stern Aluminum Canoe?
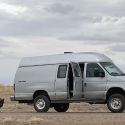
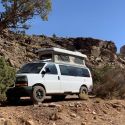
For those who are interested, here are some general pictures that illustrate how it all came together:


__________________
Flint - 2016 SMB Sprinter 4x4 144" RB 150S w/ PH
KN6BJX
|
|
|
|
|
|
| Thread Tools |
|
|
| Display Modes |
 Linear Mode Linear Mode
|
 Posting Rules
|
You may not post new threads
You may not post replies
You may not post attachments
You may not edit your posts
HTML code is Off
|
|
|
|
 » Recent Threads
 |
|
|
|
|
|
|
|
|
|
|
|
|
|
|
|
|
|
|
|
|
|
|
|
|
|
|
|
|
|
|
|
|
|


 PhoTo
PhoTo