|
|
 10-14-2019, 10:39 PM
|
#681
|
|
Senior Member
Join Date: Nov 2015
Location: Vacaville, just east of the San Francisco Bay Area
Posts: 1,063
|
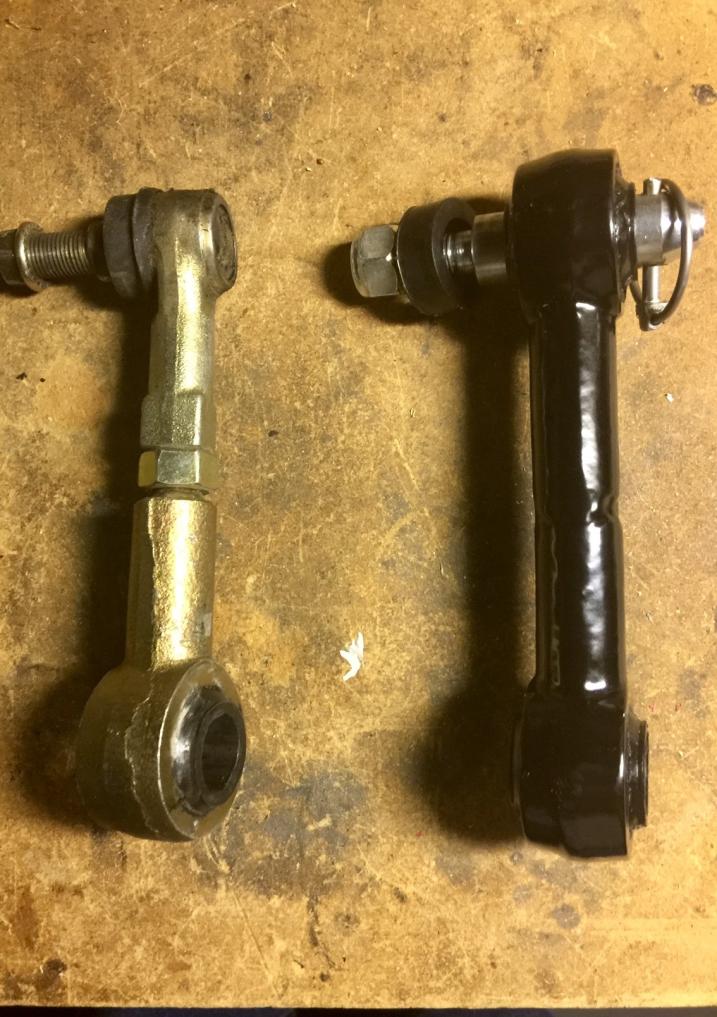
Update to Post 657 (pg 66) Van Compass Front Sway Bar Disconnect
Post 657 describes my installation of the Van Compass Front Sway Bar Disconnect Kit. For my purposes here I will call it Version 1.0.
I ran the kit for about two thousand miles and when I went back to look things over I wasn't satisfied with the lower attachment point. I contacted Mark and Rob and we discussed my concerns, the end result is Version 2.0 of the kit.
Version 2.0 eliminates the vehicle attachment point for the disconnected link, you simply remove the link and store it in the vehicle, plus it changes the method of attachment of the lower pin to the vehicle to a much more (in my opinion) robust connection.
I have about a thousand miles on Version 2.0 and so far I am very satisfied with it.
Here is a picture of the two sway bar links side-by-side, Version 1.0 is on the left and Version 2.0 is on the right. I should have rotated the picture, the lower attachment points are shown at the top of the picture.
Here is what the kit looks like with the two pins installed, note the now unused hole left over from the original installation. This is where the pin was installed that the link was mounted to when the top pin was disconnected. In Version 2.0 this pin is not used and the link is simply removed and stored in the van. Much simpler and (my opinion) much better. Note also the spacer on the lower pin, this is what maintains the correct alignment of the link. It slides off the pin, either remove and store it when the link is removed or put the keeper pin back in place (my choice) as you see in the picture.
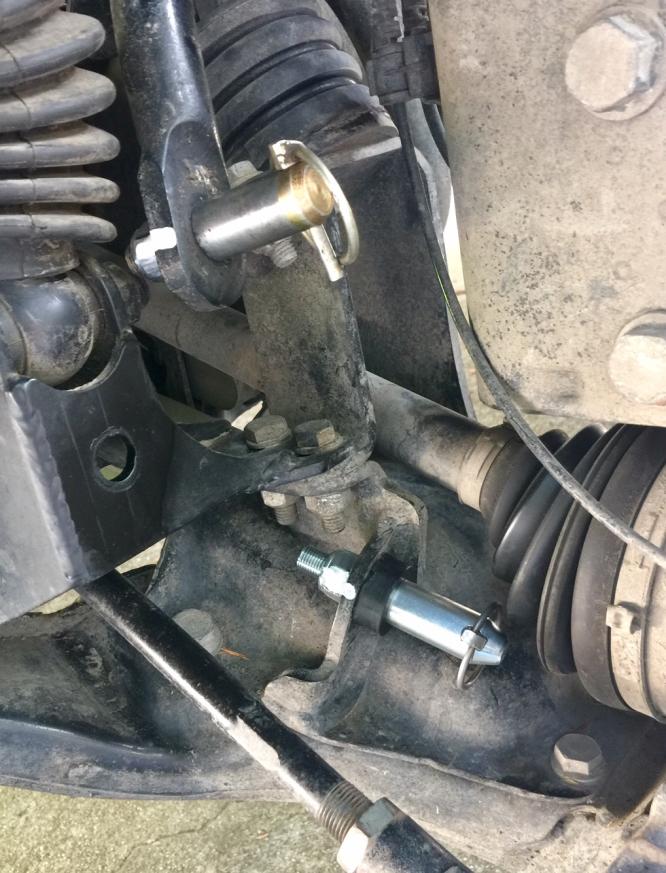
And here is what the kit looks like with the link installed. Both joints have zerk fittings that are easy to access to grease. My big old grease gun was a bit awkward for this, thus giving me the opportunity to buy a small hand-held cartridge unit. Much nicer!

If you have Version 1.0 and like it, great! If you have Version 1.0 and are not satisfied with it, contact Mark and Rob and I am confident they will work it out to your satisfaction.
This is a nice modification. It doesn't provide a massive amount of additional articulation, but what it does provide is greatly appreciated and you will notice the difference when pushing your Sprinter on rough terrain.
__________________
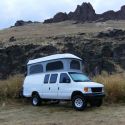
Flint - 2016 SMB Sprinter 4x4 144" RB 150S w/ PH
KN6BJX
|

|

|
|
11-10-2019, 09:28 AM
|
#682
|
|
Senior Member
Join Date: Nov 2015
Location: Vacaville, just east of the San Francisco Bay Area
Posts: 1,063
|
Update to Post 613 (pg 62) Agile 14 Gallon Auxiliary Tank Install
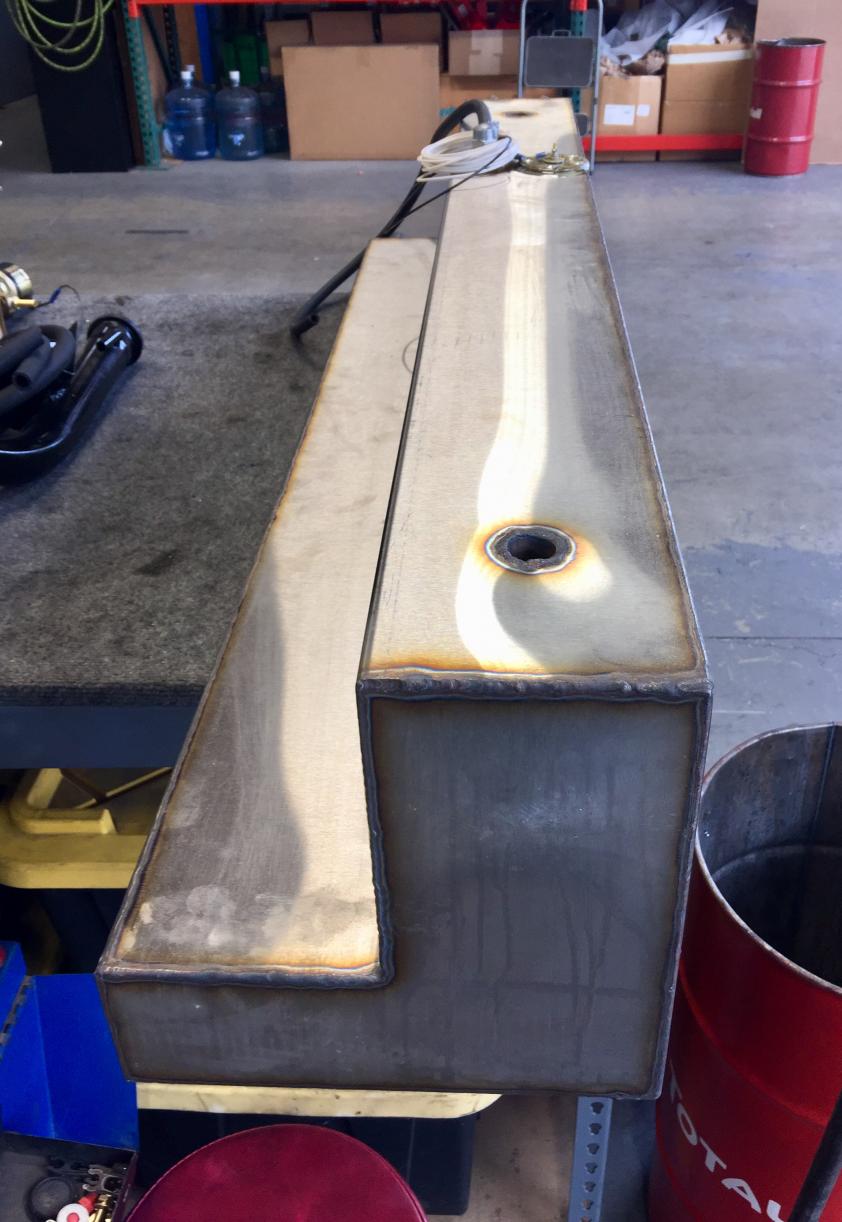
Post 613 of this thread details the installation of the 14 gallon Agile auxiliary fuel tank located on the passenger side with the fill nozzle in the rear wheel well. Note that Agile also offers a 20 gallon tank on the driver's side with a corresponding rear wheel well fill nozzle.
One issue I noticed is that with the auxiliary tank full fuel would leak from around the cap when going up a steep incline. Annoying, but it makes sense when you look at the fill nozzle/tank configuration and realize that the vented fuel cap is located only a couple of inches above the top of the tank.

I called John at Agile and he pointed out to me that the auxiliary tank has a vent at the top, thus we agreed that there was no need for a vented cap on the fill nozzle. For under $10 I picked up a Stant non-vented cap, part number 10826.
Problem solved. It's nice when the solution is a simple one!
__________________
Flint - 2016 SMB Sprinter 4x4 144" RB 150S w/ PH
KN6BJX
|
|
|
|
|
11-13-2019, 10:53 AM
|
#683
|
|
Member
Join Date: May 2017
Location: Bend, Oregon
Posts: 59
|
I hadn't noticed any leaks from Starr's cap even when driving with a full aux tank up 30+% slopes. But I changed over to the non-vented cap anyway. Thanks, Fitz!
BTW, I also experienced an airlock problem when filling the aux fuel tank as described in your earlier post. So I also straightened the breather/overflow tube (it was a PITA) and the tube unfortunately split/cracked at the bend's original inner radius. I patched using a Permatex 09101 Fuel Tank Repair Kit and all's been well.
__________________
Rick
2018 Sprinter 4x4 RB150S w/PH Lithium Build ("Starr Van")
Pictures of some Starr adventures (starting in 2019): https://rick.samcos.com/galleries/
|
|
|
|
|
11-17-2019, 01:07 PM
|
#684
|
|
Senior Member
Join Date: Nov 2015
Location: Vacaville, just east of the San Francisco Bay Area
Posts: 1,063
|
Rick,
Your post above made me think of another issue.
See the following two pictures for the location and detail of the tank vent.
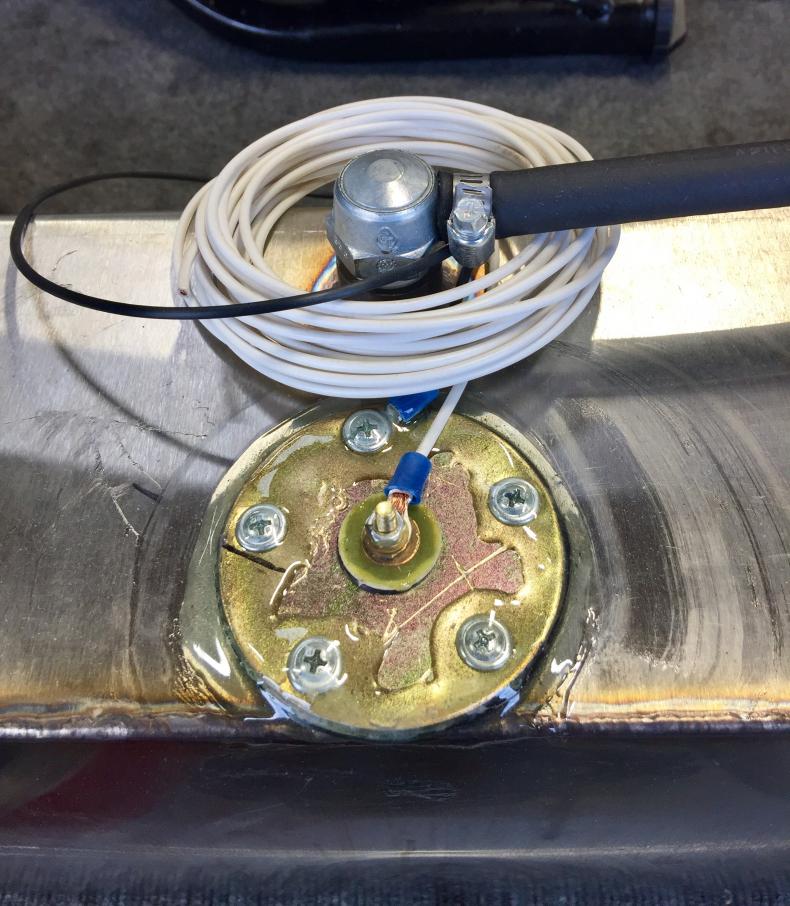
Flint is off looking at the geology at Devil's Slide right now (Highway 1 in northern CA), thus I can't take a picture of the vent tube termination, but the vent hose runs across the top of the tank and is attached to the 2" tank inlet at the bottom of the tank (shown in Post #682 above).
The issue is deep water. The vent tube inlet is right at the bottom of the tank, the connection is on top of the tank just under the floor of the van. I don't anticipate being in water deep enough to cause a problem, but not anticipating isn't equal to being prepared.
Just as I carry rubber cane tips to cover the inlet and exhaust of the D5 in deep water situations, I now carry a plastic plug to insert in the vent tube in the same situation.
In addition, reference back to post 558 on page 56 and post 585 on page 59. On my to-do list is to run the vent up to the breather referenced in those two posts that is located up under the hood. That will put it up out of harm's way and will be one less thing to worry about.
__________________
Flint - 2016 SMB Sprinter 4x4 144" RB 150S w/ PH
KN6BJX
|
|
|
|
|
01-01-2020, 12:36 PM
|
#685
|
|
Senior Member
Join Date: Nov 2015
Location: Vacaville, just east of the San Francisco Bay Area
Posts: 1,063
|
2019 Year-In-Review
2019 Year-In-Review Stats... Still working full time...
44,431 - 33,481 = 10,950 miles and 30 nights spent in 2019 (vs. 13,108 miles and 50 nights in 2018)
The van has been very reliable and we still love it every time we get the chance to climb in and go.
Best modification in 2019: Replacement of the Sure Power Separator with a Blue Sea 7622 ML-ACR Automatic Charging Relay with the ML Series Remote Control Switch. Now both the engine and house batteries charge with the engine running, when connected to shore power or with solar input, MUCH better.
Goal for 2020: Spend more nights in the van and get the ham radio that is sitting ready and waiting installed.
Use this year was adversely impacted by the fact that Laura took a fall and broke her ankle in three places. That's bad enough, but she was in India at the time and she had to wait almost a full month after surgery before the doctors would clear her for the long flight home. But that's another story onto itself...
Wishing everyone a HAPPY, SAFE, AND PRODUCTIVE NEW YEAR!
__________________
Flint - 2016 SMB Sprinter 4x4 144" RB 150S w/ PH
KN6BJX
|
|
|
|
|
01-01-2020, 01:15 PM
|
#686
|
|
Senior Member
Join Date: Jun 2016
Location: New Mexico
Posts: 261
|
Thanks Tim & happy new year!
What HAM and antenna did you get? I'm looking for one and can't decide...
Also, have you decided where you will locate the radio and antenna?
M
__________________
W3TAX
WRDZ686
2016 4wd 144" Sportsmobile Sprinter
2019 Chevy Colorado ZR2
2002 lifted & armored WRX wagon (sold)
|
|
|
|
|
01-02-2020, 12:18 PM
|
#687
|
|
Senior Member
Join Date: Nov 2015
Location: Vacaville, just east of the San Francisco Bay Area
Posts: 1,063
|
Matt,
Sitting on the shelf waiting for me to install:
1. Radio - Yaesu FTM-400XDR/DE, 144/430MHz 50W Dual Band Transceiver
2. Antenna - Diamond NR770HB 2m/70cm Dual Band Radialless Mobile Gain Whip Antenna
3. - Mount - Diamond K9000 Motor Drive Mount
It's my current thought that I will place the motor drive mount at the top rear of the roof ladder that is on the driver's side of the van, this will require me to fabricate a custom bracket. This way when in the down position the antenna will be protected along the side of the van. Wiring will route down the ladder to the underside of the van (possibly run through the VC rock slider) and from there up through the floor via a Blue Sea CableClam and into the area under the driver's seat base.
I'm thinking the body of the radio will be mounted on the driver's seat base adjacent to the parking brake handle, and that the Controller will be mounted adjacent to the rear view mirror where visibility is good. I have an external speaker, I won't know if that will be needed until everything else is installed.
Next on the list is to fabricate the bracket for the motor drive, that will most likely happen the next time I have another metals project. I'm not in a hurry, but it is definitely moving up on the list.
Thoughts from anyone more experienced than I (that's almost anyone reading this!) would be greatly appreciated.
__________________
Flint - 2016 SMB Sprinter 4x4 144" RB 150S w/ PH
KN6BJX
|
|
|
|
|
01-03-2020, 10:49 PM
|
#688
|
|
Senior Member
Join Date: Nov 2015
Location: Vacaville, just east of the San Francisco Bay Area
Posts: 1,063
|
Update to Post 613 (Pg 62) and 682 & 684 (Pg 69)
Flint has Agile's 14 gallon auxiliary fuel tank installed on the passenger's side. Post 613 details the installation of the fuel tank, Post 682 discusses my change from a vented to a non-vented fuel cap, and Post 684 documents my reasoning to run the as-installed vent up to the breather valve (see Post 558, Pg 56) I installed under the hood.
I took advantage of a couple of hours of free time today and knocked this one off the to-do list, always a good feeling.
Here is the as-installed vent, note that it terminates just behind and below the rear of the auxiliary fuel tank.

And here is my connection to the vent hose with a new hose that runs up to the front of Flint and terminates at the breather valve I installed under the hood. It's hard to see the new line in the picture, it is just above the two hose clamps.

While we don't make a habit of it, we have had Flint in water deep enough to cover the vent in the original as-installed location. Running the vent up under the hood will prevent water from entering the vent in the future, a good preventative measure in my book.
__________________
Flint - 2016 SMB Sprinter 4x4 144" RB 150S w/ PH
KN6BJX
|
|
|
|
|
01-05-2020, 11:25 AM
|
#689
|
|
Senior Member
Join Date: Nov 2015
Location: Vacaville, just east of the San Francisco Bay Area
Posts: 1,063
|
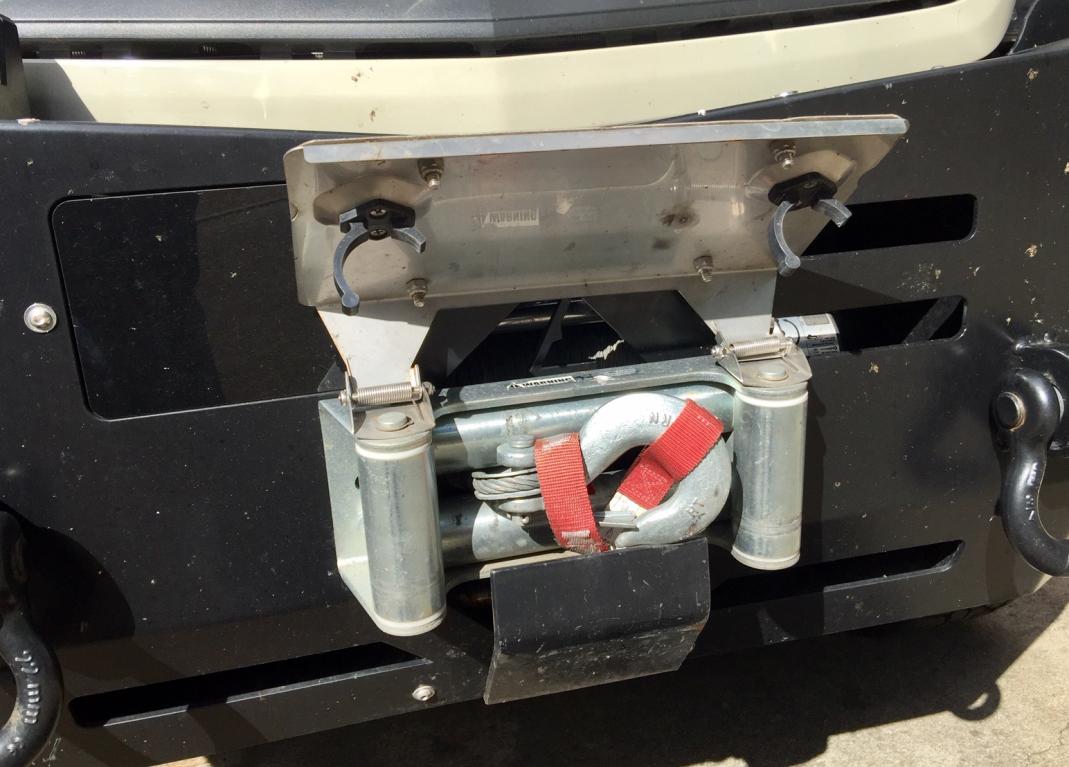
Front Winch - Wire to Synthetic Rope Conversion
This is another project that has been sitting on the workbench waiting for me to get around to it. Yesterday afternoon was free, thus one more project is now off the to-do list.
Flint's front winch was fitted with standard wire rope and the associated roller fairlead, plus a hinged license plate bracket. With every extra pound a consideration, especially when extended out over the front, I decided to switch over to synthetic rope and see what weight gain (or rather loss) I could achieve.
Here is what I started with.
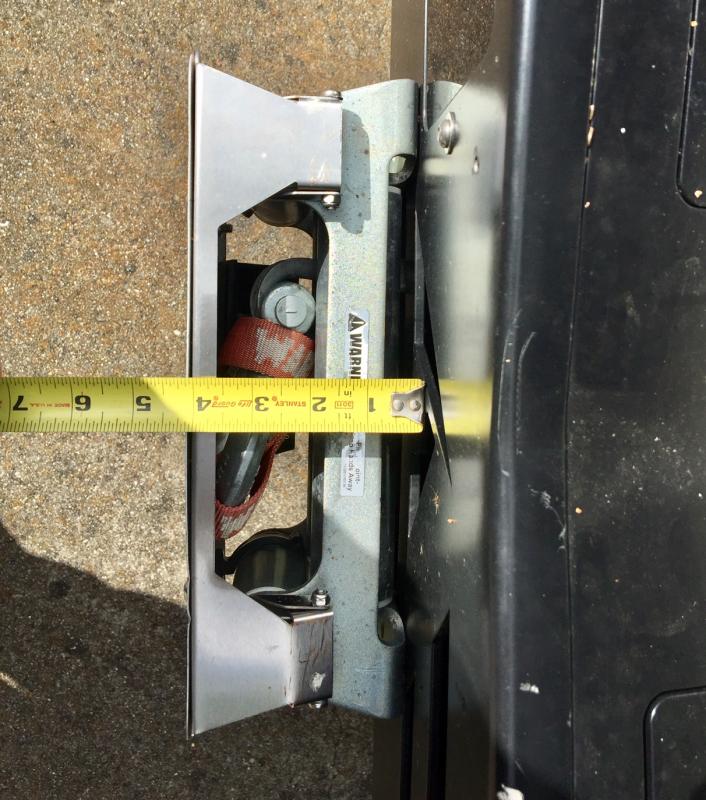
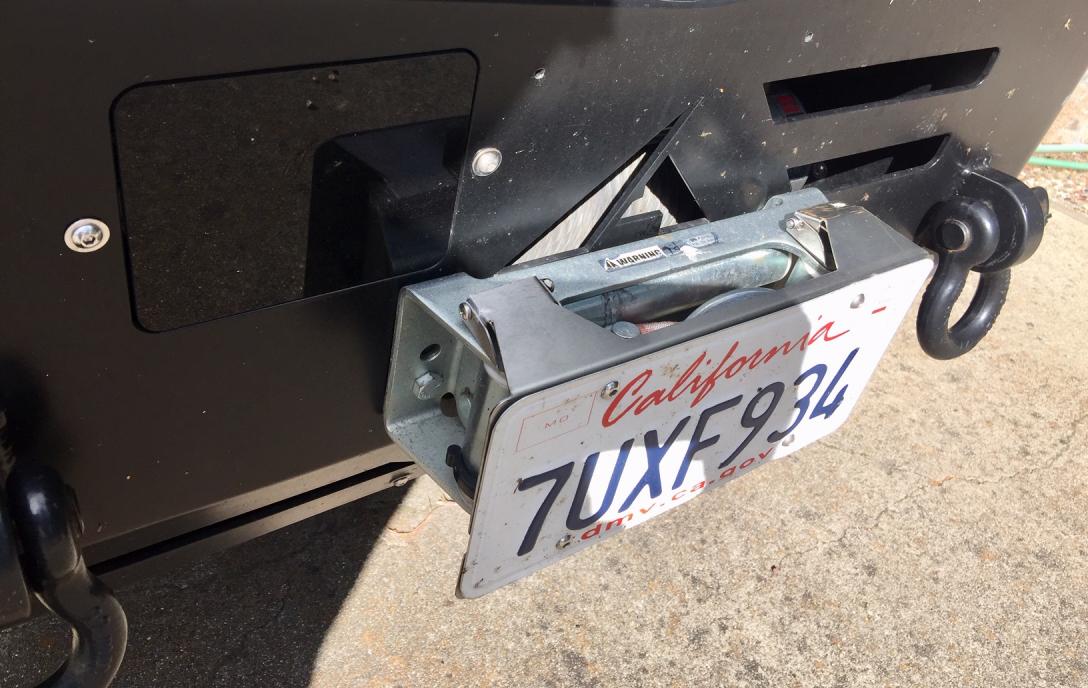
And here is what I ended up with. Note that in this case the hinged license plate bracket has been replaced with one held on by two thumb screws. I may change the thumb screws to something a bit more difficult to remove, I'm still thinking about this.
BTW, CA is a state that requires a front license plate, thus I could not consider eliminating the license plate.

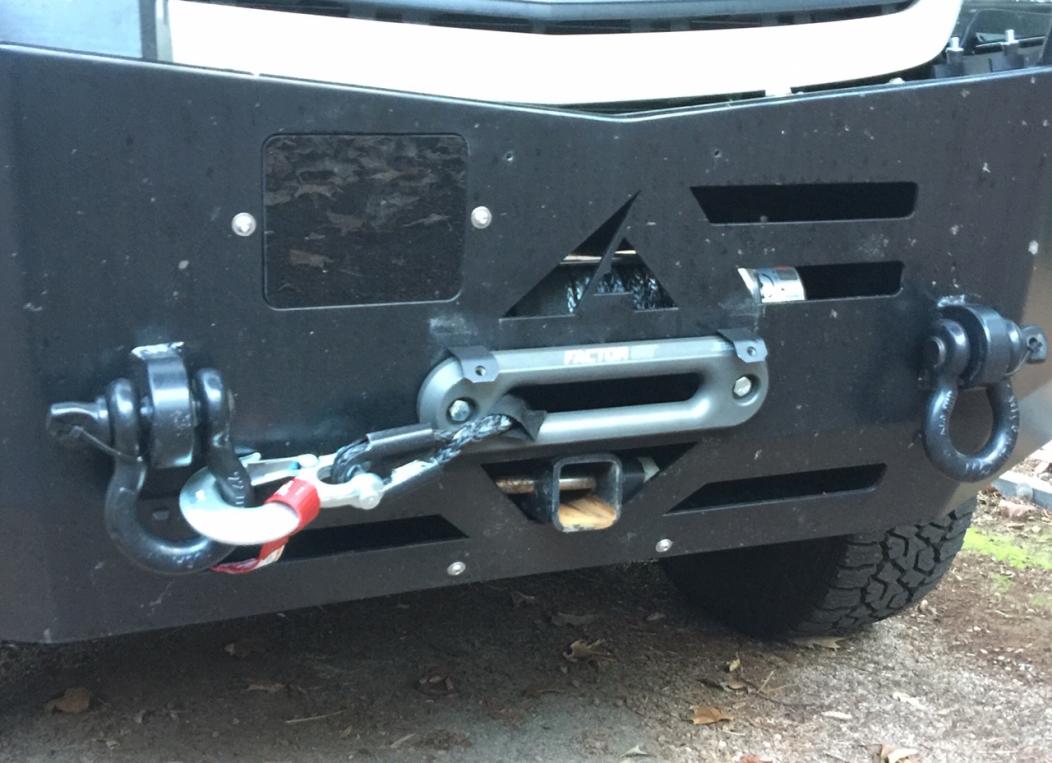
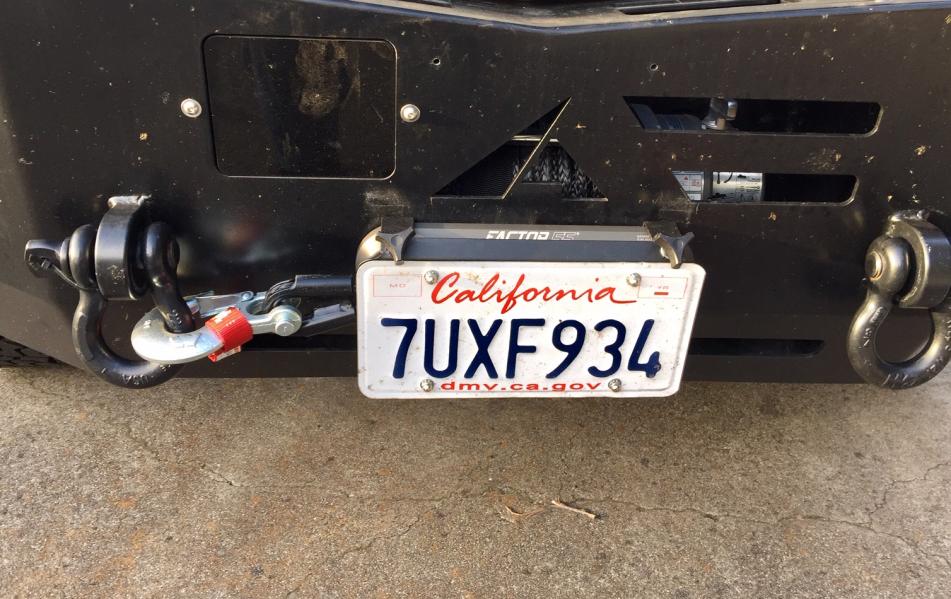
All told, the front projection was reduced by 2" (important when boarding a ferry when you are as close to the limit as Flint is) and the weight was reduced by 21 pounds. Probably not the most cost effective modification on a dollar per pound basis, but one I am happy with nonetheless.
__________________
Flint - 2016 SMB Sprinter 4x4 144" RB 150S w/ PH
KN6BJX
|
|
|
|
|
02-28-2020, 10:35 PM
|
#690
|
|
Senior Member
Join Date: Nov 2015
Location: Vacaville, just east of the San Francisco Bay Area
Posts: 1,063
|
What I Hope is an Unusual Repair
Laura just took Flint to Arizona and back to attend the big Tucson Rock Show. As with most trips she takes in Flint without me the point-to-point mileage was about tripled, but that's what these vehicles are for, correct? (Remember, I am still working full time and she is retired, her taking Flint solo is a new dynamic for us...)
I took Flint to the car wash when she returned and this is what I noticed when I was spraying under the van. (BTW, I will never go to the car wash without my creeper again, it is by far the best way to get underneath and access all those spots where the mud tends to hide. Kate, this is the same creeper you used when you visited.)

That 4 lb. chunk of steel you are looking at hanging from the driver's side rear brake line (draw your own conclusions) caught my attention, here is what I found on closer inspection:


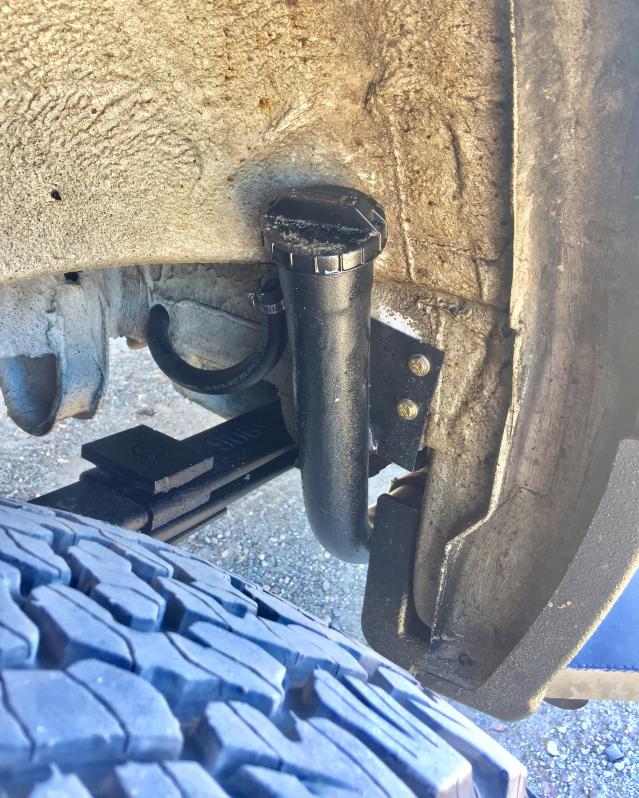
Mounted on top of the axle tube, this is the lower part of the rear bump stop. In my experience, this is typically welded to the axle tube, not so on the Sprinter. On the Sprinter, it is held in place with a steel bracket that in my case looks like it had a flaw and vibrated itself into two pieces.
Once I figured out the problem, the repair was fairly simple. I welded the bracket and added an additional piece of angle iron to reinforce the exterior of the 90 degree bend.
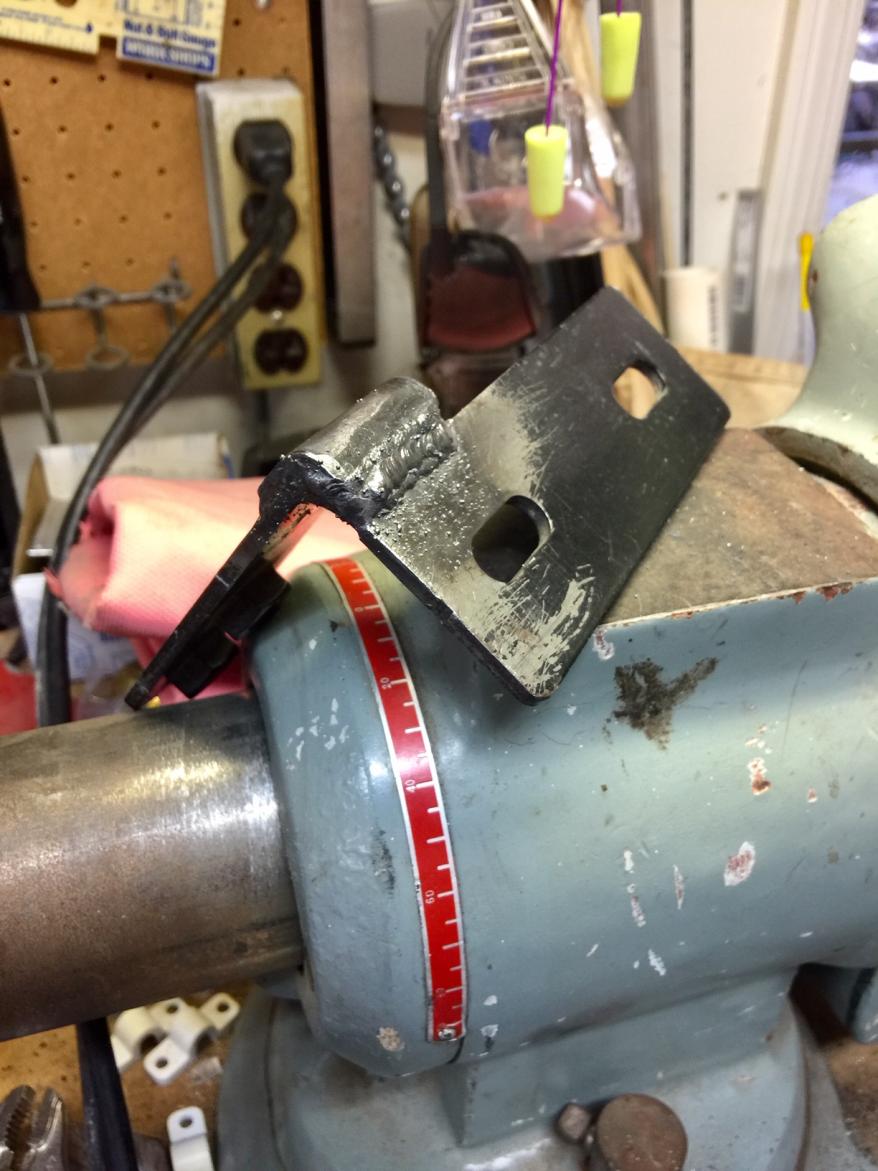

After a little clean-up and some paint, here is what the repaired bracket looks like in place:

And here is what it looks like from the other side:
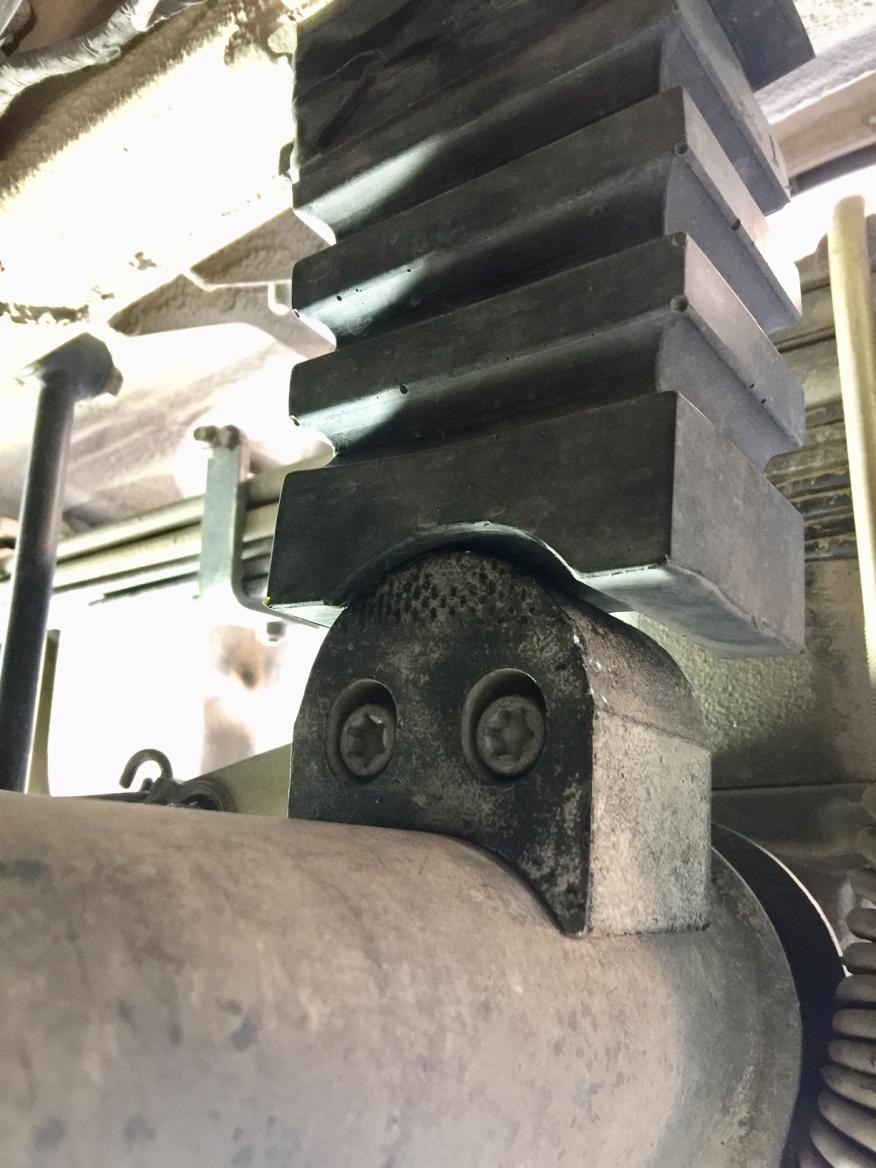
Note that I have replaced the original Bump Stop upper rubber piece with a Sumo Spring (Post #536, Page 54), but I can see no reason why this would have caused excessive strain on the bracket.
One more thing to watch out for. As far as I am concerned it just proves that Flint is getting used for his intended purpose!
__________________
Flint - 2016 SMB Sprinter 4x4 144" RB 150S w/ PH
KN6BJX
|
|
|
|
|
|
 Posting Rules
|
You may not post new threads
You may not post replies
You may not post attachments
You may not edit your posts
HTML code is Off
|
|
|
|
 » Recent Threads
 |
|
|
|
|
|
|
|
|
|
|
|
|
|
|
|
|
|
|
|
|
|
|
|
|
|
|
|
|
|
|
|
|
|


 PigPen
 Linear Mode