|
|
 06-10-2017, 07:50 PM
|
#381
|
|
Member
Join Date: Dec 2015
Location: San Francisco Area
Posts: 40
|
Quote:
Originally Posted by TomH

Biological perspective: Denim is organic in the true definition of the word.
Mathematically, the concentration of water moisture in wet denim is constant while the concentration in Thinsulate is quadratic.
|
Hi Tom,
While I didn't choose denim as an insulator, it shouldn't be confused with just cotton. Per the Ultratouch website, their denim is 80% natural fibers and treated for flame retardant, anti-microbials etc. it's not the same as a wet t-shirt in the rain.
Some of your statements, while very "scientificish", were hard follow (and I'm a scientist who uses math and physics for a living). For example, concentration is independent of a mathematic function; if it's saturated, it's just full of water. If you were trying to describe how water acts in a material like thinsulate, "quadratic" is a mathematical function that could describe many outcomes, such as linear or parabolic, so I'm unsure what you were trying to say about thinsulate.
Regards,
Dazed and confused
Sent from my iPad using Tapatalk
|

|

|
|
06-10-2017, 09:59 PM
|
#382
|
|
Senior Member
Join Date: Aug 2010
Posts: 752
|
Let's say you take a cotton sock from a person who has been hiking and you graph the moisture concentration from the warm side (inside) to the cold side (outside), where the value of x is moisture concentration and y is the distance from the warm side, the x value will remain constant all the way across, creating a horizontal line across the Cartesian graph.
If you do the same thing with a wool sock, you start barely above (0,0) and you wind up with a non-linear function whose upward curve increases logarithmically as you approach the cold side. Rather than quadratic, I should have said non-linear.
The same contrast happens for a denim jacket and one using the modern synthetics which mimic the wicking properties of wool.
The result of this is that cotton/denim that is even mildly damp stops being an insulator and becomes a thermal conductor. It does not have to be anywhere close to saturated. A cotton T-shirt uses conduction, convection (if air is moving), and evaporation to actively refrigerate a person's body even when you can't feel any moisture in it. The wool or synthetic analogue, OTOH, remains dry against the warm side. The evaporation which occurs on the outer side utilizes ambient heat (remember 0°C is still >373°K) rather than heat from the warmer side of the insulating fabric. It is true, however, that a vapor barrier will slow the movement of moisture through a fabric, but you can't keep it out. Changes in air pressure always force air in and out of an insulator and that air always holds humidity. Cotton is either going to rot, or (as I said above) it must contain poisonous anti-microbial chemicals.
The fact that some company sells vehicles for >$300K and uses denim as an insulator profers no scientific evidence whatsoever that denim is a good insulator. It is instead, a thermal conductor unless kept absolutely dry.
As far as installation of Thinsulate, it does have to be done properly. It is true that overcompression destroys loft and eliminates the micro-pockets of air which give the material its insulating qualities. The installer must have the expertise and the patience, however, to do it correctly.
|
|
|
|
|
06-12-2017, 08:40 AM
|
#383
|
|
Senior Member
Join Date: Jun 2016
Location: Denver, CO
Posts: 242
|
So all these companies with years of experience installing insulation have been doing it wrong from the start, and they're actually installing a material that draws heat from the interior?
Do you have scientific evidence that Thinsulate insulates better than Denim? Because even 3M themselves don't market that stuff as insulation. All the high-quality upfitters I've talked with don't use thinsulate exclusively. Rather, they do so upon the request of the owner, who likely read about on a forum from Hein. He's got posts selling this stuff on eBay on nearly every van-related forum. Yet, I've seen no testing or evidence that Thinsulate does a better job, or that Denim just wets out instantly.
I'm not arguing that Thinsulate is bad. But you seem fairly confident in it's superior use, despite the fact that Denim has been used to insulate vans, and homes, for years without much issue.
|
|
|
|
|
06-14-2017, 09:36 AM
|
#384
|
|
Senior Member
Join Date: Nov 2015
Location: Vacaville, just east of the San Francisco Bay Area
Posts: 1,062
|
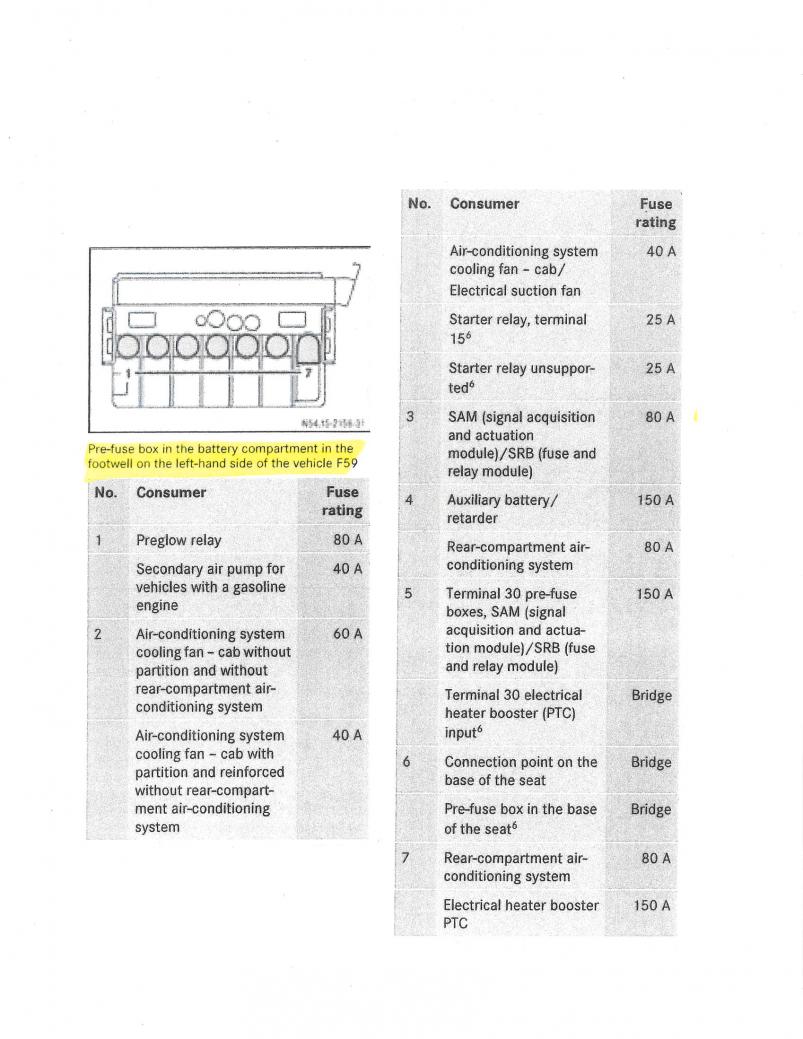
Spare Fuses - Answering my own question
Quote:
Originally Posted by Fitz
Spare Fuses
I went through the two fuse panels (under the driver's seat and in the base of the rear bench seat) plus looked at the various in-line fuse holders scattered about and came up with a list. From there it was a simple matter to determine what I needed for spares.
What I didn't realize is that there are more fuses in the Sprinter battery compartment, and they are not your garden variety fuse!
To access, first you have to use the correct Torx driver (if you don't have a set add them to your on-board tool kit) to gain access to the panel below the floor, and then you need another size driver to remove the panel itself. Note: There is a MB-supplied Torx driver contained in the bag with the tools for the jack located in the passenger's side foot well.
The battery is located in the driver's side foot well. Here is what you see when you open it up.
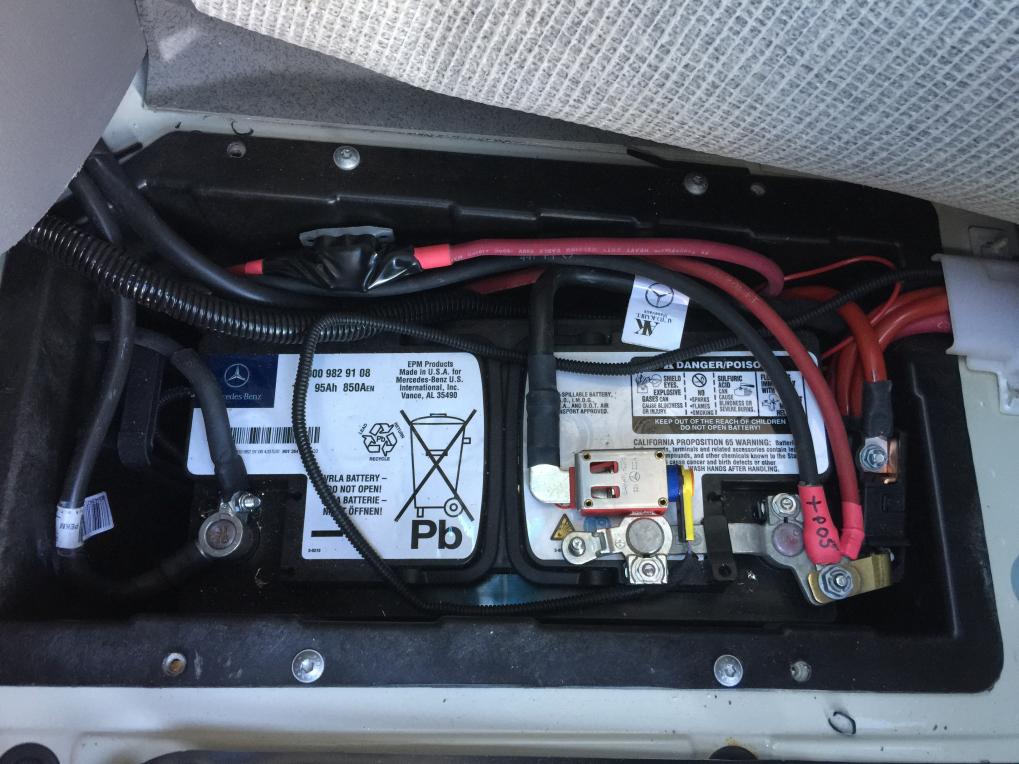
Note the brass bar on the right hand side coming off the positive terminal. Follow it and you will find a black plastic cover nestled immediately to the right of the battery. You can just see the uppermost part of it in this picture.
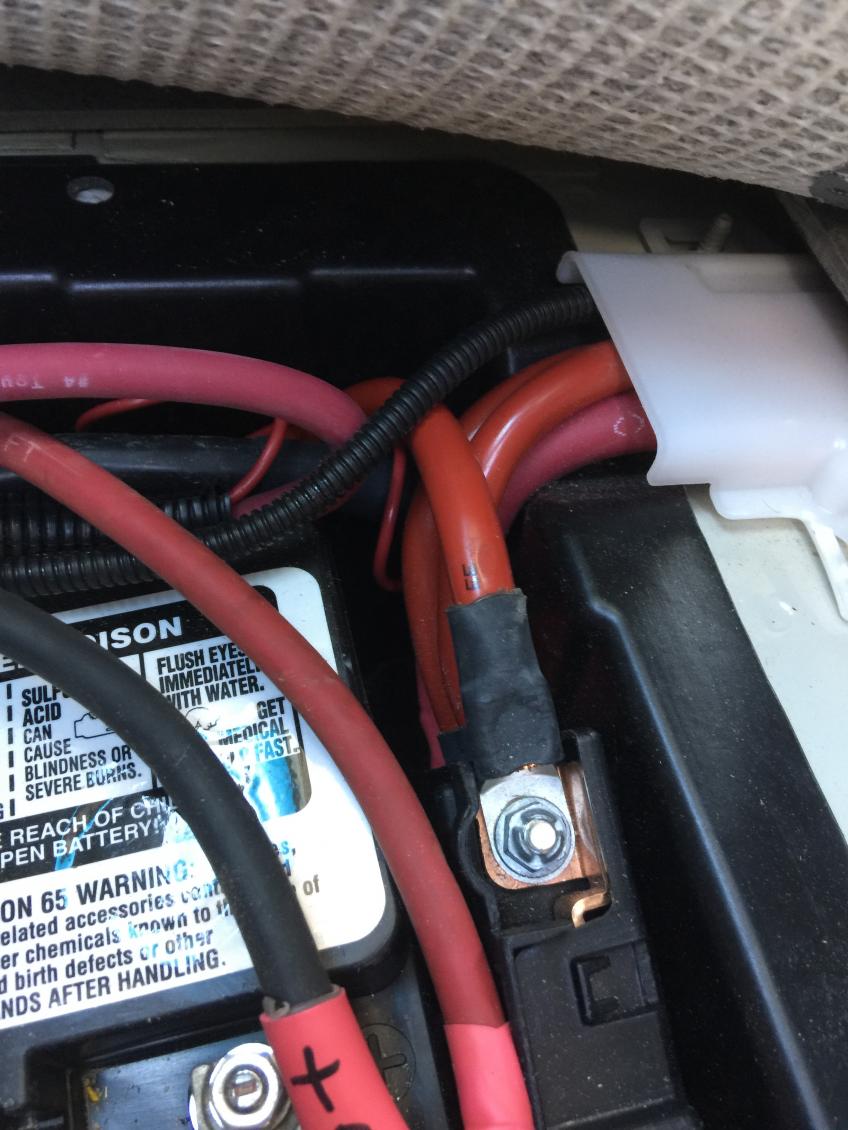
Remove the 13mm nut attaching the brass bar to the positive terminal and carefully extract all that is attached to it. Remove the plastic cover and this is what you will find.
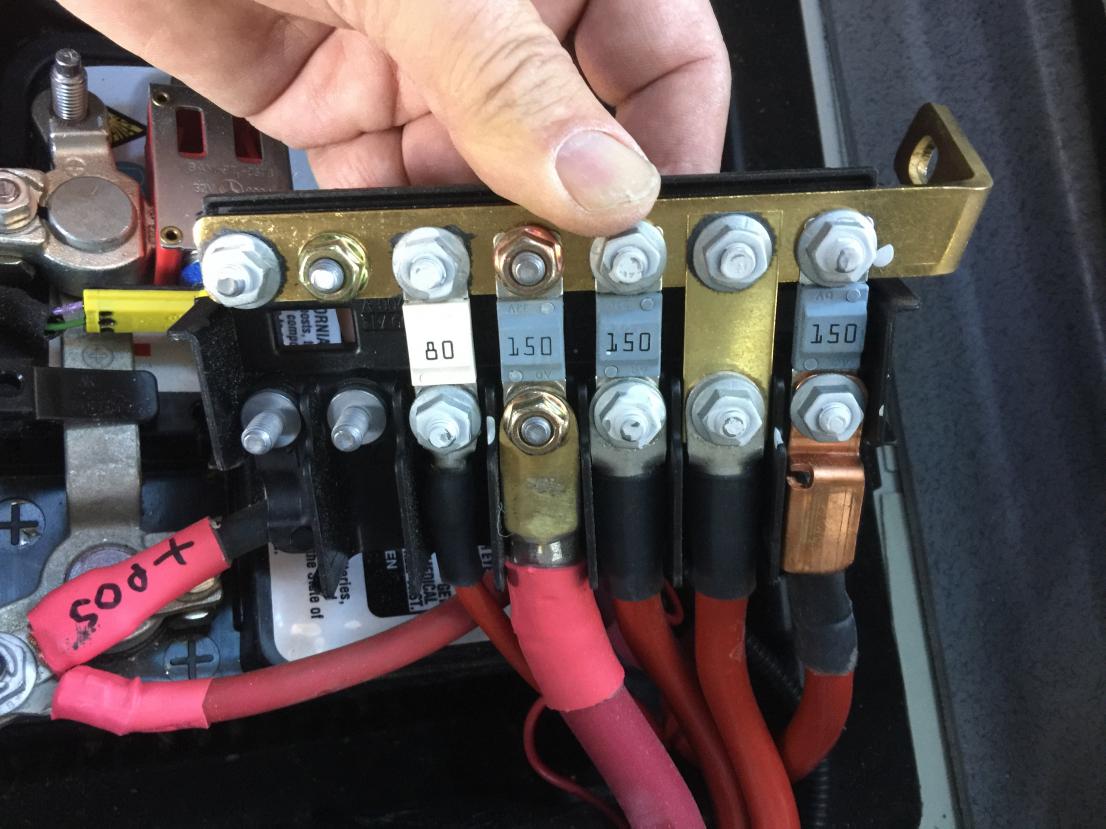
Note the first 150 amp fuse from the left, this is what SMB added to run power to the separator and then on to the house battery. The other fuses are MB factory and I have no idea what they are for. I haven't started to look yet, but I will. If anyone knows what they are for please pass on the information as I want to label them.
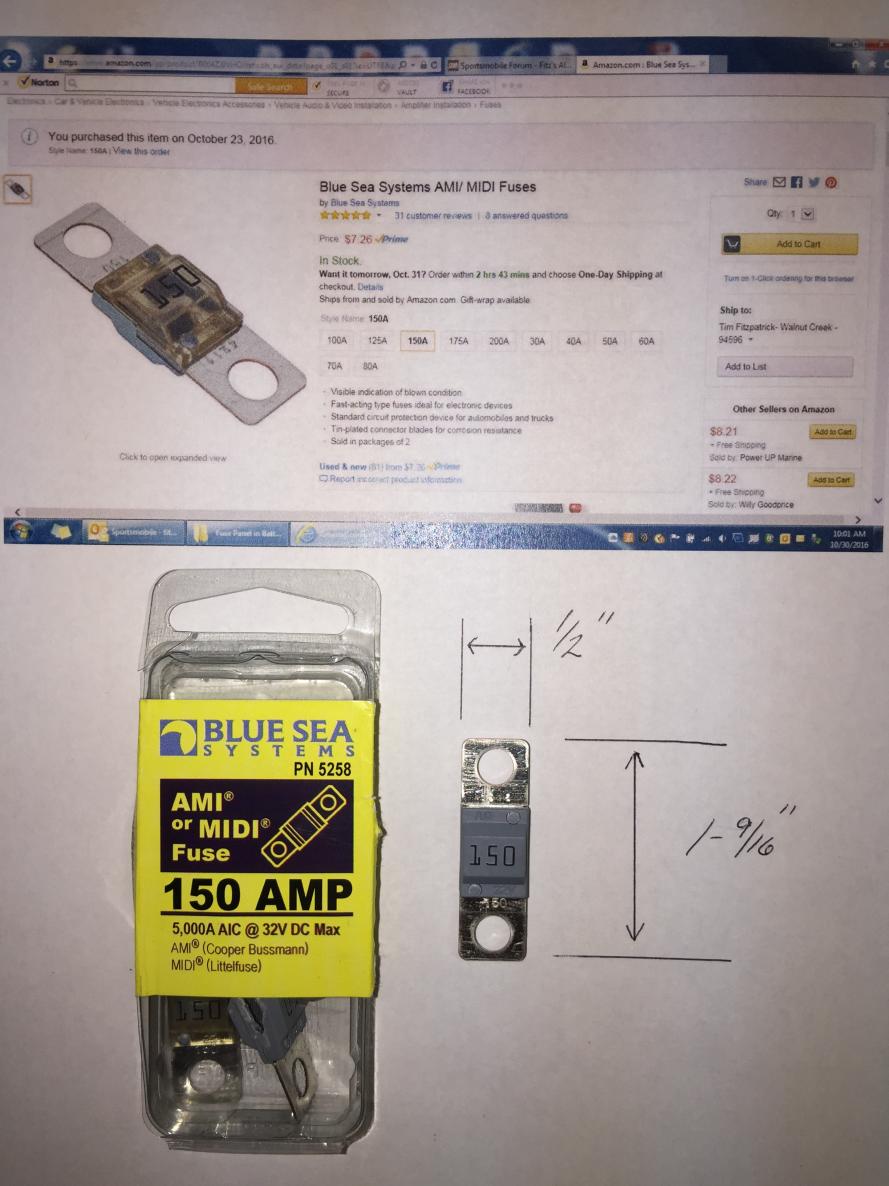
Next I thought I'd run to the auto parts store and pick up a couple of spares. No luck, and I tried several different stores. Not only were they not in stock, but I didn't find one person behind the counter who had ever seen them! Of course that meant an on-line search followed by an Amazon delivery. If you want spares, and who doesn't, here is what to look for.
I hope to never need them, but having them and knowing where they are located is the best way I know of to assure that I won't need them. If you run across any other odd-ball Sprinter items like this, please pass them on for the rest of us to learn from. |
The above is Post #185 from this thread. In it, I asked the question if anyone knew what the additional MB fuses found in this location were. (The 150 amp fuse located in the Number 4 position was added by SMB and feeds the house battery system.) The answer can be found on pages 6 & 7 in the Sprinter Fuse Allocation Supplement....
__________________
Flint - 2016 SMB Sprinter 4x4 144" RB 150S w/ PH
KN6BJX
|
|
|
|
|
06-18-2017, 06:25 PM
|
#385
|
|
Junior Member
Join Date: Mar 2016
Posts: 25
|
Quote:
Originally Posted by Fitz
Member Kelp posted this thread not long ago about rust....
|
I need to take a closer look when I'm in the Austin shop this week, but a quick glance revealed some kind of caulking or something around the penetration I walked by on our van.
I saw this comment right after, so didn't think much of it at the time. Will update if it looks like they've updated their process to help protect these penetrations.
|
|
|
|
|
06-19-2017, 09:18 AM
|
#386
|
|
Senior Member
Join Date: Nov 2015
Location: Vacaville, just east of the San Francisco Bay Area
Posts: 1,062
|
Quote:
Originally Posted by DWilliamsTX
I need to take a closer look when I'm in the Austin shop this week, but a quick glance revealed some kind of caulking or something around the penetration I walked by on our van.
I saw this comment right after, so didn't think much of it at the time. Will update if it looks like they've updated their process to help protect these penetrations.
|
Looking forward to seeing what you find out. I shared some pictures with Austin so they are aware of the issue. It is interesting to note in my case that the exterior LED porch lights were the biggest offenders. The plastic "gasket" behind the fixture does not seal out the water and the two screws that attach the fixture to the van serve as conduits for water penetration.
__________________
Flint - 2016 SMB Sprinter 4x4 144" RB 150S w/ PH
KN6BJX
|
|
|
|
|
06-22-2017, 09:19 AM
|
#387
|
|
Senior Member
Join Date: Nov 2015
Location: Vacaville, just east of the San Francisco Bay Area
Posts: 1,062
|
Rust Continued
Quote:
Originally Posted by Fitz
Looking forward to seeing what you find out. I shared some pictures with Austin so they are aware of the issue. It is interesting to note in my case that the exterior LED porch lights were the biggest offenders. The plastic "gasket" behind the fixture does not seal out the water and the two screws that attach the fixture to the van serve as conduits for water penetration.
|
As I said above, the exterior LED porch lights (I have two, one on each side at the rear) were the worst offenders. Here is what I started with:
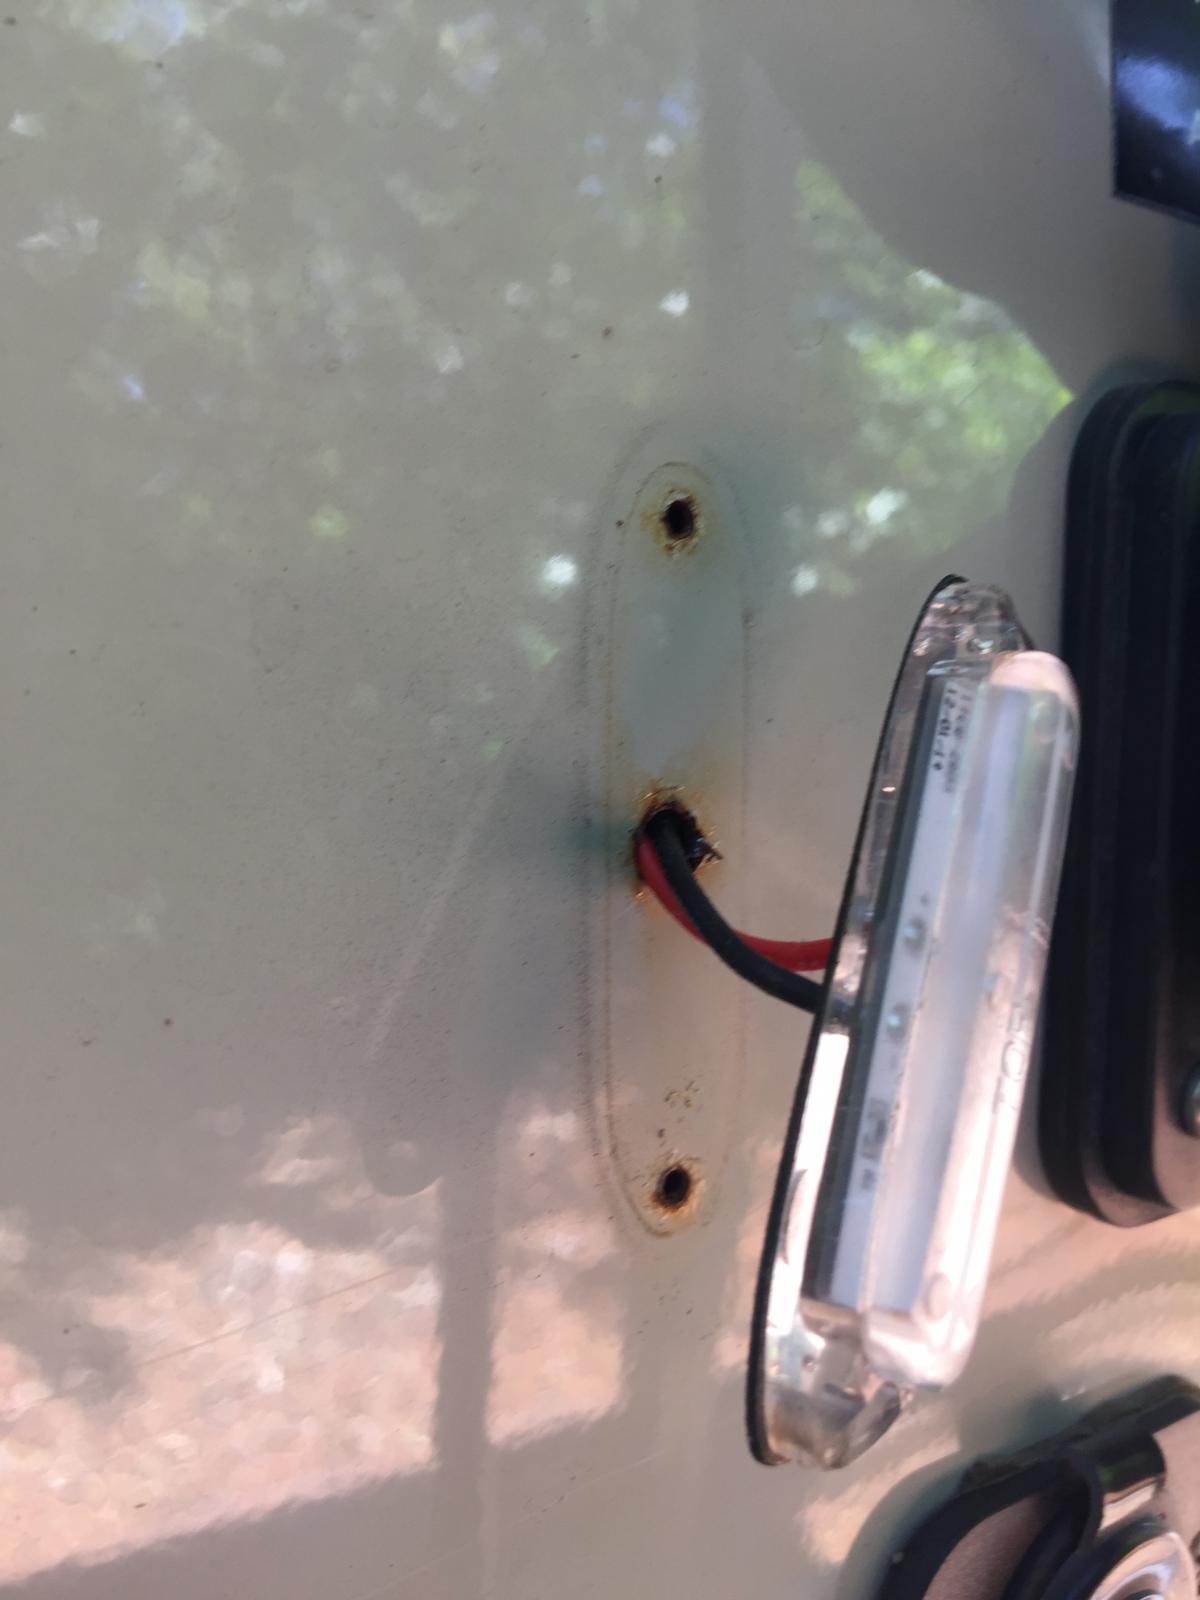
As I said previously, I pulled the fixture , cleaned up the rust, coated with POR15 and re-assembled. Then I thought a bit about how I wanted to seal the fixture, knowing that I would want to be able to pull it off in the future to service the light. The way the light is designed, there are two recesses that contain the attachment screws and that serve as perfect funnels to trap and channel water to the head of the screws.
Here is a phone number to keep, 877/666-2277, it is the Technical Service Advisor Help Number for 3M's Automotive Aftermarket Division. It took me a while to get here, including several discussions in several automotive paint supply stores, but once I got Clay on the line I finally found what I was looking for. UV resistant, clear, compatible with automotive painted finishes, available in a standard caulk tube, this is good material to be aware of:

And here is the link: http://multimedia.3m.com/mws/media/7...aler-08405.pdf
In addition, I ordered some OOO tapered rubber plugs, with the thought that I will always be able to get them out in the future.
Here is the finished product:

I used the seam sealer to glue the plugs into the light fixture, thus blocking the water path to the fasteners behind them, and I used the seam sealer on the top and sides of the fixture itself, covering both exposed edges of the plastic gasket that came as part of the fixture. The fixtures are 8' up in the air on the sides of the van, thus there is no issue with the appearance.
I believe this is a serviceable fix to a poor design, only time will tell.
__________________
Flint - 2016 SMB Sprinter 4x4 144" RB 150S w/ PH
KN6BJX
|
|
|
|
|
06-22-2017, 06:50 PM
|
#388
|
|
Junior Member
Join Date: Jan 2016
Location: Northern Calif (East Bay)
Posts: 25
|
Fitz,
Now that you have used the 3M 08405 sealant, what are your thoughts on using it to seal the Molding Trim Clips (post #212) instead of Sikaflex?
|
|
|
|
|
06-22-2017, 07:49 PM
|
#389
|
|
Senior Member
Join Date: Nov 2015
Location: Vacaville, just east of the San Francisco Bay Area
Posts: 1,062
|
Mer1039,
I would be happy using either product for the trim clips. That said, were I doing it again I would use the 3M 08405 Seam Sealer because it is specifically rated for automotive finishes, and because it can be used in both applications.
__________________
Flint - 2016 SMB Sprinter 4x4 144" RB 150S w/ PH
KN6BJX
|
|
|
|
|
06-28-2017, 10:02 PM
|
#390
|
|
Senior Member
Join Date: Nov 2015
Location: Vacaville, just east of the San Francisco Bay Area
Posts: 1,062
|
Aluminess Winch Bumper on a Sprinter
A current finding is that a small percentage of Aluminess winch bumper installations on Sprinters results in an issue with high intercooler temperatures. My installation is not one of these cases, but another Forum member’s installation is – or I should say was.
I got involved because issues like this intrigue me, plus because finding a solution now may very well prevent me from having a problem in the future. I will let the other Forum member identify himself if he wishes, for the purposes of this write up I will simply use the term “test vehicle #1”.
Almost immediately after installing the winch bumper (no winch installed with it) test vehicle #1 began throwing fault code PO26A – Charge Air Cooler Efficiency Below Threshold. Needless to say, this was a cause for concern.
I didn’t know much about this issue, but Lance (the Shop Foreman at MB of Stevens Creek) was great to work with and he provided MB information specific to this issue. Here is a screen shot of the MB Fault Code Description that Lance provided:
 )
And here is a picture showing exactly where the Charge Air Cooler is located in the Sprinter: )
And here is a picture showing exactly where the Charge Air Cooler is located in the Sprinter:
 Working with Lance’s information, it was fairly easy to determine the parameters that drive the fault condition:
1. Speed must be above 25 mph
2. Intake manifold pressure must be above 1,250 kPa
3. Engine coolant must be above 113 degrees F
Given the above, the fault is generated if:
1. There is a 68 degree F difference between intake (charge) air temperature and ambient air temperature that lasts for 2 minutes or more
2. The efficiency of the intake (charge) air cooler is less than 55%
At this point Kyle from Aluminess got involved and we all began discussing options and sharing data.
I programmed the Blue Driver (see Posts 191, 196, 198 & 203 above) to display the required information, see the Blue Driver screen print below:
Working with Lance’s information, it was fairly easy to determine the parameters that drive the fault condition:
1. Speed must be above 25 mph
2. Intake manifold pressure must be above 1,250 kPa
3. Engine coolant must be above 113 degrees F
Given the above, the fault is generated if:
1. There is a 68 degree F difference between intake (charge) air temperature and ambient air temperature that lasts for 2 minutes or more
2. The efficiency of the intake (charge) air cooler is less than 55%
At this point Kyle from Aluminess got involved and we all began discussing options and sharing data.
I programmed the Blue Driver (see Posts 191, 196, 198 & 203 above) to display the required information, see the Blue Driver screen print below:
 In addition to my van, test vehicle #1 was equipped with a Blue Driver and we began collecting data in various use cases for both vehicles while I built a spreadsheet to allow comparison and sharing. While we were doing this Kyle at Aluminess was doing the same. It is interesting to note this observation he made:“After trying several other monitors (Scangauge II, iCarSoft, Matco scanner), the Blue Driver was the only one that worked to read the charge temperature.”Shameless plug - for $99, this unit has worked really well for me.
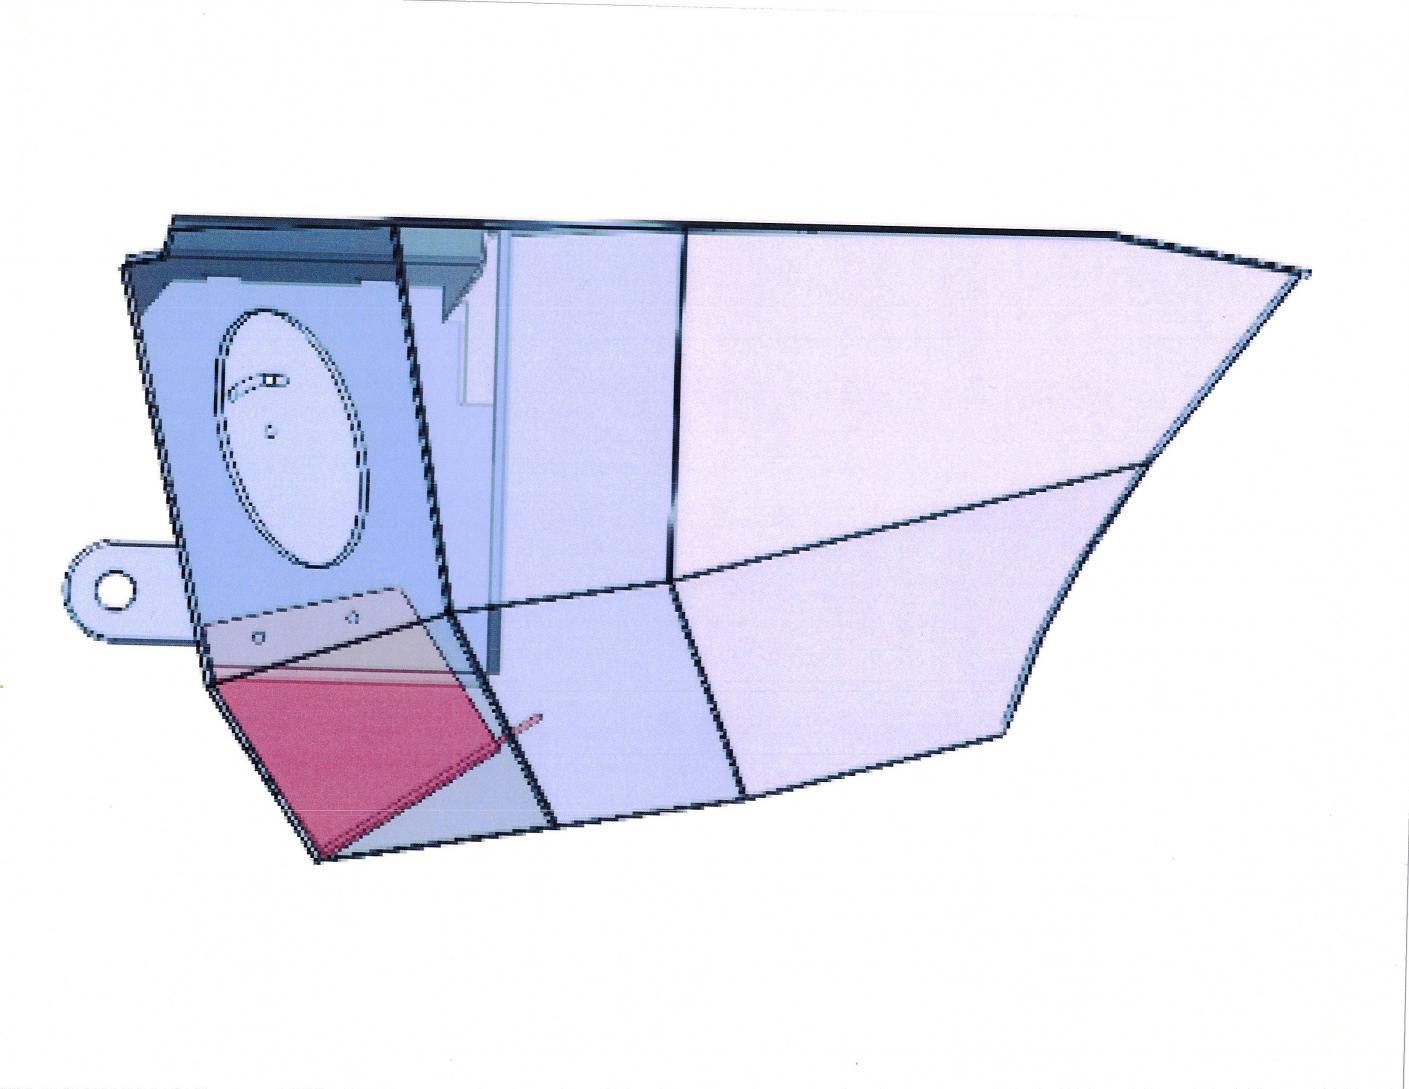
It wasn’t long before Kyle came up with a solution, an air scoop mounted below the toolbox (the toolbox is where the winch is located if one is installed).
See below (shown in red) for a rendering of the air scoop:
In addition to my van, test vehicle #1 was equipped with a Blue Driver and we began collecting data in various use cases for both vehicles while I built a spreadsheet to allow comparison and sharing. While we were doing this Kyle at Aluminess was doing the same. It is interesting to note this observation he made:“After trying several other monitors (Scangauge II, iCarSoft, Matco scanner), the Blue Driver was the only one that worked to read the charge temperature.”Shameless plug - for $99, this unit has worked really well for me.
It wasn’t long before Kyle came up with a solution, an air scoop mounted below the toolbox (the toolbox is where the winch is located if one is installed).
See below (shown in red) for a rendering of the air scoop:
 Test vehicle #1 went to Santee for the installation, as for me I elected to have Kyle ship me the air scoop and I did the installation myself.
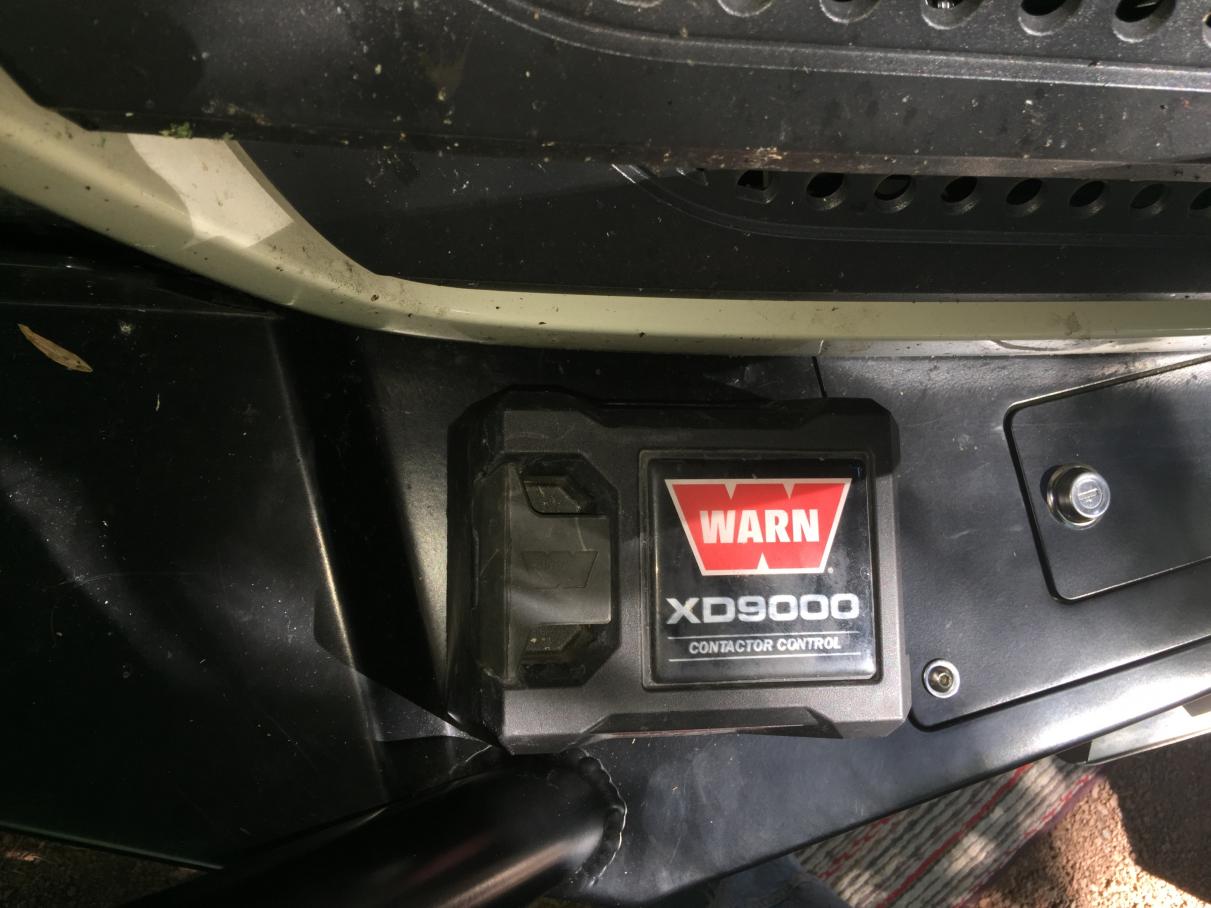
In my case, my installation was complicated by the fact that I had a winch installed and the controller/contactor pack for the winch (originally installed by Aluminess when they installed the bumper) was installed below the bumper in a location I was not happy with as it required reaching up and under the bumper to install the lead for the remote control, not good in a variety of situations!
Anyway, to make a long story short I had to completely remove the winch, the power wiring, and the contactor pack and start over. The good news is that it made installing the air scoop simple, the bad news is that it turned into quite a job – something that hardly ever happens to any of us!
Here is the air scoop installed:
Test vehicle #1 went to Santee for the installation, as for me I elected to have Kyle ship me the air scoop and I did the installation myself.
In my case, my installation was complicated by the fact that I had a winch installed and the controller/contactor pack for the winch (originally installed by Aluminess when they installed the bumper) was installed below the bumper in a location I was not happy with as it required reaching up and under the bumper to install the lead for the remote control, not good in a variety of situations!
Anyway, to make a long story short I had to completely remove the winch, the power wiring, and the contactor pack and start over. The good news is that it made installing the air scoop simple, the bad news is that it turned into quite a job – something that hardly ever happens to any of us!
Here is the air scoop installed:
 Here is the layout on top of the winch bumper for the wire cut-out for the relocated contactor pack location:
 Here is the installed contactor pack, view from above:
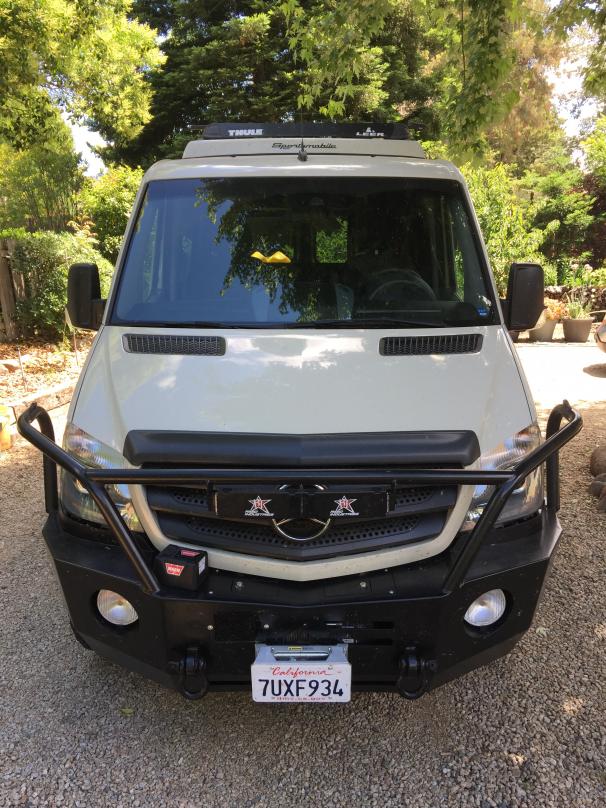
 And here is a front-on view of the completed installation. The air scoop is behind the lower edge of the bumper and is not visible in this picture, a testament to the clean solution Kyle came up with:
 The air scoop is installed and has delivered positive results on both vans. In my case the van was not throwing the code prior to the installation, in the case of the other van it is no longer throwing the code following the installation, and in both cases the measured efficiency has improved. It was very interesting to work through the process and in some small way be part of what looks to be a good solution.
Note: I am not posting specific data results here as Kyle and Aluminess are still working with this information.
The air scoop is installed and has delivered positive results on both vans. In my case the van was not throwing the code prior to the installation, in the case of the other van it is no longer throwing the code following the installation, and in both cases the measured efficiency has improved. It was very interesting to work through the process and in some small way be part of what looks to be a good solution.
Note: I am not posting specific data results here as Kyle and Aluminess are still working with this information.
__________________
Flint - 2016 SMB Sprinter 4x4 144" RB 150S w/ PH
KN6BJX
|
|
|
|
|
|
 Posting Rules
|
You may not post new threads
You may not post replies
You may not post attachments
You may not edit your posts
HTML code is Off
|
|
|
|
 » Recent Threads
 |
|
|
|
|
|
|
|
|
|
|
|
|
|
|
|
|
|
|
|
|
|
|
|
|
|
|
|
|
|
|
|
|
|


 Linear Mode