Journey with Confidence RV GPS App RV Trip Planner RV LIFE Campground Reviews RV Maintenance Take a Speed Test Free 7 Day Trial ×


Reply
 
Thread Tools Display Modes
 
Old 01-25-2023, 03:01 PM   #1
Senior Member
 
Join Date: Nov 2020
Posts: 436
Rain Gutter/ Drip Rail - Experience Sharing

Hey guys

Not too much to tell, but as I was trying search for rain gutter repair thread it was all fairly scattered. So my idea here is so collect experience about it to make it easier for others in the future.
So feel free to add your experience here!

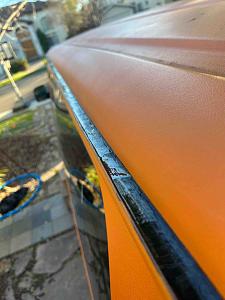
While repainting my van I sanded down my whole rain gutter to the bare metal as well. I took out the stock sealer using a screwdriver to get the main volumes out, then used a vinyl flooring knife to “clean the corners” and eventually used a wire brush to get to the bare metal.
This was followed by 2 component epoxy primer and Raptor liner layers.

Now I cleaned the surface using bug and tar remover and sealed the gutter off.

I was happy to borrow a pneumatic dispense gun from our lab so that I could dispense the 3M 08308 Heavy Bodied Seam Sealer easier. Once in I used a spatula to “level it”.

And here comes the main info I could find any answer online:
I needed 5 1/2 200ml cartridges of seam sealer to fill the complete rain gutter up again!

Click image for larger version

Name:	69629709617__48513A20-3131-40A5-A094-376D22399696.jpg
Views:	32
Size:	102.3 KB
ID:	46320

And now I can start to put my roof rack back on again :-)

E-350 is offline   Reply With Quote
Old 01-25-2023, 04:27 PM   #2
Senior Member
 
Join Date: Sep 2020
Posts: 377
Nice. I want to do mine. That 3M sealer looks expensive - if needing 6 cartridges. But I guess it's a 1-time job.
N147JK is offline   Reply With Quote
Old 01-25-2023, 04:49 PM   #3
Senior Member
 
Join Date: Feb 2014
Location: Santa Maria, CA
Posts: 586
Ugh. I really need to do this on my van. I just repaired two small rust spots in the gutter this week, but need to bite the bullet and do the whole thing.
TheLetterJ is offline   Reply With Quote
Old 01-25-2023, 05:13 PM   #4
Junior Member
 
Join Date: Sep 2022
Posts: 24
Nice! Need to do mine as well. Did you raptor liner the whole van? How do you like it?

I have a white van and am thinking (hoping?) I can do white auto paint on top and just hopefully never notice any difference from the factory paint..,
Ace944gs is offline   Reply With Quote
Old 01-25-2023, 07:03 PM   #5
Senior Member
 
Join Date: Nov 2020
Posts: 436
Yes, the 3M is really expensive. BUT: that’s for me the only way to go :-) and I chose epoxy as it’s more UV resistant than polyurethane. There’s a reason why yachts (so big yachts ;-)) are getting their seals renewed every year. And there is a reason you have a black print on your windshield where it’s glued in ;-)

Yes, I Raptored my whole van. See the thread here in van body “The next big thing: repaint the van” with all details.
You can get it in white directly with the UPol tint (UP4854) or also at amazon from others.
E-350 is offline   Reply With Quote
Old 01-26-2023, 05:52 AM   #6
Junior Member
 
Join Date: Sep 2022
Posts: 24
Got it!

Silly question in this case...it looks like you painted then did the sealant, right? Im totally new to all this, is there a reason for that? Or does it not matter one way or another?

Either way, love the way it looks!
Ace944gs is offline   Reply With Quote
Old 01-26-2023, 10:21 AM   #7
Senior Member
 
Join Date: Nov 2020
Posts: 436
In general I think you could even leave it without sealer (at least here in CA :-)), but the sealer surely increases resistance. As I have the rack on I wanted to avoid the rack clamps in direct contact on the painted metal, so decision for the sealer was clear.

I don’t have any specific technical reason why I painted first and sealed afterwards. For me it was
A) easier while I painted the roof and
B) the stock sealer was also the last step and not painted.
So I just did it this way.

The 3M seam sealer generally is made for direct metal sealing/ bonding, but I might also be afraid sealing first and painting afterwards:
The high volume of sealer and the related absolute shrinkage (4% volumetric for these mercaptan epoxies/ perhaps 3% seeing filler amount in the formulation) while curing might cause delaminations. If this would happen I still have the paint/ primer as protection.
Sealing first and painting afterwards and then seeing the shrinkage might crack the paint layer as well as you’re on bare metal…
E-350 is offline   Reply With Quote
Old 01-26-2023, 02:02 PM   #8
Senior Member
 
Join Date: Nov 2019
Location: Denver Colorado
Posts: 820
On my 2002 E350 ext van, the factory gutter sealant looked like it only had some minor cracking on the edges. As I scraped on it I found the sealant popped out easy and underneath that sealant was hidden rust. My van has been in dry Colorado it's entire life, so if your in a humid area it has to be worse. It's hard to see because the gutters are well above you line of sight. I urge everyone to closely look at your gutters before you get a nasty surprise.
__________________
2002 e350 window eb,
7.3
CCV high top
Conversion in process. Lol
Denver, CO
Lilnuts2 is offline   Reply With Quote
Reply


Posting Rules
You may not post new threads
You may not post replies
You may not post attachments
You may not edit your posts

BB code is On
Smilies are On
[IMG] code is On
HTML code is Off
Trackbacks are Off
Pingbacks are Off
Refbacks are Off

» Featured Campgrounds

Reviews provided by

Powered by vBadvanced CMPS v3.2.3
Disclaimer:

This website is not affiliated with or endorsed by Sportsmobile SIP or any of its affiliates. This is an independent, unofficial site.


All times are GMT -6. The time now is 03:58 PM.


Powered by vBulletin® Version 3.8.8 Beta 4
Copyright ©2000 - 2024, vBulletin Solutions, Inc.