Journey with Confidence RV GPS App RV Trip Planner RV LIFE Campground Reviews RV Maintenance Take a Speed Test Free 7 Day Trial ×


Reply
 
Thread Tools Display Modes
 
Old 04-21-2022, 12:00 PM   #11
Senior Member
 
Steve Hunt's Avatar
 
Join Date: Mar 2020
Location: North Florida
Posts: 282
Be sure to check out the www.quikrstuff.com bike rack. Its the original 1-Up founder/engineer and he seems to have improved on a lot of details of the 1-Up design. Nothing that would effect your bumper design just sayin because I have a 1-Up and if i was doing it again I'm sure I'd go with the quikrstuff....as you obviously like nice stuff!

__________________
Steve
2008 E350 V10 EB Cargo "CAZA-mobile"
2014 Triumph 675 Daytona track bike
2019 Yeti SB130 Turq Race X01
Steve Hunt is offline   Reply With Quote
Old 04-21-2022, 03:16 PM   #12
Senior Member
 
aarcaris's Avatar
 
Join Date: Feb 2020
Location: Bend, OR
Posts: 309
Garage
dhally
Thank you for the added points you bring up! I'll have to look more at how Buckstop bumpers mount and their latching assembly.


Steve Hunt
Thanks for the link! I actually already have a 1Up rack on my truck that I plan on using on the Van once I get the bumper situated. This is actually the first time I have ever heard of or seen Quikrstuff bike racks and they do look nice with some nice additions in comparison to the 1UP. I have been super happy with my rack so far but if I didn't already own one I would have to look more seriously at the Quikrstuff rack.
__________________
Vandit - 2013 E250 Ground Up Build
- Full Custom DIY Interior Build
- DIY U-Joint Off Road 6" 4x4 Conversion
aarcaris is offline   Reply With Quote
Old 04-24-2022, 09:33 PM   #13
Senior Member
 
Join Date: Dec 2014
Location: Riverside Ca.
Posts: 740
A 37" tire will be bigger than your renderings. I have a 35" and I set my bumper up so I could open the rear right door without having to swing the left open. This covers almost 1/2 of my tailight. I also raised the hitch into the frame rails and punched it thru the bumper. It is as high as possible. The bumper does not hang lower than the mounting horns. I will post pics asap.
Vanimal is offline   Reply With Quote
Old 04-25-2022, 11:00 AM   #14
Senior Member
 
aarcaris's Avatar
 
Join Date: Feb 2020
Location: Bend, OR
Posts: 309
Garage
Vanimal Thanks for the comments! You are 100% right that the scale on the renderings are off. I currently have two models going one that is on my previously modeled Van Body (the scale of this one is off) for the overall design look, and then a more dimensionally accurate bumper model without the Van body. I modeled the Van body before I had a van back in early 2020 using the Ford Body Builder Layout Book. It was pretty rough since it was just for visualization, not for true scale, so now my one model is more just for the overall lines and shapes rather than a true working model. I know that for most the ability to open one door without opening both swing outs is ideal but due to my rear drawer design, there isn't a whole lot of benefit to having that as an option for me so I'll probably just squeeze the tire and box as close to the center as I can. I would be curious to see pictures of your bumper if possible as it sounds like you have the integrated hitch pretty dialed.

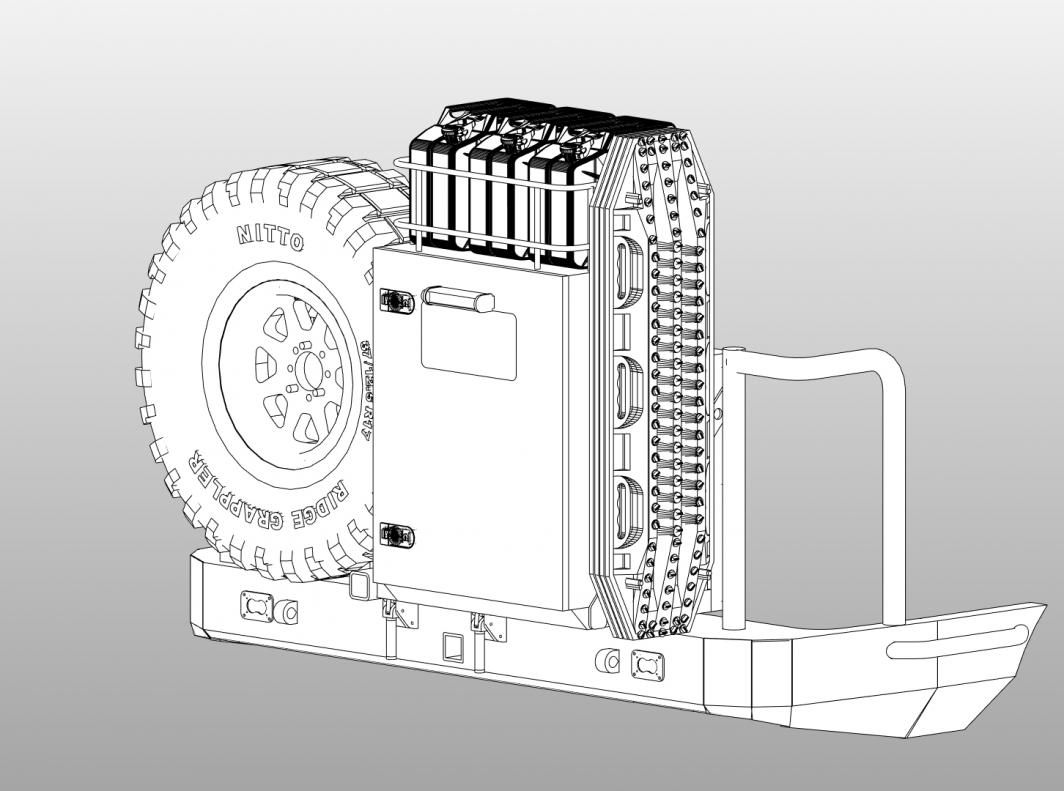
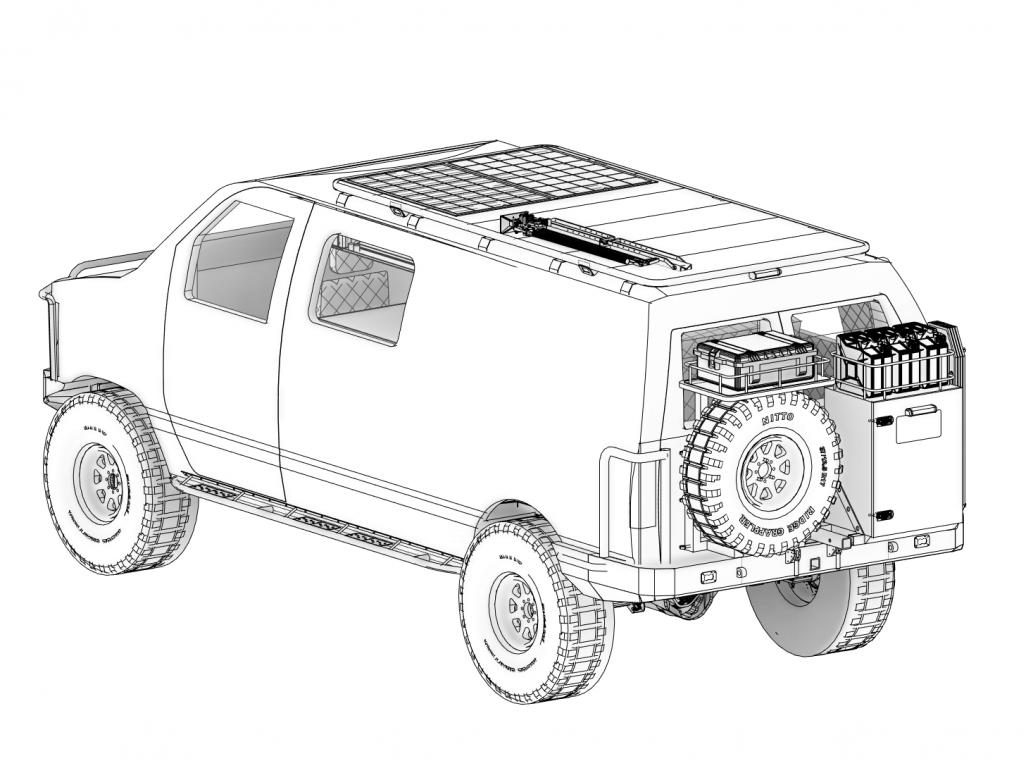
Here are a few additional model views of the bumper that are more accurately scaled, but still not 100%.


Also while I was making some changes and additions I thought I would see what an additional storage rack above the tire would look like as Twoxentrix had suggested. If I did anything like this I would make it modular, so I could add or remove it as needed.


The next steps for me are to get some cardboard and start taking some of these ideas out to the van and see what problems exist in the real world with this design. So far the biggest problem I am seeing is the wrap-around design and how that will interact with the van body. If the body in this area was like a truck bedside (which is a single layer of sheet metal) I would have no problem with cutting it away to allow for the bumper to cap under it. Unfortunately, this area is double-walled sheet metal that connects to the rest of the interior van structure so this might cause some problems. We will see if I can come up with a solid solution for this once I get into the cardboard stage of things.
__________________
Vandit - 2013 E250 Ground Up Build
- Full Custom DIY Interior Build
- DIY U-Joint Off Road 6" 4x4 Conversion
aarcaris is offline   Reply With Quote
Old 04-25-2022, 11:06 AM   #15
Senior Member
 
Join Date: Nov 2020
Posts: 436
Getting along. Nice!

One thing that just came to my mind: what about specific positions for a hi jack? Something where the “hook” can’t easily slide out and you have a good grip.
E-350 is offline   Reply With Quote
Old 04-25-2022, 11:13 AM   #16
Senior Member
 
aarcaris's Avatar
 
Join Date: Feb 2020
Location: Bend, OR
Posts: 309
Garage
E-350 That is a great idea and something I was thinking about! I will have to do a little research on the best way to achieve this and see how to integrate it into a few areas on the bumper. For anyone who has any greater experience with Hilifts and bumpers would an aluminum bumper be up to the task to be used as a jacking point? Without any research, I would think that the bumper might need to be steel to handle that kind of load on it. If so that might drive my decision for material choices. Time to do some more research.
__________________
Vandit - 2013 E250 Ground Up Build
- Full Custom DIY Interior Build
- DIY U-Joint Off Road 6" 4x4 Conversion
aarcaris is offline   Reply With Quote
Old 04-25-2022, 12:22 PM   #17
Senior Member
 
Twoxentrix's Avatar
 
Join Date: Mar 2015
Location: Maryland
Posts: 3,381
Garage
aarcaris I respect how you take everything into consideration - seems to fuel your creativity (you seem to enjoy that)... so I'll throw something else into the mix that could be permanent or just modular (use when it suits you):
Mine simply plugs into the hitch receiver, and doesn't hang any lower than the hitch receiver, but could limit the departure angle in extreme circumstances (but I'm able to just remove it if I'm in a situation as such).
2 boxes; I use one for my electrical cord & supplies (very convenient when I stop and need to plug-in), the other I currently use for fire supplies (kindling, long lighter, fire starters, citronella candle, etc.). Not so important what's in them since each traveler will find there own use - but for me it represents extra storage for stuff that isn't kept inside!
I had it made to hold the Pelican cases & Scepter Runt's...etc.
__________________
TwoXentrix
"AWOL"
Twoxentrix is online now   Reply With Quote
Old 04-26-2022, 08:05 AM   #18
Senior Member
 
Join Date: Dec 2014
Location: Riverside Ca.
Posts: 740
I think your spot on with the Jack up top. I carried mine on my full length rack and never used it, until the day you need it of course. I will be locating it on the rear or front soon so I can remove it when I am not out on trails. It is very susceptible to corosion due to weather even with a cover and one of the driest states. It needs monthly lubing to assure proper ratcheting.
Attached Thumbnails
20180621_060646.jpg  
Vanimal is offline   Reply With Quote
Old 04-26-2022, 08:20 AM   #19
Senior Member
 
Join Date: Dec 2014
Location: Riverside Ca.
Posts: 740
Here's the pic of the hitch and the minimal overhang of my bumper. The hitch goes in and between frame rails. The tongue support is from the 1/4" wall 2x6 square tubing and 2 additional 5/16" c channel. One directly behind tubing on frame and another c channel plated with 1/4" flat plate roughly 8" further forward.
Attached Thumbnails
20220227_080246.jpg   20220227_080229.jpg   20220227_080214.jpg  
Vanimal is offline   Reply With Quote
Old 04-26-2022, 02:33 PM   #20
Senior Member
 
aarcaris's Avatar
 
Join Date: Feb 2020
Location: Bend, OR
Posts: 309
Garage
Twoxentrix:
You are right that I do enjoy this process of designing and thinking through all the options! Also thanks for the picture and Ideas. Something else to add to the list to think over.


Vanimal:
Thanks for the pictures! Like you said you never need the Hi-lift till you really need it. It's a pretty inexpensive insurance policy to have on the van just in case.
__________________
Vandit - 2013 E250 Ground Up Build
- Full Custom DIY Interior Build
- DIY U-Joint Off Road 6" 4x4 Conversion
aarcaris is offline   Reply With Quote
Reply


Posting Rules
You may not post new threads
You may not post replies
You may not post attachments
You may not edit your posts

BB code is On
Smilies are On
[IMG] code is On
HTML code is Off
Trackbacks are Off
Pingbacks are Off
Refbacks are Off

» Featured Campgrounds

Reviews provided by

Powered by vBadvanced CMPS v3.2.3
Disclaimer:

This website is not affiliated with or endorsed by Sportsmobile SIP or any of its affiliates. This is an independent, unofficial site.


All times are GMT -6. The time now is 04:20 PM.


Powered by vBulletin® Version 3.8.8 Beta 4
Copyright ©2000 - 2024, vBulletin Solutions, Inc.