Journey with Confidence RV GPS App RV Trip Planner RV LIFE Campground Reviews RV Maintenance Take a Speed Test Free 7 Day Trial ×


Reply
 
Thread Tools Display Modes
 
Old 04-19-2022, 07:04 PM   #1
Senior Member
 
aarcaris's Avatar
 
Join Date: Feb 2020
Location: Bend, OR
Posts: 307
Garage
Rear Bumper Project

So I've been playing around with the idea of doing a custom rear bumper especially after reading through all of boywonder's bumper thread (link)and figured I would create a thread to discuss my ideas and reasonings for looking at this route. Let me know what you think of my ideas and design. I would rather find the flaws in my thinking now than later in the process so let me know what you think!

Okay so my initial plan was to go with an Aluminess bumper front and rear but after looking at it more I am leaning toward just the front bumper from Aluminess and then designing and fabricating my own rear bumper. I am still in the idea/design stage of this so figured the group on here might have some good feedback for me. See my reasons below.Aluminess:
PROS:
  • A fan of the overall design.
  • Design ties into the front bumper design.
  • Lighter weight option than other steel bumpers.
  • Like the design of the light guard brush rails.
CONS:
  • Does not protect against lower rear quarter panel damage.
  • Bike swing-out puts bikes over the top of the van level.
  • Hitch still sits below the bottom of the bumper which to me defeats the purpose of lower profile design.
  • Needs to be modified to fit a 37” spare. (not really that much of a problem)
  • Swingarm not rated to support full storage box, bikes, and fuel
  • No integrated recovery points
In my design, I tried to keep similar design ideas and shape as the Aluminess bumper, but also address some of my concerns.
  • The bumper would extend all the way to the wheel well at the width that would allow for the bush wacker fender flares to die into the bumper.
  • This bumper mimics the design of other high clearance bumpers by tapering from the wheel well back to the end of the bumper improving the departure angle.
  • The tire swing out could allow for up to a 37” spare without modification.
  • The second swing out would have a secondary center mount hitch location to attach a bike rack to.
  • The Storage box would most likely be an Aluminess or similar deluxe box with a tray on the top that could hold 3 small runt fuel or water cans. In addition, it could possibly have a mounting location for Maxtrax on the side.
  • The reverse lights would be Baja Design flush mount S2 lights flush-mounted in the bumper.
  • The bumper also would have two recovery shackle mounting points as well as an integrated hitch that could tie back into the frame where the current spare sits.
  • Similar to the Aluminess bumper it would have a small integrated storage compartment on the top face of the bumper under the swing outs.

Some of the issues that I see with this design:
  • Not sure if aluminum is going to be the best option for a few reasons. One the strength, and two I have never welded aluminum. Still undecided on this especially since I might try to see if a local fabricator can build it if I design it all and have all the parts pre-cut.
  • Due to the wrap-around design, it would make a typical Aluminess rearward ladder impossible. As you can see in the pictures I was thinking about the idea of tying a ladder into the bumper design. Obviously, the concern with this idea is the bumper is frame-mounted while the ladder is body mounted on the top side. So my thought is to have the bottom of the ladder be mounted with some kind of bushing that would allow for the two to flex independently of each other.
  • This design will also be much heavy than the Aluminess bumper regardless of the material choice since it has a wrap-around design. This may not make much of a difference, but it is something to consider.
Bumper Design 1.0 with a 1UP Bike Rack installed and folded up.


From the passenger side corner.


This is the side profile of it from the passenger side.


From the driver side corner.


Rearview of the bumper (The scale isn't quite right, so It's going to be a tighter fit than this shows).


Views with two bikes on the 1UP Bike Rack.


Passenger side corner.


Passenger side view.


Driver side corner


Couple line drawings for easier viewing of the form breaks.


A few Views of just the Bumper.


Bumper without any swing arms.


Let me know what you think!

__________________
Vandit - 2013 E250 Ground Up Build
- Full Custom DIY Interior Build
- DIY U-Joint Off Road 6" 4x4 Conversion
aarcaris is offline   Reply With Quote
Old 04-19-2022, 08:12 PM   #2
Senior Member
 
Join Date: Apr 2021
Posts: 407
Love the overall idea and the attention to detail in your projects! I have a couple questions:

1) Any details on the hinge design for your swing outs? Would they be supported entirely by the bumper, or tied into the door hinges?
2) Skeleton + skin design (a la UJOR) or single material/piece?
3) What CAD program are you using to model all this up?
4) Do you REALLY need that extra ground clearance and departure angle?

SendCutSend is your friend once you are ready to order laser cut panels!
motovan_mn is offline   Reply With Quote
Old 04-19-2022, 09:26 PM   #3
Senior Member
 
Twoxentrix's Avatar
 
Join Date: Mar 2015
Location: Maryland
Posts: 3,378
Garage
Like motovan mn, I too believe you do a great job thinking out you projects, so i'm subscribing just to see what you end up designing.
If I were to tackle a project as such (no way my skills would support such a venture, I'd have to go through a very patient fabricator) I envision a swing arm capable of carrying three 5gal sceptor's (2 fuel and 1 water) on top of a box that could handle a portable generator...but that's about 160lbs. If you can make that work, I'll buy one!!! For me, the 10 gallons of additional fuel is something which would have eased my concern on numerous occasions, but there currently just isn't an easy solution unless I give up the box.
Another thought; I've always thought a shelf above the spare would come in very handy for light stuff - like two small Pelican style storm cases; I'd use one for the electrical stuff like extension cord, RV 30-Amp Power Defender Voltage Protector & adapters - since it would be so close to the hook-up it would be very convenient to deploy. The second may hold grill stuff like BBQ utensils, cast iron pan, fire starters, citronella candle(s), etc.
Just throwing it out there.
__________________
TwoXentrix
"AWOL"
Twoxentrix is offline   Reply With Quote
Old 04-19-2022, 11:37 PM   #4
Senior Member
 
Join Date: Nov 2020
Posts: 436
Like the basic idea and can’t help with the question Al or steel.
BUT:
I personally don’t like 2 design details.

1. Width
Why do you want to have it wider than the van body?
Click image for larger version

Name:	IMG_1113.jpg
Views:	10
Size:	31.6 KB
ID:	43701

2. Bottom edge
You’re creating 2 different heigths marked in red. Looks like an odd offset and I would avoid it in case I’d be able to design it [emoji23]
Why not going straight down as roughly marked in green?Click image for larger version

Name:	IMG_1114.jpg
Views:	11
Size:	224.3 KB
ID:	43702


BTW: UJOR stated 200lbs per arm, so the 160lbs should generally work…
E-350 is offline   Reply With Quote
Old 04-20-2022, 05:48 AM   #5
Senior Member
 
carringb's Avatar
 
Join Date: Jan 2009
Location: Corvallis, OR
Posts: 5,300
Have you seen the Buckstop-Reunell rear E-series bumper? It has an integrated hitch recevier, and has heavier swing outs than the Aluminess bumper, you can choose what size light cutouts, and it has an adjustable tire bracket to fit just about any size tire or wheel offset. They're almost local to you too (Prineville business park). Mine was made with a jerry-can rack, but they also make an arm with bracket to mount a box.

I do see potential for issues with your proposed quarter-panel extensions. Especially if the bumper isn't mounted to the bottom of the frame rails. The stock frame horns that the stock bumper (and Aluminess) bolt too have a bit of flex. Combine that with normal body-on-frame movement, and I think you might have issues with the sides of the bumper contacting the body.
Attached Thumbnails
IMG_0317.jpg  
__________________
2000 E450 dually V10 wagon
carringb is offline   Reply With Quote
Old 04-20-2022, 10:41 AM   #6
Senior Member
 
aarcaris's Avatar
 
Join Date: Feb 2020
Location: Bend, OR
Posts: 307
Garage
motovan_mn
Thank you! If I decide to go this route I plan on trying to take the same level of care on this as I did for the interior. I appreciate your questions see my responses below.

1) This is something I still haven't gotten totally in the weeds on. Since lots of the design is similar to Aluminess I think I will need to investigate some more on how they do it and see if it would be possible to get enough strength out of that style pivot. In a previous bumper, I had built for my old Land Rover Discovery II I used a spindle style pivot which I would think would be plenty strong. The only issues I see with this style are one how to integrate it into the bumper design while maintaining the light brush guards and two all spindles I have seen are steel so if I choose aluminum it wouldn't be an option.

2) I have looked at Ujoints bumpers and I like the idea of doing a steel subframe and then having an aluminum skin that bolts on as it would help give the main structure and swing arms a lot of strength. My biggest deterrent for this method is just how to integrate the brush bar connections into it all especially if those end up being steel because they're the swing arm attachments. I guess now that I am typing all this out the tail light brush bars might be adding more complexity than they are worth, but I do really like the look of them. I guess more to think about and look at.

3) If you know anything about CAD programs you will probably think this is really funny, but all of this along with all my interior work was modeled in Autodesk Revit. For those that don't get why that may be funny or odd, it's because it is an Architectural/Structural/MEP BIM software. I'll most likely end up doing the final work in Autodesk Inventor or Fusion 360, but since I use Revit daily for work I am more comfortable with the interface for coming up with my basic design.

4) Realitsacally probably not. I don't really plan on getting too crazy with it off-road, but there's always a chance that once you start down a trail you come across something bigger than you intended and only have one option of going forward. I've seen a few vans now that have had rear quarter panel damage from dropping off something and landing on the body, so I figured if I am going to design it from the ground up might as well try to address this. Also, I am not too proud to admit that some of these things are purely because I think it looks cool.


Twoxentrix
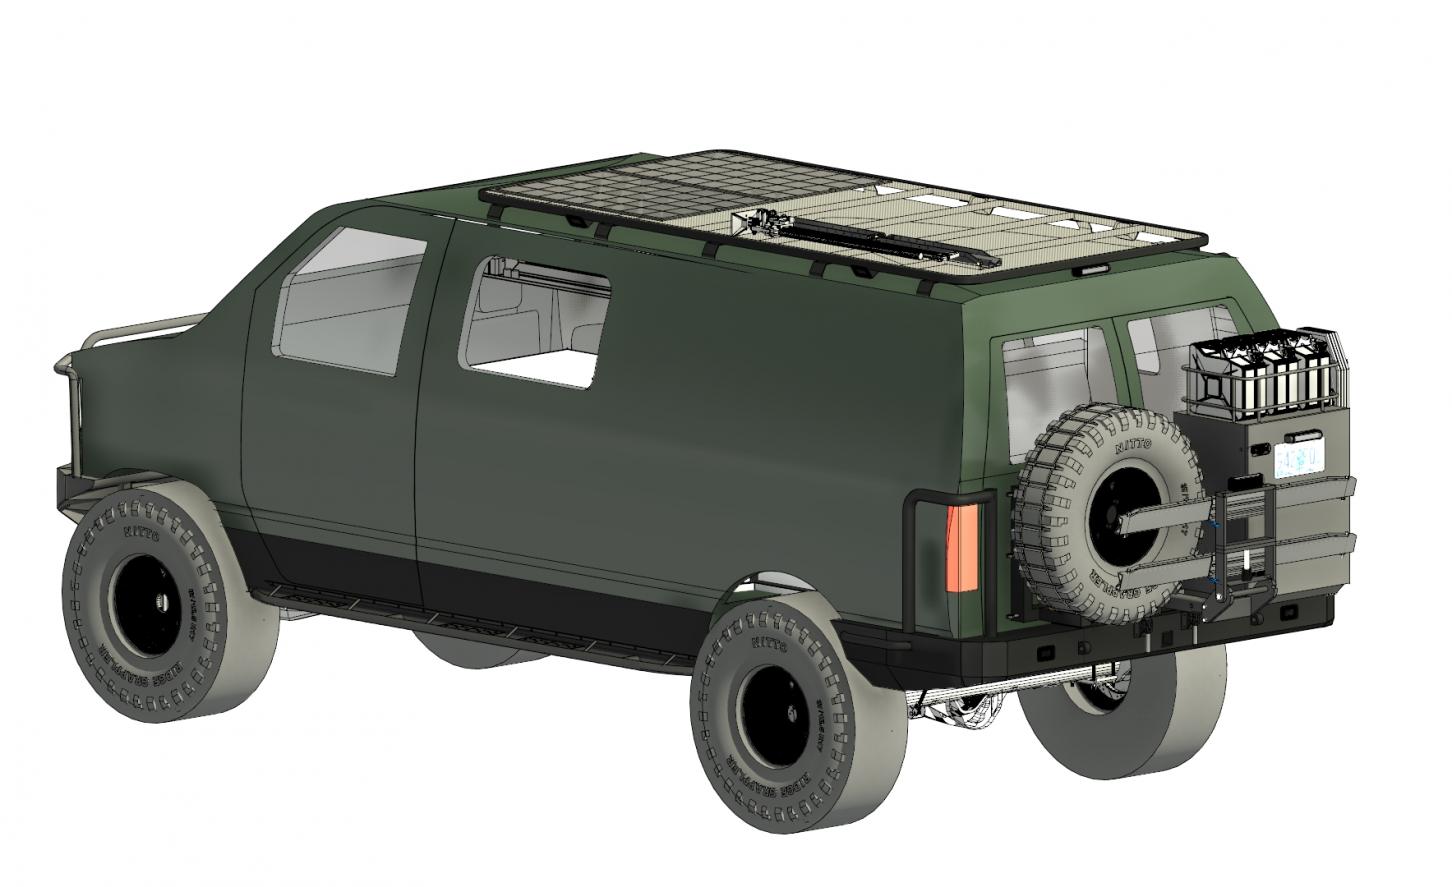
Thank you! I agree that always having some fuel on hand takes a little stress off when you are getting far out in the backcountry. Also having some additional storage/basket on top of the spare is a neat idea and something I'll have to play around with.


E-350
Thanks for the questions and comments!

1. I think the images are a bit deceiving in how far out the bumper would stick, but the plan was just to have the overall width match the width of the Bushwacker fender flares. In the model, I currently have some rub bars modeled, which I think is what you were circling. These were a last-minute addition. After adding a side ladder into my model I realized it would be a pretty big step up to the first rung of the ladder, so I figured adding one additional rung on the bumper might fix the problem while also allowing for some added protection. Once I put it on the passenger side I figured it would make sense to match it on the driver's side just for a more symmetrical look. This is just the first iteration of the design and I agree that it would be better to keep the bumper no wider than it needs to be to flow with the rest of the design.

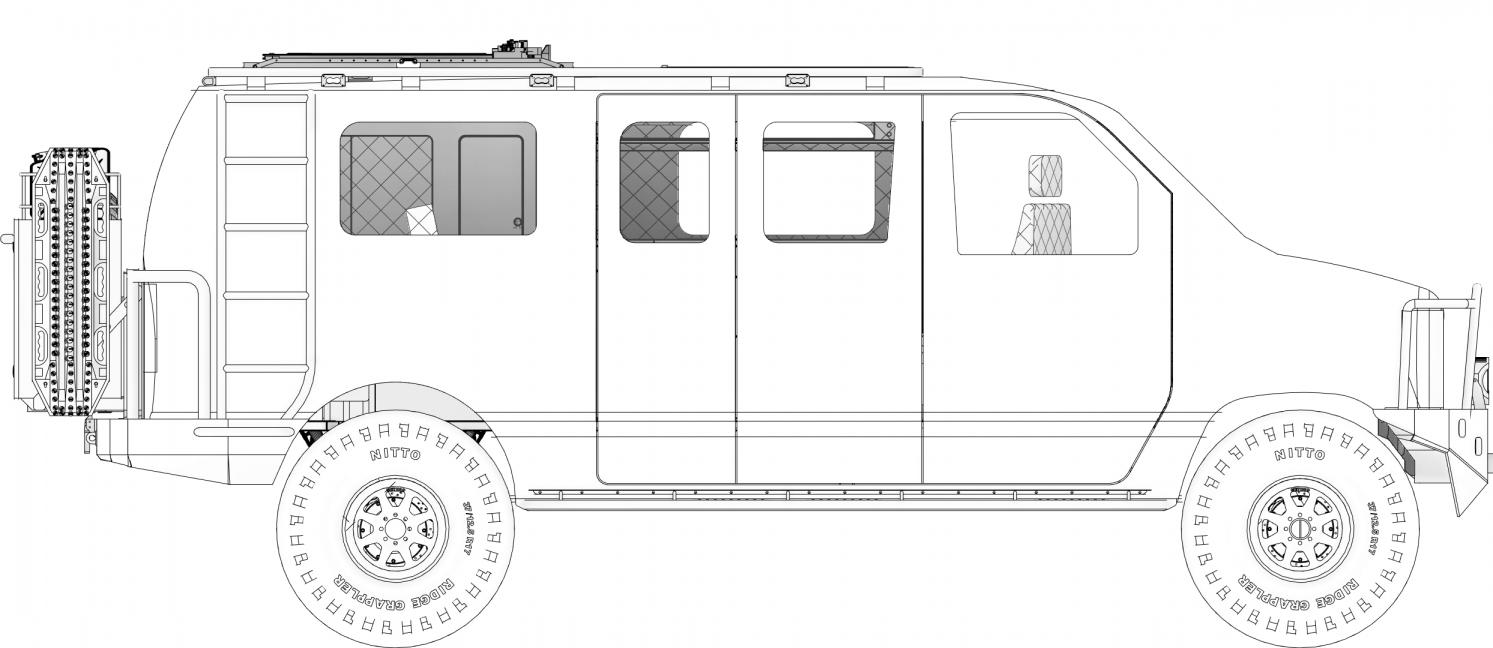
2. Totally understand what you're pointing out here, and I think you make a good point. Here is an updated image that eliminates the flat spot, and just carries the same angle through to the end of the bumper.


Trying to think back at why I had it the way I did in the original design I think there were two reasons, though they may be flawed. I don't really want to hack up the body of the van unless I have to to accomplish the full wrap-around effect of the bumper, so that means I am trying to work around the existing drop of the body in the rear corner. When I initially tried to pull the line straight as you show I would have to level it out and drop it lower than I would really like at the rear end of the bumper, or I would need to cut the body at a higher plane but then there is the issue of the spring hangers. The rear spring hangers for the rear leaf packs hang down some off the frame, so if I cut the body up to give more room for the bumper the leaf hanger would now be lower than the bumper edge. So my compromise on this idea was what I have shown a flat section to keep the bumper from getting too low at the wheel well, but still allowing for a steeper angle return back to the face of the bumper. I should also state again that this hasn't left the model yet, so a lot of these things could change as I start dialing it in to more real world numbers and constraints.

carringb
I have looked at the Buckstop-Reunell bumpers and they seem like a very stout solid bumper, but for my preference, I am not as much of a fan of the overall styling. They do offer a lot of great options and it would be nice since they are so close by.

I think you bring up a great point and something that would need to be addressed in how the bumper would mount. If I did an integrated hitch then I would plan on having a mount that sits between the frame rails where the existing spare sits helping tie the bumper to the frame in a more solid fashion than the stock mounting holes as you mentioned. I also had thought about adding additional cross bracing from the frame to the bumper quarter panel extensions in hopes to eliminate any flexing of the bumper to the body, or pivoting off the end of the frame rails up and down. Thanks for pointing out some additional things I need to dive into more.
__________________
Vandit - 2013 E250 Ground Up Build
- Full Custom DIY Interior Build
- DIY U-Joint Off Road 6" 4x4 Conversion
aarcaris is offline   Reply With Quote
Old 04-20-2022, 01:01 PM   #7
Senior Member
 
Join Date: Apr 2021
Posts: 407
Quote:
Originally Posted by aarcaris View Post
Also, I am not too proud to admit that some of these things are purely because I think it looks cool.
Ain't nuthin wrong with that!
motovan_mn is offline   Reply With Quote
Old 04-20-2022, 02:37 PM   #8
Senior Member
 
vandiesel's Avatar
 
Join Date: Oct 2009
Location: Portland, OR
Posts: 1,257
Garage
I just love all there drawings... Can I get a sticker?
__________________
2001 Ford RB 7.3 Quadvan (sold)
2006 Sportsmobile EB Transformer 6.0
vandiesel is offline   Reply With Quote
Old 04-21-2022, 08:30 AM   #9
Senior Member
 
aarcaris's Avatar
 
Join Date: Feb 2020
Location: Bend, OR
Posts: 307
Garage
Thanks, vandiesel! Though I am by no means an artist. If you are actually looking for some cool vehicles illustrations you should check out The Overland Design on Instagram, or their webstore. Pretty sure they will even do commissioned work for your own vehicle.
__________________
Vandit - 2013 E250 Ground Up Build
- Full Custom DIY Interior Build
- DIY U-Joint Off Road 6" 4x4 Conversion
aarcaris is offline   Reply With Quote
Old 04-21-2022, 10:57 AM   #10
Senior Member
 
dhally's Avatar
 
Join Date: Sep 2009
Location: SE Washington
Posts: 1,028
Garage
I got the Buckstop rear bumper, which is similar to your concept. I also considered fabricating one, but it would have been functional, not good looking...

- Flush mount lights would be subject to damage if the bumper was "bumped". I used smaller lights recessed into the bumper. Need to select the light before cutting the bumper!
- The Buckstop design also attaches to the bottom of the frame rails with some thick straps. However their integrated receiver ends up lower than my old hitch, disappointing. Although I haven't scraped it yet.
- The Buckstop is thick steel and HEAVY. I didn't think that would be an issue, but with the bumper and my loaded Aluminess box, I'm now installing a rear sway bar.
- I moved my license plate onto the bumper, and their plate light is sketchy. It's easy to step on when using the bumper step. Again, the light should be selected before fabrication.
- The Buckstop swing arm hinge and latch is very stout and the main reason I chose them over Aluminess. It is a bronze bushing with zerk. The latch is adjustable.
__________________
---------------------
2009 E250 RB 5.4L "SilVan"
dhally is offline   Reply With Quote
Reply


Posting Rules
You may not post new threads
You may not post replies
You may not post attachments
You may not edit your posts

BB code is On
Smilies are On
[IMG] code is On
HTML code is Off
Trackbacks are Off
Pingbacks are Off
Refbacks are Off

» Featured Campgrounds

Reviews provided by

Powered by vBadvanced CMPS v3.2.3
Disclaimer:

This website is not affiliated with or endorsed by Sportsmobile SIP or any of its affiliates. This is an independent, unofficial site.


All times are GMT -6. The time now is 12:05 AM.


Powered by vBulletin® Version 3.8.8 Beta 4
Copyright ©2000 - 2024, vBulletin Solutions, Inc.