|
|
 08-10-2022, 03:36 PM
|
#21
|
|
Site Team
Join Date: May 2007
Location: Southern New Mexico
Posts: 10,179
|
Quote:
Originally Posted by SheepShagger

...Personally hate the very rough finish of Berliners on vehicles bodywork as you simply cant wash them easily, rips a sponge, pita with a cloth etc. So I thin Raptor liner down with a thinner and spray with a normal paint gun, (upol will give you all the instructions to do this). that way you get a textured finish you can easily clean and IMO looks far better...
|
How has the "thinned" bedliner held up? I've used full-strength as a rock guard on the front of my teardrop, the teardrop fenders, and the fiberglass hood of my Bronco, and I really like it for its durability, but I wonder how well it holds up when its thinned.
thanks,
Herb
__________________
SMB-less as of 02/04/2012. Our savings account is richer, but our adventures are poorer.
|

|

|
|
08-10-2022, 08:30 PM
|
#22
|
|
Senior Member
Join Date: Apr 2009
Posts: 453
|
Quote:
Originally Posted by BroncoHauler
How has the "thinned" bedliner held up? I've used full-strength as a rock guard on the front of my teardrop, the teardrop fenders, and the fiberglass hood of my Bronco, and I really like it for its durability, but I wonder how well it holds up when its thinned.
thanks,
Herb
|
Perfectly fine, just like thinning regular oil based paint for HVLP gun, when you thin you don’t really use much/any less product or create a weaker layer, it simply their to allow you to spray easily and the thinning agent will mostly evaporate leaving just the product. You will need more coats though, since each coat is thinner. I can’t say this works for any beadliner, but upol / Raptor liner has all the information published on their site on how to thin, what thinners you can use, ratio to use, etc. You simply get a smoother and more even finish, it’s still textured though, just not to the extent of the schutz gun.
|
|
|
|
|
08-11-2022, 01:46 PM
|
#23
|
|
Site Team
Join Date: May 2007
Location: Southern New Mexico
Posts: 10,179
|
Thanks for the great feedback. I've only used Raptor bedliner, so I at least have that going for me, not to mention I already have the Raptor gun.
Herb
__________________
SMB-less as of 02/04/2012. Our savings account is richer, but our adventures are poorer.
|
|
|
|
|
08-13-2022, 11:03 PM
|
#24
|
|
Senior Member
Join Date: Nov 2020
Posts: 436
|
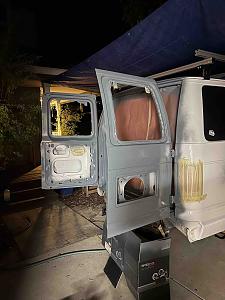
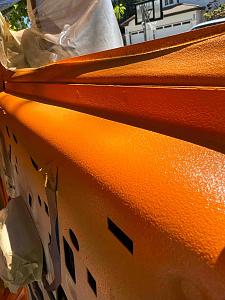
Part 1: done!
Painted the door jams today and will add the final color tomorrow morning (means big reveal tomorrow [emoji23]).
All in all in went well, but the last layer went a bit too thick here and there
so got to sand the tears :-)
Good training for tomorrow!


|
|
|
|
|
08-14-2022, 02:56 PM
|
#25
|
|
Senior Member
Join Date: Nov 2020
Posts: 436
|
And there goes the first weekends target!! Door Jams done!
I used 3 gallons of epoxy primer.
3 bottles Raptor Tintable in Raptor Orange. 15% reducer. 30 psi on HVLP with a 2.0 nozzle.
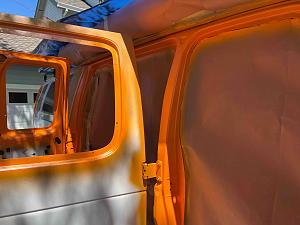
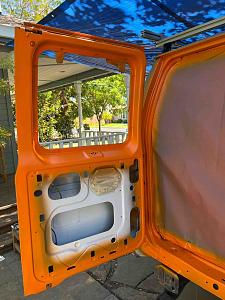
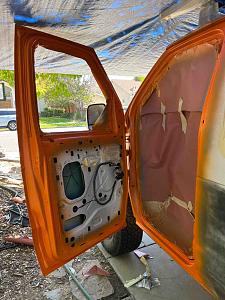
Texture is as targeted!
|
|
|
|
|
08-14-2022, 03:14 PM
|
#26
|
|
Senior Member
Join Date: Nov 2016
Location: FL and VA
Posts: 1,952
|
Nice, looks great so far.
__________________
Chris
2008 GMC 3500 Quigley Weldtec 4x4 Savana SMB
|
|
|
|
|
08-14-2022, 03:18 PM
|
#27
|
|
Senior Member
Join Date: May 2018
Location: Arizona
Posts: 666
|
Quote:
Originally Posted by E-350
And there goes the first weekend‘s target!! Door Jams done!
I used 3 gallons of epoxy primer.
3 bottles Raptor Tintable in Raptor Orange. 15% reducer. 30 psi on HVLP with a 2.0 nozzle.
Texture is as targeted!
[]
|
Looks great and I’m envious you can make such progress so quickly.What i don't understand is why so much primer . Did you do the whole body a few times over?
Also how well did it flow with that 2.0 mm jet? I tried a harbor freight hplv and drilled it out to 1.5 and nothing would flow and i had to run the shutz gun because it was all already mixed.
I was only doing a couple of bumpers for a trial run but it was still a little panic when nothing would spray.
I did test with solvents and it had a great pattern wide open at 60 psi.
Im still doing work on the roof befor spraying a bubble top.
|

|
|
|
08-14-2022, 03:50 PM
|
#28
|
|
Senior Member
Join Date: Nov 2020
Posts: 436
|
Thanks guys.
Not sure why so much primer. Used a 1.4 HVLP at 30psi and did 3 coats. Thats where I ended up
For the Raptor.
All I was reading was 2.0 nozzle and 15-20% reduction. SheepShagger also confirmed via PM.
Flow:
In general good and Im ok.
2 drawbacks:
1. I just a 2 gallon compressor. Spraying fairly quickly means the compressors pressure went down and I had to wait from time to time.
Secondly it once got hot and I had to wait until it cools down [emoji23]
So for the body I either buy or rent a bigger compressor.
2. could be my cheapo Amazon gun or not, but at the air outlets of the nozzle the paint got collected. So I had to clean it up 2-3 times.
But as long as it was clean and pressure was up, it went down really well.
|
|
|
|
|
08-15-2022, 06:58 AM
|
#29
|
|
Senior Member
Join Date: Apr 2009
Posts: 453
|
Quote:
Originally Posted by posplayr
Also how well did it flow with that 2.0 mm jet? I tried a harbor freight hplv and drilled it out to 1.5 and nothing would flow and i had to run the shutz gun because it was all already mixed.
|
To run through HPLV gun it needs to be reduced / thinned and minimum 1.8 jet, 2.0 is preferable. I have never got on with that purple HF gun, many on the net seem to get decent results though, but they are obviously better than me.
|
|
|
|
|
08-15-2022, 07:00 AM
|
#30
|
|
Senior Member
Join Date: Apr 2009
Posts: 453
|
Quote:
Originally Posted by E-350
|
That looks awesome. So much nicer than the finish you get with a Shutz gun.
|
|
|
|
|
|
 Posting Rules
|
You may not post new threads
You may not post replies
You may not post attachments
You may not edit your posts
HTML code is Off
|
|
|
|
 » Recent Threads
 |
|
|
|
|
|
|
|
|
|
|
|
|
|
|
|
|
|
|
|
|
|
|
|
|
|
|
|
|
|
|
|
|
|


 2008 GMC 3500 SMB
 Linear Mode