|
|
 04-13-2020, 07:00 PM
|
#151
|
|
Senior Member
Join Date: Apr 2007
Location: SF Bay Area, CA
Posts: 1,289
|
Just about time to go use it! Looks great. I love this build.
__________________
Phil
- 2005 EB50 6.0PSD - SMB 4x4
|

|

|
|
04-13-2020, 07:19 PM
|
#152
|
|
Site Team
Join Date: May 2007
Location: Southern New Mexico
Posts: 10,179
|
Great work. How have those exterior storage areas shaken out?
Herb
__________________
SMB-less as of 02/04/2012. Our savings account is richer, but our adventures are poorer.
|
|
|
|
|
04-13-2020, 10:50 PM
|
#153
|
|
Senior Member
Join Date: Feb 2013
Location: Santa Cruz, CA
Posts: 246
|
Quote:
Originally Posted by BroncoHauler

Great work. How have those exterior storage areas shaken out?
Herb
|
Tx! I don't have the best pics of those yet but will get some this week. They're pretty much complete and looking really good. They house gas, electical, battery, storage, heater, toilet, etc. Ive beeen wanting to do a comprehensive post on all the cabinets at once.
|
|
|
|
|
04-24-2020, 10:34 PM
|
#154
|
|
Senior Member
Join Date: Feb 2013
Location: Santa Cruz, CA
Posts: 246
|
Cabinets are nearing completion. I was able to get most of them scrubbed out clean of any dirt and rust dust in the corners. Sealed with a nice protectant and sprayed with a spray rubber. The "as seen on tv" kind. Works very well, looks good, and seals up the cabinets nicely. Matches the rhino lining very well. Still not entirely finished but here are a few pics of those. Minus the horiztonal cabinet driver side. SHown a post or two ago.
Batteries, electronics and compressor are behind the driver side door. We finally got our renogy shore power inverter installed. Works great. Using a stainless steel 30A plug coming out the bottom of the cabinet to connect to shore. We've got two 118 Ah in paralell AGM. Plus the additional 90Ah in the Kodiak. Should only use a fraction of the power i'll have at any given time. With the arrival of the UBCO bike i'd like to be able to mostly charge the battery of the bike using the Kodiak and on board power. Haven't really done any solid calculations on that yet, however, so we will see how vehicles battery system does in charging it.
In another pic you'll see a close up shot of the transfer switch allowing me to charge the house batteries or the kodiak batteries independently of one another. That's full time separation. I have to manually use the switch to charge the different battery bank. We decided to keep them separate for the obvious reasons i won't go into here - and that most folks are aware of already. Kodiak being lithium the primary.
The cabinet behind the electronics is open storage with the sliding panels for stacking items.
Behind that is bath and dish cabinet shown in a previous post. Behind that is the heater and bootwarming/toilet closet. It will be one or the other during the winter time. Definitely room for a joke in there but i'll leave it alone as this is long enough already. My intentions are not really to use the restroom set up in the winter time. That said the T track on the floor of the interior will accommodate a bolt that will fasten the Ammo can casing for the black water resevoir to the ground to stabilize it for those night time restroom calls while camped in the ski resort parking lot. I'm sure i'll make use.
Working around the rear of the vehicle / back most rear passenger cabinet is the water and grey tanks for the interior sink. There is a large heating pad under that shelf heating both those tanks. We will have to see how well that idea performs as the heating pads won't be applied directly to the tanks as advised. The interior heat from the cabin, double walled doors, and heat pads working on full time should do the trick and keep things unfrozen,..i hope! Storage underneath those tanks.
Middle long cabinet is the sliding external kitchen drawer. In front of that is the propane tank and food storage.
Lastly behind the front passenger door is additional water storage. One with heating pads and one without. I won't be doing that much winter camping that will require large volumes of water so I should be fine in that regards. 10 gallons of heat protected potable water for a few days of winter fun somewhere should work just fine. Above those is my partner steel stove - a beautiful piece of kit. im looking forward to many meals with that unit. the blue 5 gall jug is also a viral water filter with pump in case of an emergency which wont be likely but nice to have if you need the water capacity anyhow. Dual purpose.
THe large black panels are the lower bed panels that will nestle in the spot directly in front of the chest freezer along the front cabin wall. The bed panels lay perpendicular to the cabin above the chest freezer and third passenger seat. I'll make sure to follow up with some additional pics of the bed once the 'securing tabs' are finalized. Im 200# and one bed [panel holds me well with 4 1" square beam tubes for each panel. Can sleep two there if necessary.
Lastly you can see the table that was made for the third seat that will act as a nice work/eating station. THe hinges are inset into the cross section of the wood. I mentioned hinges those previously.
That's it for now. Switch/headboard at the front cabin wall next...
|
|
|
|
|
04-24-2020, 10:39 PM
|
#155
|
|
Senior Member
Join Date: Feb 2013
Location: Santa Cruz, CA
Posts: 246
|
Bed Panels...more pics to come on that set up.
...and tx TWO X for the slight photo crop tip to get them to upload correctly! kinda odd.
|
|
|
|
|
04-25-2020, 09:56 AM
|
#156
|
|
Senior Member
Join Date: Feb 2015
Location: Durango, Colduhrado
Posts: 687
|
Sweetsweetsweet
__________________
All things being equal - fat people use more soap.
|
|
|
|
|
06-05-2020, 08:35 PM
|
#157
|
|
Senior Member
Join Date: Feb 2013
Location: Santa Cruz, CA
Posts: 246
|
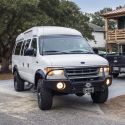
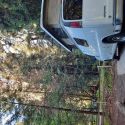
Stiiiillll at it. It's genuinely almost wrapped up. There will be some final pics and a good video at some point I"ll link too. After that, it's almost in the wild. Getting the bullet proofing done at a shop not to far from here in Walnut Creek. And then!... free to roam. For now, however, these pics show the rig in its mostly complete condition.
Lower bunk is complete. Those mount behind the fridge along the back wire/light chase. Eli created a very cool mountain range scene that i was definitely pleased with. THough the lower bed panels block a chunk of it you get the idea. Looks really good. I may have etched into the panels a continuation of the mountain range feature. We'll see...
The bed clips for the T track is shown. Lower bunk is stable and could sleep one person comfortably two smaller people pretty easily.
Another shot is of the electric UBCO trail bike mounted inside. Fits great. THe kodiak battery i have as an addtional battery system will be dedicated to that primarily when the bike is on the journey. Should be able to run the bike exclusively from solar charge.
The insulated pass through curtain is complete and looks great. Works very well... pleased with that. Nice and easy velcro tie up.
Fresh coat of white paint on white areas still exposed in the interior.
Rear doors were insulated with spray foam and topped with black marine deck pad for additional insulation and aesthetics. Handles and lock reinforced. No rattles! One of the great things about this rig is it's lack of ratlles. I made certain of that! I've still got a little chirp above the driver side in that seam that joins the cab and body but once insulation and interior gets put up there that'll help.
The fridge sips power and i have yet to see my tow AGM's dip below 100% with the 300W of solar.
Still working out a few kinks and more good pics of Navigation, max trax, hammock chairs, etc to come.
|
|
|
|
|
06-06-2020, 06:06 AM
|
#158
|
|
Site Team
Join Date: May 2007
Location: Southern New Mexico
Posts: 10,179
|
Man this build keeps getting better and better. Just don't get so wrapped up in the build, that you don't get around to using it. I've seen that too many times, and I'm guilty of it as well.
Herb
__________________
SMB-less as of 02/04/2012. Our savings account is richer, but our adventures are poorer.
|
|
|
|
|
06-06-2020, 04:26 PM
|
#159
|
|
Senior Member
Join Date: Feb 2013
Location: Santa Cruz, CA
Posts: 246
|
hahaa!..tx Herb. No doubt about it.... Good advice! It's really just gotten finished, however. Taken quite a while. I've gotten it out a bit and once the fix of the rear back up camera takes place it's done. Just getting that done today in fact. Couple other minor things as well i need to do but it's pretty much ready to use. I work so darn much i hope i can get a a fun little trip in with it by the end of the month but we'll see.
|
|
|
|
|
07-28-2020, 01:51 PM
|
#160
|
|
Senior Member
Join Date: Oct 2015
Location: Sonoma County
Posts: 788
|
Man, I swoon when I look at this build. Kudos.
What bike is that you're storing inside?
__________________
2003 Astro AWD
2005 Tacoma Access cab 4x4
1999 E350 RB 7.3 "Al B. Tross" aka "Exxon Valdez"
|
|
|
|
|
|
 Posting Rules
|
You may not post new threads
You may not post replies
You may not post attachments
You may not edit your posts
HTML code is Off
|
|
|
|
 » Recent Threads
 |
|
|
|
|
|
|
|
|
|
|
|
|
|
|
|
|
|
|
|
|
|
|
|
|
|
|
|
|
|
|
|
|
|


 Linear Mode