|
 05-27-2007, 11:36 AM
|
#1
|
|
Senior Member
Join Date: Apr 2007
Location: Parker, CO
Posts: 7,644
|
Posting Photos - How To ... UPDATED!
Please read this thread for the sites current frequently asked questions.
http://www.sportsmobileforum.com/for...1-a-16311.html
Please note the thread below is out of date since the new forum has been implemented.
You'll notice there are two buttons at the top "My Gallery" and "Galleries". These are two of the areas we will be using, as well as creating or replying to a post. You should be familiar with submitting a post to follow this tutorial.
Before you start make some images that are JPG, GIF or PNG. The dimensions must be 800x800 or smaller. This means a 1024x100 won't work, but a 100x800 will. I recommend Picasa (free from Google) for browsing and basic resizing using the export menu, although most any program you are familiar with will work.
There are three ways to put images on the site. One is in your Gallery. Anyone registered can see photos in your gallery and you can see photos in other people's galleries using the Galleries link or looking for the Gallery button below each post (see the 4th button on the line following this for my gallery).
The Gallery photos can be used many places. They can be put into threads in 3 different sizes. They are also the source of images for the rolling slideshow in the header. Lastly they are part of "Random", the link in the header which brings up a random selection of images from everyones galleries.
The other is actually putting an image in a thread. This second method is like an email attachment, where the image is tied to the thread. Remember, you can also put Gallery photos in threads, but they must be put in the Gallery first.
Generally thread attachments are faster and good for thread specific items- while everyone wants to see photos of your van, not everybody needs the detail shot of the mushroom growing in your backyard that was funny in context.
That said, either will work. Let's discuss Galleries first, and I'll get to the third way later.
__________________
it was good to be back
|

|
|
|
05-27-2007, 11:37 AM
|
#2
|
|
Senior Member
Join Date: Apr 2007
Location: Parker, CO
Posts: 7,644
|
PART ONE: Uploading Photos
PART ONE: Uploading Photos
Prepare all images on your computer.
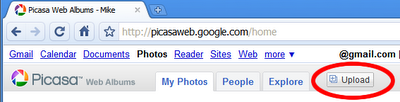
To upload photos, start by clicking on the My Gallery link in the header. You can open it in a new window and keep this tutorial open here.
For now you will see a screen that says "This gallery is empty."
Click on the "Upload Images" button above or below on the left.
Title and Description are optional. You do not need to put anything, but it is very helpful when people are browsing your images to have things labeled. The title and or description will go with all of the images you upload at that time, and you can upload up to 10 images at once.
Next are the 10 "File:" fields. You can use any number of them, just leave the rest blank if you do not have 10 photos to upload.
To identify a file for uploading first click the Browse button on the next empty "File:" line.
Browse to the images you prepared previously on your computer. You can only choose one for each "File:" line.
Choose the file in the dialog box and hit "Open'.
The location of the file is copied to the blank field. It will have slashes and identifies where the image is on your computer. Don't worry if you don't understand what it says.
To include another image in this batch use the Browse button on the next empty line and repeat until you have up to 10 images.
With one or more of the "File:" lines completed scroll to the bottom and hit the "Submit" button.
If there are no error messages you will now have the images you uploaded in your gallery. Note that they appear in reverse order (last uploaded is the first displayed).
For another batch, now or later, repeat at the "Upload Image" button.
__________________
it was good to be back
|
|
|
|
|
05-27-2007, 11:38 AM
|
#3
|
|
Senior Member
Join Date: Apr 2007
Location: Parker, CO
Posts: 7,644
|
PART TWO: Using Gallery Images in Posts
PART TWO: Using Images in Posts
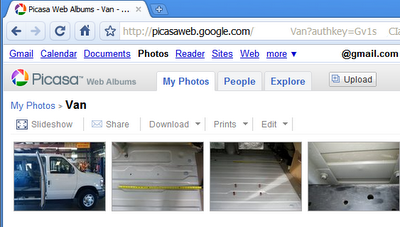
You can view your own gallery and other people's galleries by clicking on the Galleries button at the top, or by clicking on the Header Slideshow image, or Random.
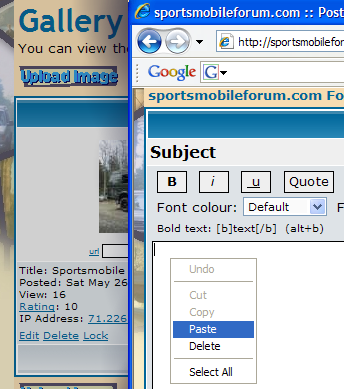
Under each image you will notice three white boxes labeled Thumbnail, Fullsize, and Direct. This is an example showing only one line, but they all work the same. Thumbnail and Fullsize use a number to identify the photo, and Direct uses a url string.
Fullsize is probably the best to use. although the tutorial shows using Direct, the process is the same.
Clicking any one of the three boxes should select the whole line. It will turn a solid color (blue in my case). If this doesn't work you will have to select manually. Try double or triple clicking to change the whole line to "selected".
Once selected CUT this info to your clipboard.
If you've cut the whole string correctly your white box will now be empty. If there is anything left refresh the page or try again with a different image.
Now if you PASTE the text in your clipboard directly into a post, the image will be placed there. The [IMG] tags are included so you don't need to do anything but PASTE. Note, you don't use the [Img], [thumb] or [photo] buttons above the posting section. The string already includes the correct information.
 Notice I've opened a new window to post. This allows me to CUT multiple image strings and put them in the same post.
The complete string will start and end with an [img]and[/img] tag, [photo] and [/photo], or [thumb] and [/thumb]. You can add text before or after these tags, but be sure not to add spaces inside of them, or linebreaks (although they may naturally appear on two lines).
Practice in the Test section of the forum. Try Thumbnail, Fullsize and Direct to see the differences.
__________________
it was good to be back
|
|
|
|
|
05-27-2007, 12:17 PM
|
#4
|
|
Senior Member
Join Date: Apr 2007
Location: Parker, CO
Posts: 7,644
|
PART THREE: Attaching Images to Posts
PART THREE: Attaching Images to Posts
The second method of showing images on the site is to attach them to a post. As noted these images will not show up except in that post.
Prepare the one or more images on your computer. Remember they must be JPG, GIF or PNG and 800x800 or smaller.
Start composing your post or your reply to someone else's post. You can do this in a separate browser window and keep this tutorial open.
Below the white textarea where you compose your post there are three buttons, "Preview" "Submit" and "Cancel". Scroll down and you will find another section titled "Upload Attachment".
To identify a file for uploading first click the Browse button on the next empty "Filename" line.
Browse to the images you prepared previously on your computer. You can only choose one now, but you can add several to a post.
Choose the file in the dialog box and hit "Open'.
The location of the file is copied to the blank field. It will have slashes and identifies where the image is on your computer. Don't worry if you don't understand what it says.
With the "Filename" line completed, hit the "Add the file" button.
If there are no error messages the image will now appear as a new section under the upload attachment section. On the left is the filename and a Delete button, an area to update the optional description and an icon that represents a file (it's half image half file).
You can repeat and upload another by starting at the Filename Browse button again. The next image will make a new line under the Post Attachments section.
The image is now uploaded and becomes an element you can use in your post. If you do not use the images in your post they will appear at the bottom of the post, if you just wanted an image or a few at the bottom of your post, you can Submit the post and be done.
Once you Submit, each image will appear in it's own grey box area.
If you want to type after the image, or between multiple uploaded images you much place them inline, as an element in your post before Submitting the post.
Note that along with the Posted Attachments lines where you can delete or edit the description of uploaded images, there is also a new line directly under the big white textarea. This new line is labeled "Attachments" and has a dropdown menu with the file names of each of the files you uploaded (possibly only one).
Put the cursor where you want to insert, Choose the filename you want and hit the Place inline button. A line that looks like this will be added:
[attachment=0]imagename.jpg[/attachrnent]
You can type before or after the line, but be careful not to type anything, including spaces, inside the tags or between them. The line may appear right after text like this:[attachment=0]imagename.jpg[/attachrnent]. If so you can safely put it on it's own line by putting a newline (Enter) before it, just be sure to not break up the square brackets when you do.
Where ever you have put the the gray area and image will appear in your post. You can put multiple images in order this way by selecting each from the dropdown and using the Place inline button.
Once you have the post completed (I recommend using the Preview button to see how things will look), you can use Submit and the images will be displayed where you have put them, or at the bottom if you have not used them as elements.
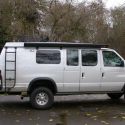
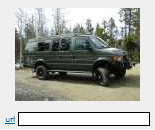
Here is an example of an attached image:
__________________
it was good to be back
|
|
|
|
|
01-30-2009, 01:44 PM
|
#5
|
|
Senior Member
Join Date: Apr 2007
Location: Parker, CO
Posts: 7,644
|
temporary
PART FOUR: Using Photos from Other Sites
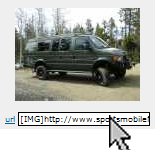
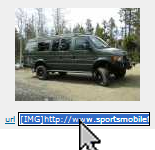
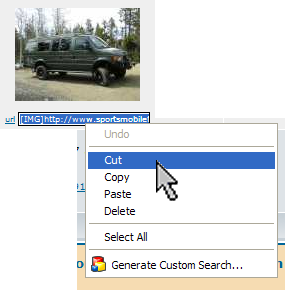
This is the third method, and it involves having images already located somewhere else. This is the least favorable as things change and go away, and sometimes older posts will be left with broken images. Which look like the thing our little friend is poking.  I'm sure you've seen them.
That said, you can still link to images offsite. First you need to Copy the entire URL of the image.
To do this right click on the image and bring up properties (may vary by system). This should bring up a dialog box with a location line that starts with http:// and ends with .jpg, .gif or .png.
You can highlight this line with the mouse, be sure to get the whole thing. Once highlighted, use the copy command on your keyboard (Ctrl+C). There is not a menu option you can use, and right clicking with the mouse may or may not work.
The URL which looks something like this: http://www.website.com/hosted/jage/proj ... CF4924.JPG
Needs to be surrounded by [img]tags.%20%20You%20can%20type%20[IMG]%20and[/img] putting the URL between them, or you can use the gray [img]button%20above%20the%20white%20text%20area,%20and% 20then%20paste%20between%20the%20[img][/img] which come up.
Picasa has a free online album feature and there is a way to use images from there. The specifics are outlined in the next post. For other albums and websites you will need to determine the best way to get photos yourself.
Post questions in Forum problems, comments, suggestions.
__________________
it was good to be back
|
|
|
|
|
07-13-2009, 05:30 PM
|
#6
|
|
Senior Member
Join Date: Feb 2009
Location: Monroe, WA
Posts: 310
|
How to post photos (with Google Photos, aka PicasaWeb)
Because I often see people wondering how to post photos on the forum, here's a guide to using PicasaWeb (aka Google Photos) to do it for free. There are other services out there; I'm just a Google guy 
The first time through will require a few more steps. Once you have your login and an album set up, it'll be much faster the next time.
1. Go to http://picasaweb.google.com.
2. If you don't have a Google Account, click Create an Account to make one. You can use your regular email address, it doesn't need to be a gmail one.
3. Sign in and accept the Terms of Service.
4. Click the Upload button in the toolbar.
5. Enter a Title, and any other info you want. Your Privacy level can be either Public or Unlisted. I usually choose unlisted, just so my photos don't turn up in Picasaweb searches.
6. Click the Browse... button and select your photos from your hard drive.
7. Click Start Upload. Your new album will be created and you'll see your photos on the page.
8. Click on the first photo you want to post to the forum.
9. In the right-hand toolbar, click Link to this Photo.
10. Select the Image only checkbox.
10b. Select the size from the drop-down box (I like 'medium 400px')
11. Copy the text in the Embed image textbox (starts with http://)
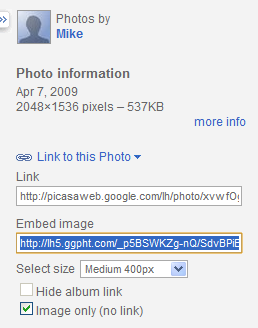
12. Go to your forum post.
13. Click the Img button. A set of tags will be added to your post: [img][\img]
14. Paste the copied text in between these two tags. You're good to go.
Cheers!
Mike.
|
|
|
|
|
 Posting Rules
|
You may not post new threads
You may not post replies
You may not post attachments
You may not edit your posts
HTML code is Off
|
|
|
|
 » Recent Threads
 |
|
|
|
|
|
|
|
|
|
|
|
|
|
|
|
|
|
|
|
|
|
|
|
|
|
|
|
|
|
|
|
|
|


 Linear Mode