|
Affordable Starcool replacement
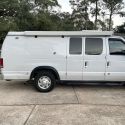
We have an oldy but goody 1992 E250 EB Sportsmobile. Weve had it since 2012. Its in fine shape and only 137,000 miles. But a couple of years ago the Starcool a/c for the van body became sincerely dead.
We tried doing without any a/c. This worked OK for the PA woods where we live. But a western trip that included both Palo Duro Canyon near Amarillo and Lees Ferry on the Colorado in June with temps of 90+ at 9 p.m. convinced us to find an a/c solution. Plus we have plans for Florida camping.
Starcool repairs were impossible and funds limited so we had to find an affordable solution. Here it is.
Our first step was to have a local a/c shop remove the entire Starcool system and compressor. Then he capped off the refrigerant lines so that the standard a/c mounted in the engine compartment could operate as if the Starcooll had never been installed. This cost a bit over $200 plus the cost of a system recharge of Freon. That a/c now works fine but of course only operates when the engine is running.
The short description of step two is that I bought a small, 110 volt, window-mount a/c at Walmart (GE model AHV05LYQ1, 5k BTU, 35 pounds). I built a removable window mount for it from scrap materials that I had lying about. This cost $150 for the a/c unit and less than $10 for the mounting hardware.
The longer description of step two with pictures follows.
I decided to mount the a/c in the front passenger side window opening with a removable mounting assembly. I made a platform for the a/c to sit on and a panel to both hold the a/c in place and close off the front passenger window opening. These were made from scrap 3/8 inch exterior plywood that was handy with a retaining bar made from a wooden garden stake.
One piece of the plywood was even warped in approximately the same curve as the van body. If I was building another assembly I would again use 3/8 plywood for the base (for strength) and 1/4 inch plywood for the window opening (for flexibility).
For the mounting plate I used a large piece of cardboard as a template for the complex shape. Once I had the cardboard properly trimmed and fitted I traced it onto the 3/8 plywood. I did the same for the window opening panel. Then trim for final fit.
In order to prevent the mounting plate from tilting radically outward after placing the a/c on it I added two angle brackets to the inner edges. To prevent he window panel from kicking out at the bottom after the retaining bar was installed high on the window opening inside the van I added two wooden blocks on the mounting platform.
I found some foam strips left over from some packaging material. I glued them in place on the panels and the a/c to seal off the openings / edges. Before installing it I made sure that it was closed cell foam. Installing open celled (like a sponge) would obviously just soak up water when it rained.
A couple of coats of paint covered with polyurethane and were good to go.
Its easy to install and takes less than ten minutes to do so. The a/c weighs about 35 - 40 pounds and must be lifted to place on the mounting plate. But Im 6 3 so its OK for us.
If we know that we wont need it for a trip we just leave the a/c at home. For storage on trips we carry it along at the rear of the van where a toilet was originally installed. We removed the toilet just after purchasing the van and used the space for storage ever since. I had installed a wooden cover plate over the black water tank. The tank was left in place so that the toilet could be reinstalled if desired. To prevent the a/c from shifting around when driving I drilled a few holes in that cover plate to drop in bolts.
The van being an Extended Body certainly helps with storage. Removal of the Starcool evaporator under the clothes closet and the air hoses running through the closet freed at least as much space as the a/c occupies in the van.
|


 Vandiesel II


 Linear Mode