Purchased the 3-camera system from Rearview Safety (rearviewsafety.com) through Amazon.com (better prices).

The three camera package came with everything but the license plate bracket which was additional and had to be purchased directly from Rearview Safety.

The main control box, and heart of the system. The inputs Camera 1 and Camera 3 are Video 1 and Video 2. Camera 2 is actually only on when the reverse wire is powered. Video 3 on the monitor is the AV input on the front.

So the whole system is a bit of a pain if you just want three active cameras. It's actually two active cameras and one on backup, with a 3rd input. This is not what I wanted, but I found a way to make it work.
This side shows an extra video output and two switches- to unmirror Camera 1 and Camera 2, which means Camera 3 is always mirrored. Camera 2 is on the reverse switch... it took some time to work out the best configuration for my application, and even then once installed I was swapping the cables around to try to get a workable solution.

The license plate holder had a built in shade hood and was all one piece, so the rear bumper was at too much of an angle to use the camera with this bracket. There was the same problem in the front, which left the license plate section in the back door.
In the door license plate section it would be blocked by anything I put in the tray.

In addition the standard camera comes with a separate hood, which makes doubles the metal on each side of the camera, making it twice as thick. Thus, the camera screws are too long to use with the single thick license plate hood and caused me to break one off during testing. It was too small to be extracted, and clearly cheap Chinese hardware in the first place.
Testing was done to try to understand the system. The power dongle has red to power the system, blue as reverse indication and black as ground. This part couldn't be simpler, as 12v powers the whole system, cameras and all. Unfortunately the blue wire overrides whatever video input you have up, so simply tying it to the red is not and option.

Here is where the fun begins. You can find my other post about what junk the ram mounts I bought were, so I was left with a monitor terminating in a non-standard ball size and a generic mount I did not want to use.

Here you see the final arms for the ball getting plasti-dipped.

The base. Originally intended to move in the vertical direction too, but for stability and ease this configuration was settled on- namely so there wouldn't be double ball joints.

Just some additional brackets shaped and bent and attached to the dash. I used hard plastic washers between the arm and the brackets and these need to be replaced with rubber so they grip more.

The whole arm with both ends but no monitor. The ball falls between the 5 and 6 presets on the radio. When the base rotated the idea was I could move the monitor vertically and have access to the radio, but since I don't mess with the radio that much anyway the fact that I can hit the power button and move the monitor if I want to change CDs works for me.

The ball joint close up. I doubled the arms around the ball with some that had not been drilled and plasti-dipped in order to stiffen them.

Unfortunately this attached to the back of the monitor in a vertical track and I wasn't sure of a replacement that would work.

With the monitor in place I could finally focus on the wiring. Since I needed to get behind the panel to put the switches in, I decided to install that auxiliary power port I've always wanted on the passenger side. This is the back of that area on the dash.

And the front with a guess as to a route that would not hit anything.

And the hole courtesy of a wood bit. The dash is actually really thick here which caused me to cut down the back of the cigarette lighter. Drilling blind is not recommended because there are tons of hidden supports and brackets. In fact the switches you'll see later are crooked because there really wasn't enough room where I drilled- even with the engine cover out I misjudged some brackets.

The front camera wiring mirrors where my CB antenna goes, except I came through the door loom instead of around the door seal.

I had A LOT of extra cable. The Rearview Safety system seems to use proprietary ends- they are common enough, but the cable extensions are not interchangeable- the camera end is a 5 pin that is sort of like a mini CB mike plug, and the video box end is a PS/2 connector that only uses 5 of the pins.

Best Buy was clueless, the local alarm stores were mad it wasn't their hardware, and Radioshack is more pathetic then the Verizon kiosk at Costco, so I was left with A LOT of extra wire.

A LOT, LOT of extra wire. Rearview Safety sells 22ft extensions, but I was unclear if it was 22ft in addition to the 66ft I had on each camera, and in any event I did not want to spend more money on this project replacing things that came in the kit.

I ran the cables up the passenger A pillar. Actually the 3rd camera is right above the passenger, so that cable runs down, forms the second bundle of excess wire and goes back up.

The rearview location, and new 3rd brakelight.

Oh, jeeze, even more wire to deal with. Another 66ft- at least 1/3 of it will go towards actually getting from the camera to the control box this time.

I was surprised to find hot and cold water lines under the 3rd brake light. Huh?

They don't seem to go anywhere, although I have yet to understand completely the whole water system. In any case they were shortly encased in a wall of excess cable, as the open areas to each side were hardly sufficient to hide all of it in.

Once done the 3rd brakelight cover went back with a new slot and some black RTV.

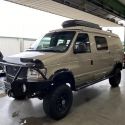
The camera goes up and down with the top- which was by design. The system is powered by a switch, and can be activated to view outside the van at any time.

The rear view with the top down. The red switch is system power, the blue is "reverse" which actually turns on the internal camera.

The internal camera.

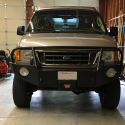
The third camera is mounted on the front through the grill.

The mount is actually cut through the chrome plastic and inserted through the back.

Looking up.

The view is perfect for anything that is smaller then the hood, or too close.

Apart from the mandatory reverse switch and the mountains of cable included, the biggest drawback to the system was the extremely short wire coming from the monitor itself. The monitor end is hard wired, so removal will be extremely difficult, and the short length required the video box to be relatively close. Since the passenger kick plate is full of cable and the driver's switches, alarm and brake controller- the box wound up in the overhead console. There is not a lot of space up there, but since it's cooler then down by the engine and makes for easy access to switch the cable ends it is a workable solution. I would liked to have put it at the end of the shelf above the driver's left shoulder, above the seatbelt on the B-pillar, but there simply wasn't enough to get from the monitor to the control box.


 Linear Mode