Journey with Confidence RV GPS App RV Trip Planner RV LIFE Campground Reviews RV Maintenance Take a Speed Test Free 7 Day Trial ×


Reply
 
Thread Tools Display Modes
 
Old 12-11-2011, 11:27 PM   #1
Senior Member
 
Join Date: Nov 2010
Location: Santa Monica, CA
Posts: 200
Center console bubble level

For years I have relied on two separate levels to get things reasonably level in our van. I used the Lev-O-Gage for left to right and a bubble level that I had strategically mounted above the drivers door for front to back. These have never been easy to see straight on from the drivers seat, particularly at night. So I have been thinking of a better way for a long time.

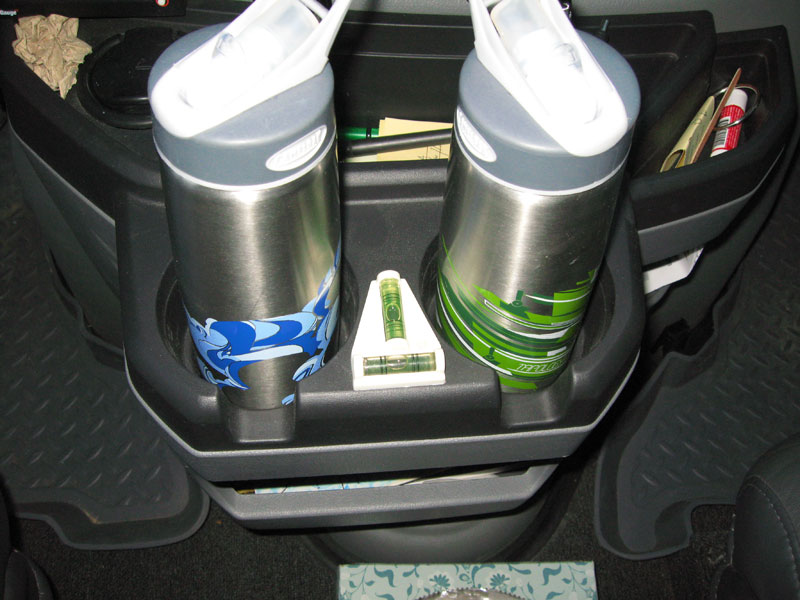
I picked up a bulls eye level a while back to see if this would work better and where I can put it. I decided to put it on the center console in plane sight. I could have just leveled the van and put some epoxy putty on the bottom of the level and stuck it in place. But noooo, I needed to make a project out of it. I didn't want it to look like an after thought. Maybe I could make it look like it was an option that the manufacture offered.

It had to be as flush as possible so I was going to have to drill a 1" hole into the top of the console. Then I had to make an adjustable support that would fit in the underside of the cup holder.
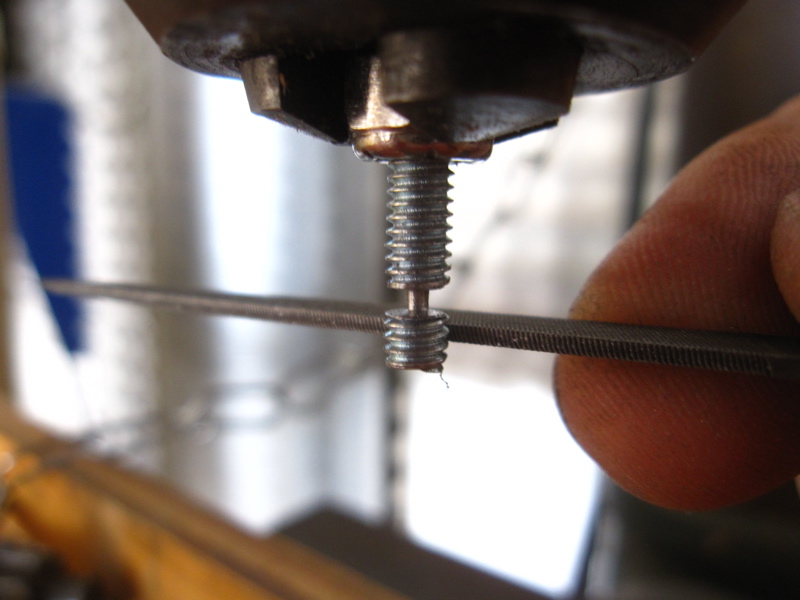
I started with a 1 1/2" ABS plastic pipe cap. I had to shape it a little to get it to center where I wanted it. Then I drilled and tapped two holes for the level adjusters. Then I started on the leveling tray, this is what the bulls eye level will sit on. I had some sheet aluminum that I cut into a three pointed star shape. One end was pointed, this would be the fixed point and the other two had a slot put into them. This slot would pinch the grove I put on the end of the two screws. These two screws give me the ability to make fine adjustments after I mounted the unit.


I also put a light in it with a separate rocker switch. That way if I was setting camp after sunset it would be easy to see. I used a short piece of the LED strip I used in my florescent light conversion. I glued the bulls eye level on the aluminum leveling tray and then glued the whole unit into the console using epoxy and Q-bond. (If you've never used Q-bond you should give it a try. I bought it for the first time earlier this year and now I use it all the time.)
http://www.amazon.com/Bond-Repair-Small ... B003YI421I


I leveled my van and reinstalled the console and made the final adjustments.


One thing I learned while doing this was that when the van (floor and cabinets) are level, the bed in the penthouse is not, it actually is sloping down in the back.

Cheers,
John

jwintersteller is offline   Reply With Quote
Old 12-12-2011, 08:22 AM   #2
Senior Member
 
pjpvi's Avatar
 
Join Date: Apr 2007
Location: SF Bay Area, CA
Posts: 1,289
Re: Center console bubble level

Very nice John. I've had a similar idea, but never acted on it. Guess I'll formally put it on the list now.

Phil
__________________
Phil

- 2005 EB50 6.0PSD - SMB 4x4
pjpvi is offline   Reply With Quote
Old 12-12-2011, 09:11 AM   #3
Site Team
 
WVvan's Avatar
 
Join Date: Jul 2009
Posts: 1,293
Re: Center console bubble level

Nice write-up. Finished project has the factory made "clean" look like you wanted.
One question if I may. What did you use for disconnects on the wiring for when you have to remove the doghouse?
__________________
Open the pod bay doors Hal.

Once I exit Hal, this is what I do.
https://larry.wvnet.edu/~van/pics/lic...late-small.jpg
WWW.WVBIKE.ORG
WVvan is offline   Reply With Quote
Old 12-12-2011, 09:32 PM   #4
Senior Member
 
Join Date: Nov 2010
Location: Santa Monica, CA
Posts: 200
Re: Center console bubble level

Thanks Guys,
Quote:
Originally Posted by WVvan
One question if I may. What did you use for disconnects on the wiring for when you have to remove the doghouse?

The connection that I used is a two prong quick connect. Don't remember where I got it but I'm sure you can pick these up at an auto parts store or a RadioShack. I had put this connecter in years ago when I installed two extra 12v accessory outlets so we could charge phones or other things that would fit in that little cubbyhole. That way there wouldn't be as many wires hanging around.


You can see the back side of the 12v accessory/cigaret-lighter behind the quick disconnect.


John
jwintersteller is offline   Reply With Quote
Old 12-22-2011, 05:39 PM   #5
Senior Member
 
woodbee's Avatar
 
Join Date: Jun 2009
Location: Rohnert Park, CA
Posts: 286
Re: Center console bubble level

I just drive til it's level. Cheep and easy install. Velcro.

Woody

__________________
2009 White E-350 Modified EB-43, 4x4, 6.0 PSD
woodbee is offline   Reply With Quote
Old 12-22-2011, 06:11 PM   #6
Senior Member
 
pjpvi's Avatar
 
Join Date: Apr 2007
Location: SF Bay Area, CA
Posts: 1,289
Re: Center console bubble level

Woody, that install is more my speed. I'll be ordering one soon.

Phil
__________________
Phil

- 2005 EB50 6.0PSD - SMB 4x4
pjpvi is offline   Reply With Quote
Old 12-22-2011, 06:14 PM   #7
Senior Member
 
woodbee's Avatar
 
Join Date: Jun 2009
Location: Rohnert Park, CA
Posts: 286
Re: Center console bubble level

Phil,

I think I got it online at Camping World.

Woody
__________________
2009 White E-350 Modified EB-43, 4x4, 6.0 PSD
woodbee is offline   Reply With Quote
Reply


Posting Rules
You may not post new threads
You may not post replies
You may not post attachments
You may not edit your posts

BB code is On
Smilies are On
[IMG] code is On
HTML code is Off
Trackbacks are Off
Pingbacks are Off
Refbacks are Off

» Sportsmobile Registry

A Ramblin Van

truen

Vandit

aarcaris
Add your Sportsmobile
» Featured Campgrounds

Reviews provided by

Powered by vBadvanced CMPS v3.2.3
Disclaimer:

This website is not affiliated with or endorsed by Sportsmobile SIP or any of its affiliates. This is an independent, unofficial site.


All times are GMT -6. The time now is 12:02 AM.


Powered by vBulletin® Version 3.8.8 Beta 4
Copyright ©2000 - 2024, vBulletin Solutions, Inc.