Journey with Confidence RV GPS App RV Trip Planner RV LIFE Campground Reviews RV Maintenance Take a Speed Test Free 7 Day Trial ×


Reply
 
Thread Tools Display Modes
 
Old 07-05-2022, 02:55 AM   #11
Senior Member
 
martinli's Avatar
 
Join Date: Aug 2017
Location: Berlin
Posts: 134
Yesterday I finaly hung the awning on the brackets. Thanks to my 4m straightedge not any adjustment was needed and it is very sturdy. For the moment I left out the midle bracket but thinking of adding it just in case.

__________________
E350 - 2014 - 2WD
martinli is offline   Reply With Quote
Old 07-05-2022, 10:33 PM   #12
Senior Member
 
Join Date: Nov 2020
Posts: 436
Servus Martin! Wo kommst du denn her? ;-)

I used 2 M8‘s in the original bracket holes. That’s what I used as standard bolt on my 45/45 profiles.
As the profiles only allowed a M12 to the inner hole I added a M12 in the middle. Just to feel more secure and to take some torque out. Also: didn‘t trust 2 M8‘s only :-)

Click image for larger version

Name:	IMG_1964.jpg
Views:	3
Size:	137.6 KB
ID:	44499


Sorry for the late response, having some fun in Washington and Oregon, trip report follows.
Click image for larger version

Name:	IMG_1949.jpg
Views:	4
Size:	221.5 KB
ID:	44500
E-350 is offline   Reply With Quote
Old 07-05-2022, 10:33 PM   #13
Senior Member
 
Join Date: Nov 2020
Posts: 436
Happy to see some pics how you did it!
E-350 is offline   Reply With Quote
Old 07-06-2022, 05:47 AM   #14
Senior Member
 
martinli's Avatar
 
Join Date: Aug 2017
Location: Berlin
Posts: 134
@E-350 I live in Berlin Germany that's where ich komme her.


I assume you bolted the M12 from in side of the awning casing since in the back there is no space for a M12 screw head.
To fix the awning against the brackets I used the original M5 screws on the lower side of the bracket.


Did you also mount the third, midle bracket? I will do that later.


Here are some pics. The first shows the old ARB awning before changes took place.
Attached Thumbnails
PXL_20220613_171803884-2.jpg   PXL_20220704_154511694.jpg   PXL_20220704_154519043.jpg   PXL_20220704_154530828.jpg   PXL_20220704_154613849.jpg  

PXL_20220704_182248571.jpg   PXL_20220705_154550527.jpg  
__________________
E350 - 2014 - 2WD
martinli is offline   Reply With Quote
Old 07-06-2022, 07:49 AM   #15
Senior Member
 
Join Date: Nov 2020
Posts: 436
Cool, greetings to Berlin from a former Ruhrpottler and Landsberg am Lech‘ler :-)

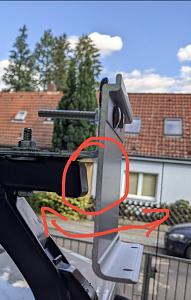
The space you have between the crossbars and the brackets (circle) was exactly what I didn‘t want to have. As we‘re taking quite some rough roads I didn‘t want to have the awning swinging.
If possible I would try to push it back towards the crossbars.

I used all 3 brackets and yes: I hid the M12 between the awning and the bracket. Wasn‘t easy, but eventually I was able to countersink a flat head into the bracket + into the extruded profile.
Don‘t have the full „holding strength“, but still adding a significant amount of safety.

Will take a pic once I take the awning down againClick image for larger version

Name:	IMG_1967.jpg
Views:	6
Size:	178.8 KB
ID:	44508
E-350 is offline   Reply With Quote
Old 07-06-2022, 09:21 AM   #16
Senior Member
 
martinli's Avatar
 
Join Date: Aug 2017
Location: Berlin
Posts: 134
I know your point regarding the gap. But its only in the front. The rear leans against the squarebar.
The middle one will also do. Currently it feels very sturdy. And yes I'm facing rough roads as well.
But i cannot simply move the bar more to the right since it is fixed against the solar panel and I have to take care of all six square bars to be in line. You know the roof is angled in all directions.
If I feel kind of unsafe I will add an additional L-bracket that faces downwards.
__________________
E350 - 2014 - 2WD
martinli is offline   Reply With Quote
Old 07-06-2022, 09:23 AM   #17
Senior Member
 
martinli's Avatar
 
Join Date: Aug 2017
Location: Berlin
Posts: 134
more important now is to close the gap between awning back and roof. Ray has a god solution for this. And of course Fiamma has got a not so inexpensive dedicated solution.
For me the awning has to work in rain mainly.
__________________
E350 - 2014 - 2WD
martinli is offline   Reply With Quote
Old 07-06-2022, 01:38 PM   #18
Senior Member
 
Join Date: Nov 2020
Posts: 436
Instead of moving crossbars you could also just add a block of plastic or so and screw into it from the outside of the bracket.
E-350 is offline   Reply With Quote
Reply


Posting Rules
You may not post new threads
You may not post replies
You may not post attachments
You may not edit your posts

BB code is On
Smilies are On
[IMG] code is On
HTML code is Off
Trackbacks are Off
Pingbacks are Off
Refbacks are Off

» Sportsmobile Registry

A Ramblin Van

truen

EB Van

ebflow
Add your Sportsmobile
» Featured Campgrounds

Reviews provided by

Powered by vBadvanced CMPS v3.2.3
Disclaimer:

This website is not affiliated with or endorsed by Sportsmobile SIP or any of its affiliates. This is an independent, unofficial site.


All times are GMT -6. The time now is 08:56 PM.


Powered by vBulletin® Version 3.8.8 Beta 4
Copyright ©2000 - 2024, vBulletin Solutions, Inc.