Journey with Confidence RV GPS App RV Trip Planner RV LIFE Campground Reviews RV Maintenance Take a Speed Test Free 7 Day Trial ×


Reply
 
Thread Tools Display Modes
 
Old 12-05-2017, 04:25 PM   #11
Senior Member
 
larrie's Avatar
 
Join Date: Apr 2011
Location: Oregon Ciry Oregon
Posts: 2,854
Glad to hear they are still working and there are no issues.

__________________
Larrie
Read detailed trip reports, see photos and videos on my travel blog, luinil.com.
Current van: 2002 Ford E350 extended body camper with Colorado Camper Van pop top and Agile Offroad 4WD conversion.
larrie is offline   Reply With Quote
Old 02-07-2018, 09:46 PM   #12
Senior Member
 
larrie's Avatar
 
Join Date: Apr 2011
Location: Oregon Ciry Oregon
Posts: 2,854
My experience

First of all I want to express my thanks to Brian or figuring out how to install screens on the window frames. When I was doing mine for the second time I discovers a couple of tricks to make the installation process simpler.

The first time I installed a screen on the side door I did not leave enough slack to allow the window to open so had to redo it. This time I measured the distance the window popped out at the bottom, about 2 inches. Then I measured the height of the window frame, about 4 inches. Finely I made a jig that was 6-1/2 inches high to hold the screen up. This allowed me to get the right amount of extra screen at the bottom of the frame to allow the window to open. It also made the installation of the screen have a neat appearance.


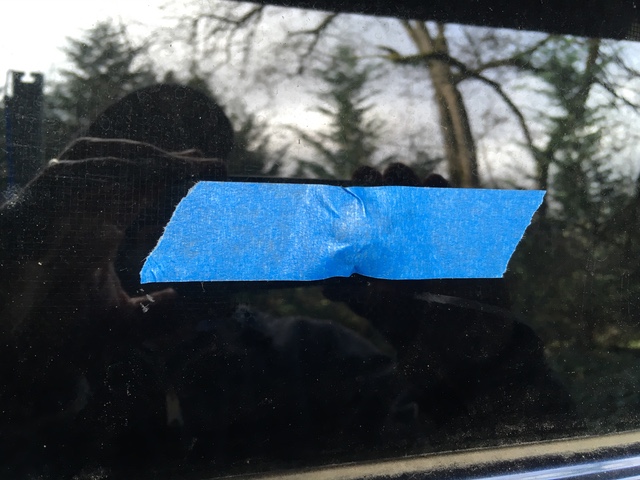
I taped the screen at the top of the window frame first. Then moved to the bottom center using the jig to hold the screen up while I put a piece of tape in place. From there I moved the jig to the bottom right corner and taped that section of the screen. Then the jig was moved to the bottom left corner where more tape was applied. Finely the sides were taped.


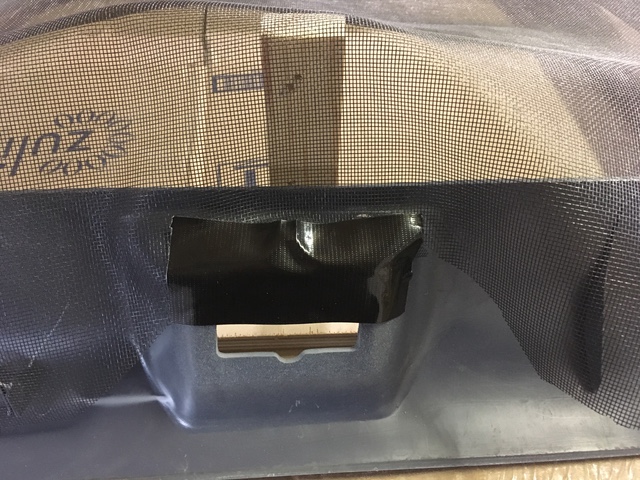
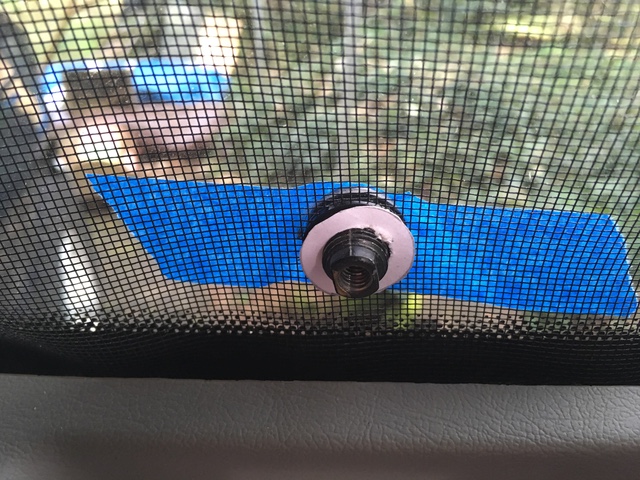
Having twice dropped the window bolt and searching for the washers for a while I decided to tape the bolt to the outside of the glass during the install. The washer that is between the screen and the window is a bit tricky to get installed as there is not much room for my fingers.


As Brian noted you need to be careful when installing the nut on the bolt as it is easy to twist the screen when tightening it. To help prevent the screen from twisting I used one of the existing washers as a template and cut a paper washer out of an index card. The paper washer was installed between the nut and the screen. It helped to reduce the tendency of the screen to twist as the nut was tightened.

__________________
Larrie
Read detailed trip reports, see photos and videos on my travel blog, luinil.com.
Current van: 2002 Ford E350 extended body camper with Colorado Camper Van pop top and Agile Offroad 4WD conversion.
larrie is offline   Reply With Quote
Old 07-02-2018, 11:05 PM   #13
Senior Member
 
dokaman's Avatar
 
Join Date: Oct 2014
Location: Stevenson WA
Posts: 363
Garage
This looks great! I will be doing this soon.
__________________
Justin

2001 Van Haus E350 EB 7.3L Quadvan 4X4
1999 Sportsmobile E150 - SOLD
2002 Sportsmobile RB50 7.3L 4X4 - SOLD
dokaman is offline   Reply With Quote
Old 09-29-2020, 03:42 PM   #14
Senior Member
 
tedujam's Avatar
 
Join Date: Jul 2020
Location: Austin
Posts: 167
What is the screen material everyone is using here?
tedujam is offline   Reply With Quote
Old 03-06-2022, 12:44 PM   #15
Member
 
Join Date: Nov 2018
Location: Vermont
Posts: 37
Thanks Brian and Larrie. Pop-out project complete with screens.
Beejmac is offline   Reply With Quote
Old 03-07-2022, 04:50 PM   #16
Member
 
Join Date: Oct 2021
Posts: 43
@tedujam, I am unsure about op, But I was thinking on useing the .9 Noseeum bug netting found here, I have bought other stuff from them and figured if they have it, why not. But that said I think the Noseeum is thicker and capable to make a bag with, so I am talking to them about getting a sample set of the diffrent mesh/bugnets they have.
https://dutchwaregear.com/product-ca.../fabrics/mesh/


Also just search Amazon bulk mesh or bulk bug net for lots of options.
kalabaddon is offline   Reply With Quote
Old 03-07-2022, 04:54 PM   #17
Senior Member
 
BrianW's Avatar
 
Join Date: Apr 2012
Location: Philadelphia, PA
Posts: 4,208
I just got basic nylon screen from Home Depot I think. I haven’t done this in my new van yet so maybe I’ll upgrade to the finer mesh. But that’s harder to see out of, no?
BrianW is offline   Reply With Quote
Old 03-08-2022, 02:53 AM   #18
Senior Member
 
1der's Avatar
 
Join Date: Apr 2013
Location: San Francisco, CA
Posts: 3,283
The Noseeum mesh has far less ventilation/airflow.

If you are in noseeum areas then you have to go w that to keep the tiny bugs out. The trade off is less airflow and visibility.
__________________
Ray
Beastie 3: 2002 7.3 EB Cargo: Agile TTB, CCV High Top, Custom Walk Through, Lots of stuff added. www.BlingMyRig.com
1der is offline   Reply With Quote
Reply

Thread Tools
Display Modes

Posting Rules
You may not post new threads
You may not post replies
You may not post attachments
You may not edit your posts

BB code is On
Smilies are On
[IMG] code is On
HTML code is Off
Trackbacks are Off
Pingbacks are Off
Refbacks are Off

» Sportsmobile Registry

Vandiesel II

vandiesel

Rosy

Isever
Add your Sportsmobile
» Featured Campgrounds

Reviews provided by

Powered by vBadvanced CMPS v3.2.3
Disclaimer:

This website is not affiliated with or endorsed by Sportsmobile SIP or any of its affiliates. This is an independent, unofficial site.


All times are GMT -6. The time now is 07:02 PM.


Powered by vBulletin® Version 3.8.8 Beta 4
Copyright ©2000 - 2024, vBulletin Solutions, Inc.