Journey with Confidence RV GPS App RV Trip Planner RV LIFE Campground Reviews RV Maintenance Take a Speed Test Free 7 Day Trial ×


Reply
 
Thread Tools Display Modes
 
Old 11-06-2022, 10:50 PM   #1
Member
 
Join Date: Sep 2022
Location: Nor Cal
Posts: 47
Top to Bottom Begins

I've posted a few threads in the short time I've had my van, asking questions, etc. and decided I've done enough thinking and it was time to start a thread to track my top to bottom to be done list. It's a long list and I don't bust out work like I used to so it's gonna take a while.

I've restored a few cars over the years and did research on custom build outs so I knew any interior, electrical, or plumbing issues I could deal with. So I did a lot of research at the mechanical level (year, engine type, etc.) and ended up with what I believe was a great deal for me.

2006 E350 RB V10, has all passenger van glass, electric penthouse, rear AC. History is not very clear. PO said there were several TVs and SMB interior when he bought it. He pulled the TVs and replaced cabinets with Trail Kitchen cabinets. I believe the original layout was 30 or something? Has a side sitting gaucho couch behind the driver and I believe that is the only piece of the SMB interior that remains.

The one thing I didn't really research was the penthouse. I figured it went up and down and didn't leak so I'm good. Then my wife asked about adding a monitor to cast movies to, so I started searching and quickly learned about the common bolt and bar issues. I took a close look at my penthouse and realized my bars were bent and wires going up to the headliner had been cut which explained why the lights didn't work.

Having an electric top I wanted to make sure my bolts are solid so boy wonder, the pop top master, agreed to help me out with squaring that away. I made the trip down south and we got it done. I've got a lot of pictures below. I didn't do a great job of pics during the fix as we were both pretty busy through the six hour process but I am moving on to the headliner removal now so I included those pics to help tell the story.

First we raised the roof as far as it would go and attempted to straighten the bars using the in place method with a big black pipe and u-bolts, but that didn't do much and I was OK with leaving them as is so we started removing all the screws from the upholstery that covers the tracks. There were two free pieces on each side and the rest just folded down into the van. In mine, the bed sits on upholstered long pieces of u shaped metal that slip over the rail of the top so the front and rear upholstery needed to be removed.

The two j hook latches needed be removed with two 7/16 wrenches. A thin upholstery tool is helpful in removing the black caps on the top and bottom of the hook latches. There was also a couple button screws in each corner covered by upholstered caps and several black screws in various locations in the corner and along the bottom. There is a top and bottom panel


Top and bottom removed


Next is the back panels. For this job you only need to remove the top panel but I'm showing all of them because of the other things I want to do with electrical, etc.
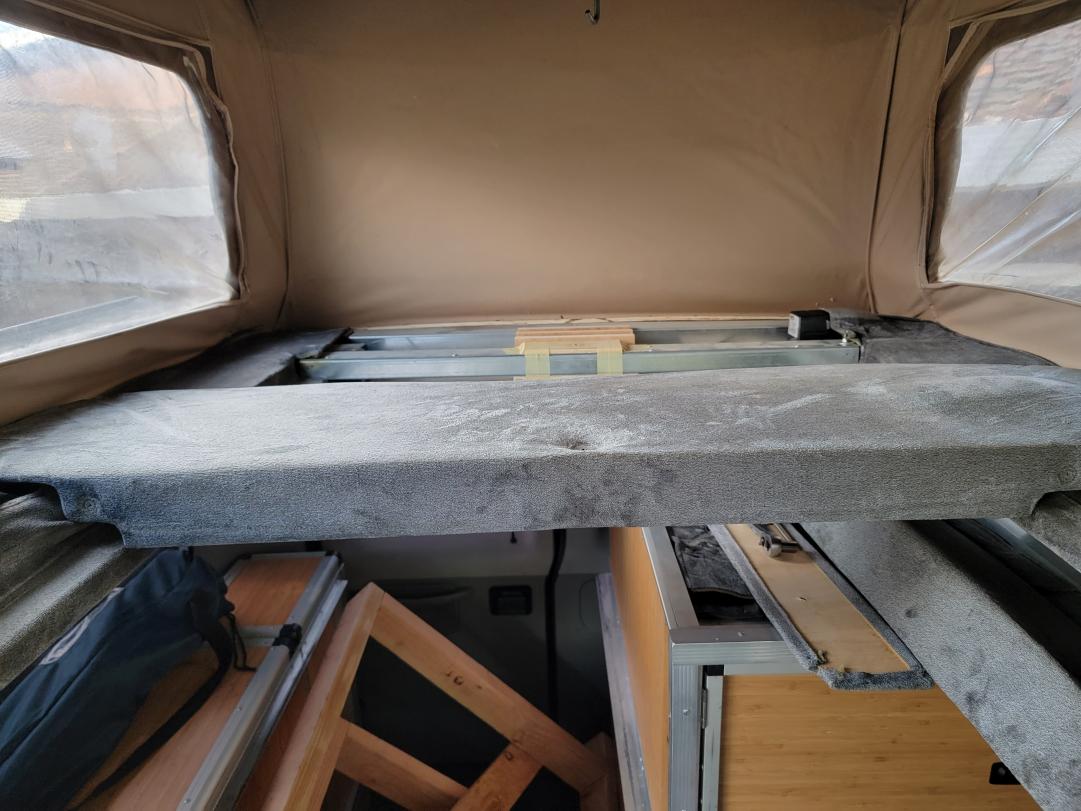


Picture isn't great but there is a trim piece tucked up near the top of the doors that is held in with four snap screws with upholstered covers.


Twp L brackets are covered by that trim piece and removing the four screws as well as any straggling black screws in the bottom panel, the four pieces all come apart.

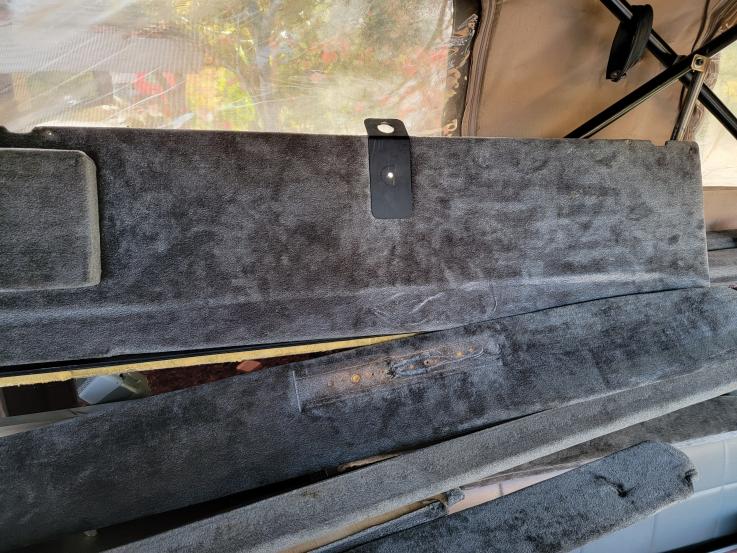


Removed the two covered U rails (see them on the couch on the left). Front view.


Rear view


Then we built a couple braces. I had already cut several pieces and brought some extra 2x4s to finish up the final design. One in the front, between the pad and j hooks and one in the back as far back as we could get it.


Next was spring de-tensioning / removal


Here is what the front pivot bolt looked like.


Rear actuator detached. Just pull the pin in both sides and lower the roof until the actuator falls off the metal piece. A couple pics follow that show the bolt setup on this one, which is the rear one. We started pulling bolts and were able to get them loosened in pretty quick fashion so we decided we may as well try to pull the bars and straighten them in the vice. This required the removal of the bar pads which is held up by 8 bolts (4 in each) that go through the roof. Luckily boy wonder had a tall ladder and we were able to remove them with the top up. I won't have the luxury at my house. Can those be removed with the top down and then the top raised without issue? I plan to replace all those bolts as part of this as well.
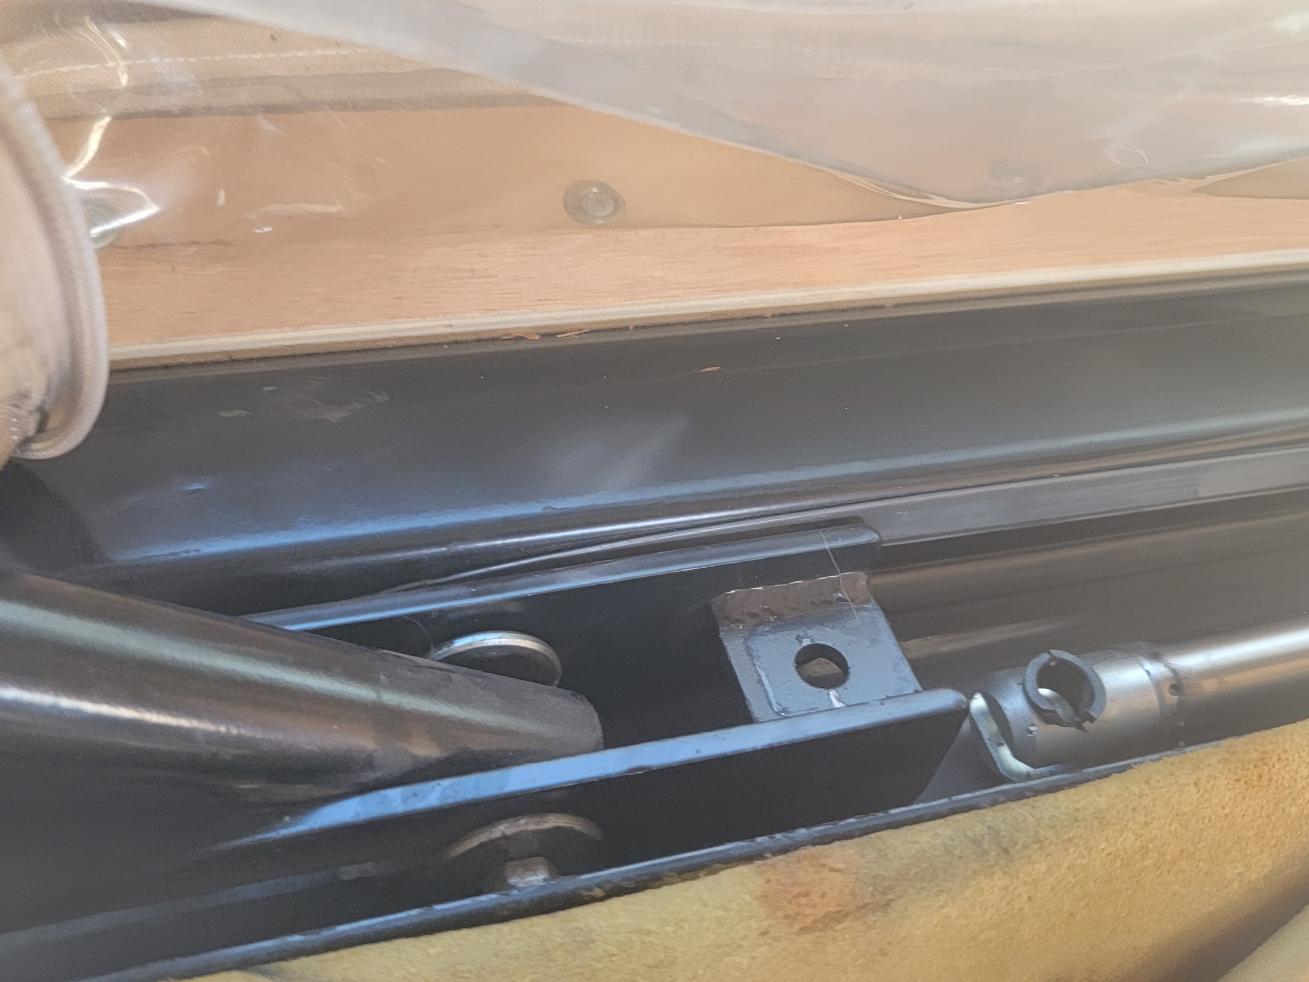


And here's what was there. The two bottom bolts where from the cross sections and were already 5/16. The middle pair were from the rear pivots and where 1/4. The top two were from the front pivots were 1/4 and were obviously bent.


Dddddoooouuuugggghhh. As we decided to do the bar pull boy wonder said "we need to disconnect these" and I said "Ok". We got busy with the the roof bolts and when the final bolt was pulled and the bars fell down...Oh well, another thing to add to the list. The other side ripped too but way smaller. I picked up several options already...stick on flexible tape, patches, vinyl repair, etc. I may end hand sewing the big one then covering with the Tear-Aid taped, but still have some research to do.


Don't know why these didn't upload straight. Here a pic of the refurbished front pivot. We used a 1/4 shoulder bolt, can't remember the length, a saddle spacer and some extra washers I believe


Scissor bolt. Two saddle spacers and a 5/16 x 2 3/4 shoulder bolt.
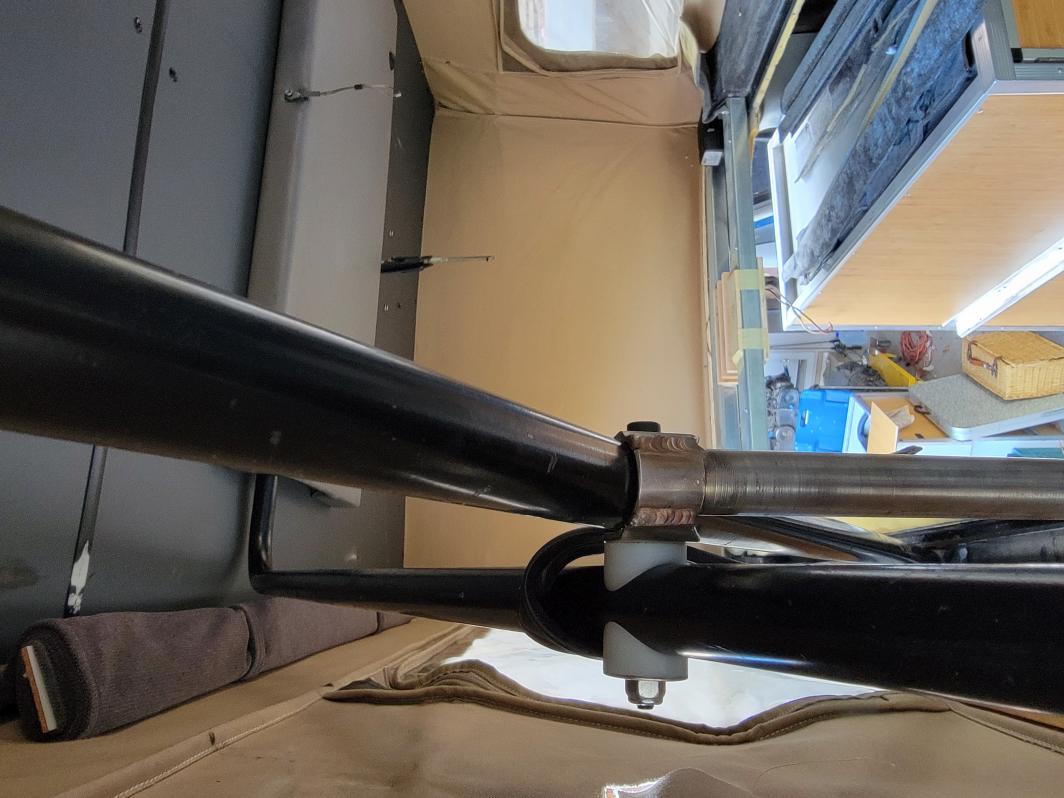

Rear bolt. We tried shoulder bolts here but because of the special roller washers the shoulder bolt was either to short or too long. I had sizes from 1 3/4 to 2 3/4 and nothing fit where we could get a nut on there so we stuck with the old bolts as they were in good shape and not bent.


In the end, all worth it. Here is the before and after. These pics are not of the same side but each side was basically in the same state. We pulled the bars out, clamped them in a big vice attached to a 3K LB mill, and used the black pipe we used for the in place attempt to use as leverage to bend them back. Took several quick pulls / pushes to get things somewhat straight. We also flipped the bars so any remaining bend was pointing to the roof instead of down. The little bar that looks like a hydrolic piece and is attached to the scissor bolt was also bent on each side. Boy wonder used a big mallet and the vise to get those straightened up too. Actuators used to top out and there was still two inches in the rear bar bad for the bar to move higher. Now it hits the end of the pad and could go even more. I'll have to pay attention when raising it now so I don't pull the canvas off the top of the van.


Plan to continue working from the top down, eventually ending with an under carriage clean and seal. Canvas repair, top bolt replacement, bar pad fixes, headliner electrical fixes, new headliner, other interior light fixes...etc.

MerlinG is offline   Reply With Quote
Old 11-07-2022, 03:43 AM   #2
Senior Member
 
marret's Avatar
 
Join Date: Nov 2016
Location: FL and VA
Posts: 1,952
Garage
Sorry about the torn canvas, thanks for posting.
__________________
Chris
2008 GMC 3500 Quigley Weldtec 4x4 Savana SMB
marret is offline   Reply With Quote
Old 11-07-2022, 10:10 AM   #3
Senior Member
 
boywonder's Avatar
 
Join Date: Jul 2013
Location: So Cal
Posts: 4,070
Quote:
Originally Posted by MerlinG View Post

........This required the removal of the bar pads which is held up by 8 bolts (4 in each) that go through the roof. Luckily boy wonder had a tall ladder and we were able to remove them with the top up. I won't have the luxury at my house. Can those be removed with the top down and then the top raised without issue? I plan to replace all those bolts as part of this as well.

Dddddoooouuuugggghhh. As we decided to do the bar pull boy wonder said "we need to disconnect these" and I said "Ok". We got busy with the the roof bolts and when the final bolt was pulled and the bars fell down...Oh well, another thing to add to the list. The other side ripped too but way smaller. I picked up several options already...stick on flexible tape, patches, vinyl repair, etc. I may end hand sewing the big one then covering with the Tear-Aid taped, but still have some research to do.

You can remove the screws holding the ceiling crossbar pads to the roof with the top down no problem.........then just carefully raise the top and wrestle the rear pad out. The front pad will fall from the ceiling once the last bolt is removed.

I recommend regular (18-8) stainless for the screws, washers and nuts when you reassemble. Consider using longer screws and skipping the black plastic beauty covers on the roof if your future plans involve roof mounted solar. You can mount some aluminum channel to those screws to mount panels.

I also used stainless sealing washers when I replaced mine; they've been in service for 8 years and no leaks.

These may not be exactly what I used but this is what I'd use today:

https://www.mcmaster.com/sealing-was...crew-size~1-4/

Buy some giant stainless 1/4" fender washers and some butyl as well....all available from Mcmaster-Carr.

....From the roof up.......butyl pancake, giant stainless fender washer, stainless sealing washer, stainless locknut.


Yes the ripped canvas was a huge bummer......

.....lesson learned, pay attention when playing with the crossbars and disconnect the canvas straps if you are removing the crossbars.

I mentioned this in Merlin's other thread but interestingly his crossbars were very thick walled....around 3/16" to 1/4" wall thickness and his pivot bolts were already 5/16"......perhaps this is just for the power tops....dunno........

And those thick-walled tubes were quite challenging to straighten, even with merlin doing his best linebacker moves with a 3' long pipe.
__________________
2008 E350 RB passenger 4WD SMB penthouse
2013 KTM 350 EXC
2008 KTM 250 XCF-W
2003 Honda Element
boywonder is offline   Reply With Quote
Old 11-08-2022, 08:09 AM   #4
Senior Member
 
Steve C's Avatar
 
Join Date: Apr 2018
Location: West Central Mountains, Idaho
Posts: 479
Garage
Merlin, not sure if a NOSO patch(s) would work in your situation or not to assist with the canvas repair. I've been using these on some recent down jacket repairs and have had great success (so far). They are basically a clean, peal, stick and heat solution to patching rips and holes. I've got an older tear in my canvas and just sent them a message asking if they'd ever consider selling the patches in different sizes. No affiliation with the company.

https://nosopatches.com/product/deserttan/

Cheers and good luck! -steve-
__________________
2001 Sportsmobile RB50 7.3
West Central Mountains, Idaho
Steve C is offline   Reply With Quote
Old 11-08-2022, 03:01 PM   #5
Member
 
Join Date: Sep 2022
Location: Nor Cal
Posts: 47
Thanks for into Steve. I've been doing a lot of searching on possible fixes and there is a lot of special tapes, etc. that I'm considering. I left messages as several SMB locations including Fresno asking if they have patches they can send but we'll see if I get any responses. I spoke to a local upholstery shop and they said they could iron on a patch but I'd like to keep looking to see if I can find a more stable solution. Considering hand sewing it best I can, then a patch front and back and possibly another stick job on those followed with the Tear Aid tape. I'll be posting whatever I end up doing but still have more searching and research to do.
MerlinG is offline   Reply With Quote
Old 11-11-2022, 06:12 PM   #6
Member
 
Join Date: Sep 2022
Location: Nor Cal
Posts: 47
Removed the front most small PH panel and wiring was definitely cut by a PO so I'll be removing all the panels to get that all squared away. My panels appear to be 1/8 wood with a dark grey plastic laminate of some kind on the inside side. Anyone have a source for 1/8 plywood with laminate? I can get 1/8 plywood but not too excited about having to laminating or covering in upholstery. The existing panels are in decent shape but there's a lot of screw holes that would need to be filled to make it look decent.
MerlinG is offline   Reply With Quote
Old 11-11-2022, 06:22 PM   #7
Member
 
Join Date: Sep 2022
Location: Nor Cal
Posts: 47
Removed the front most small PH panel and wiring was definitely cut by a PO so I'll be removing all the panels to get that all squared away. My panels appear to be 1/8 wood with a dark grey plastic laminate of some kind on the inside side. Anyone have a source for 1/8 plywood with laminate? I can get 1/8 plywood but not too excited about having to laminating or covering in upholstery. The existing panels are in decent shape but there's a lot of screw holes that would need to be filled to make it look decent.

Click image for larger version

Name:	20221111_141650.jpg
Views:	8
Size:	97.1 KB
ID:	45864

Click image for larger version

Name:	20221111_143344.jpg
Views:	10
Size:	128.1 KB
ID:	45863
MerlinG is offline   Reply With Quote
Old 11-12-2022, 10:01 PM   #8
Member
 
Join Date: Sep 2022
Location: Nor Cal
Posts: 47
Got all the headliner panels removed and cut 2 inch furring strips to keep the canvas up in the event I need to do anymore work up there. The PH lights and third brake light wires were all cut by a PO. All the wires are 12v outside lighting type wire you can get at home depot to do outside lighting that doesn't care what the positive or negative wires are. I'll be replacing all that with real red / black wire once I figure out type of LEDs are out there. I've seen posts where the old lights are retrofitted with LEDs but not sure I want to deal with that.

Sorry about the side ways pics. I don't know how to get them in the correct layout in the post. It seems that pics taken with the phone straight up and down go side ways and the pics taken with the phone side ways show correctly..

Cutting furring strips from the headliner screw positions. My headliner had a lot of screw holes that never hit the roof either from failed attempts or from the window shades so I only dealt with the holes that tied the canvas to the roof


Front panel strips installed


I used the braces we used to redo the bars and bolts to support the top in the front and back so I could get the center panel out.


Middle panel and far panel removed


For the rear panel I moved the rear brace to the center of the roof and was able to remove the panel and get all the insulation removed


All furring strips installed


I should mention that I lowered the roof all the way and removed all the bolts from the roof that hold the j hook and bar pads in place. The front pad comes right off but the rear panel needs to be pushed backwards towards the back of the van in order to get the bar free. It has a wood panel on the top that is attached on the back side of the pad but is loose on the front.


I'm looking at Duotex panels as a replacement for the headliner panels but need to do more research. My current panels are 1/8 wood with some kind of a laminate. Replacing with wood would require 3 4x8 sheets and either painting / staining or covering with laminate or other material. Duotex appears to be rigid and flexible so that's the way I'm leaning at this point.

Wiring everything up in a correct fashion is the next step.
MerlinG is offline   Reply With Quote
Old 11-13-2022, 06:47 AM   #9
Senior Member
 
boywonder's Avatar
 
Join Date: Jul 2013
Location: So Cal
Posts: 4,070
Nice work on the strips! .....another big job done.....how wide is the headliner?

If you can find real baltic birch it comes in 5'x5' sheets....then you only need 2.

I think Scalf77 re-did his headliner on his old van and got at least one seam under the padded blocks, that may be something to consider if you want a little cleaner look.
__________________
2008 E350 RB passenger 4WD SMB penthouse
2013 KTM 350 EXC
2008 KTM 250 XCF-W
2003 Honda Element
boywonder is offline   Reply With Quote
Old 11-13-2022, 06:56 AM   #10
Senior Member
 
86Scotty's Avatar
 
Join Date: Jul 2011
Location: TN
Posts: 10,242
Yep, looking good! Never heard of Duotex. Looks like a really interesting option for a van roof. How much are the panels? I found some online but need an account to see prices.

86Scotty is offline   Reply With Quote
Reply


Posting Rules
You may not post new threads
You may not post replies
You may not post attachments
You may not edit your posts

BB code is On
Smilies are On
[IMG] code is On
HTML code is Off
Trackbacks are Off
Pingbacks are Off
Refbacks are Off

» Featured Campgrounds

Reviews provided by

Powered by vBadvanced CMPS v3.2.3
Disclaimer:

This website is not affiliated with or endorsed by Sportsmobile SIP or any of its affiliates. This is an independent, unofficial site.


All times are GMT -6. The time now is 10:21 AM.


Powered by vBulletin® Version 3.8.8 Beta 4
Copyright ©2000 - 2024, vBulletin Solutions, Inc.