Journey with Confidence RV GPS App RV Trip Planner RV LIFE Campground Reviews RV Maintenance Take a Speed Test Free 7 Day Trial ×


Reply
 
Thread Tools Display Modes
 
Old 07-22-2014, 04:38 AM   #41
JWA
Senior Member
 
Join Date: Jan 2011
Location: Reynoldsburg, Ohio
Posts: 3,774
Send a message via Yahoo to JWA
Re: 1984 Dodge B350 4x4 project

Thanks Gavin--now I'm a bit smarter today!

JWA is offline   Reply With Quote
Old 10-25-2015, 08:58 PM   #42
Senior Member
 
Pntyrmvr's Avatar
 
Join Date: Jul 2011
Location: GTA, Ontario
Posts: 1,102
Re: 1984 Dodge B350 4x4 project

Hi,

Back in July 2014 I gave myself 4 weeks to get the fuel injected motor out of my well used 1993 conversion van and into the 31 year old B350 4x4.

Wow! Where does the time go? The old oil burner 360 in the 4x4 has held up well. Lots of oil leaks and some smoke, but we've had 2 great summers, 2 great Oktoberfests, and a wedding.

Now that the summer travel season and the fall beer festival has passed it's time to get down to business.

I never did get the shop built so a bit of outdoor work was in order to get the motor out of the conversion van.

My good friend Mike offered (well was arm twisted) to help this weekend. I have previously detailed my work to get the fuel injected motor running by applying power directly to the appropriate firewall connector pins so all we had to do was get the motor and blown tranny out of the thing quickly. I still have parts to pull off the chassis, but that can happen later.

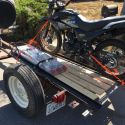
We took a reciprocating saw to the sheet metal all the way around the doghouse to allow enough headroom for the engine crane to get the oil pan over the steering linkages. We cut through the engine crossmember as well as the engine mount bases.


We then slowly hand winched the engine crane forward and pried the motor/trans combo over the steering components.


Finally we had it free, and took it over to the garage I have available for the next 2 months.


In the next 2 months I have to:

1- install new gaskets on the injected motor
2- roll the old conversion van onto it's passenger side and remove the entire fuel line setup and tank
3- adapt the old transfer case speedo output to the tone ring for the injected motor's computer speed sensor
4- build a new trans mount as the new overdrive unit is 3 inches longer than the old one
5- have 2 new driveshafts made up for the same reason! Use the same ujoints everywhere this time...
6- remove the old fuel tank and lines
7- remove the old rad and coolers
8- remove the old engine and trans
9- install the AC/heater core box from the old conversion van into the 4x4 so Leggz can travel in comfort
10- install the steering column with cruise control so I can travel in comfort
11- install the new fuel system for the injected motor liberated from the conversion van
12- install the engine and trans
13- install the driveshafts
14- install the newish aluminum rad and trans cooler from the conversion van
15- install the wiring harness for the motor/trans/fuel system
16- start the thing
17- drink craft beer, celebrate our first anniversary, and Christmas

It should be fun. A deadline for focus...

Regards,

Gavin
__________________
"Talk is cheap. Whiskey costs money."
Pntyrmvr is offline   Reply With Quote
Old 10-27-2015, 08:36 PM   #43
Senior Member
 
Pntyrmvr's Avatar
 
Join Date: Jul 2011
Location: GTA, Ontario
Posts: 1,102
Re: 1984 Dodge B350 4x4 project

Hi,

Today was cold and windy, but dry so I could start reviewing parts and ideas for their upcoming installs.

First thing was to have a look at the engine accessories. Alternator, and AC compressor seized. Note the cracks running left-right in the alternator case caused by the steel bolts that run through it swelling with corrosion and bursting the aluminum. AC is a pain once the motor is in so I would have replaced it anyway. I'll need a better looking crank pulley too. Valve covers need some love as well. The exhaust manifold bolts are ugly and so much easier to change to stainless at this point.


The rebuilt, pixie dust encrusted 4x4 overdrive transmission looks no worse for the years of storage. I found the spacer I had made up to keep the transfer case from bottoming out in the tranny housing. Gaskets too. Sadly the new billet torque converter has had water or condensation build up beneath the very tight sealing cap and will have to be replaced. Manufacturer will cut me a deal on a replacement one so that's a help.


I now have Newfie access to the underside of the donor van. The tank looks okay, but the filler pipe grommet is cracked. Hmmm. I used to have these in stock in my old Mopar street hoodlum days. Where are they? The straps will clean up and the lines are all plastic so they will come along also. So will the integral pump-in-tank wiring. The heat shields and other parts too. The bung for the oxygen sensor is an example of the little things just lying here for reuse. It's all paid for...


The van is weighing in at about 4100lbs now so the load on the uprights is well within limits. Hmmm. Well I do have some steel around here I can bolt up as well to boost my confidence. She's sitting just below her roll over point in this photo.


Looks like something out of the old Joey Chitwood Helldrivers show.

Regards,

Gavin
__________________
"Talk is cheap. Whiskey costs money."
Pntyrmvr is offline   Reply With Quote
Old 10-28-2015, 04:26 AM   #44
JWA
Senior Member
 
Join Date: Jan 2011
Location: Reynoldsburg, Ohio
Posts: 3,774
Send a message via Yahoo to JWA
Re: 1984 Dodge B350 4x4 project

Quote:
Originally Posted by Pntyrmvr

Looks like something out of the old Joey Chitwood Helldrivers show.
Wow---you're talking my era of auto thrill shows! I think by now we'd have Joey Chitwood III or IV at minimum.
JWA is offline   Reply With Quote
Old 10-29-2015, 08:50 PM   #45
Senior Member
 
Pntyrmvr's Avatar
 
Join Date: Jul 2011
Location: GTA, Ontario
Posts: 1,102
Re: 1984 Dodge B350 4x4 project

Hi,

Here's a Halloween scare photo of the old conversion van.


More work planned for tomorrow as the weather improves.

Regards,

Gavin
__________________
"Talk is cheap. Whiskey costs money."
Pntyrmvr is offline   Reply With Quote
Old 10-29-2015, 10:47 PM   #46
Senior Member
 
JackTuppVan's Avatar
 
Join Date: Nov 2014
Location: TN
Posts: 299
Re: 1984 Dodge B350 4x4 project

Quote:
Originally Posted by JWA
Quote:
Originally Posted by Pntyrmvr

Looks like something out of the old Joey Chitwood Helldrivers show.
Wow---you're talking my era of auto thrill shows! I think by now we'd have Joey Chitwood III or IV at minimum.
Attached Thumbnails
0-Chitwood.jpg   SIA-ThrillShow_lede.jpg  
__________________
2007 E250 Super Duty cargo
1988 Toyota Van 4x4 5-spd
JackTuppVan is offline   Reply With Quote
Old 11-03-2015, 10:06 PM   #47
Senior Member
 
Pntyrmvr's Avatar
 
Join Date: Jul 2011
Location: GTA, Ontario
Posts: 1,102
Re: 1984 Dodge B350 4x4 project

Hi,

The speed sensor issue is one that I have to solve as the factory computer makes a lot of decisions based on the van's speed. Tranny shift points, converter lockup, and fuel calibration are the big ones. It will run like a slug without it.

The computer and engine are from a 2wd van going into a 4wd van that never had an overdrive tranny or a computer controlled engine. So I'm forced to read the parts book and service manual to get things to cooperate.


I pulled out the speedo gears from the speedometer connection at the 2wd trans, left, and the NP208 transfer case, right.


The gears have almost the same tooth count, but don't have the same diameter let alone the same length.

They do however fit into the same diameter adapter at the trans and transfer case.


What they do have is the same depth and engagement height when "clocked" into their respective correct position in the transfer case.

So voila! A little Mopar magic. Two speedo outputs made 9 years apart for vastly different setups actually interchange and should produce the correct number of tones per revolution to tell the computer how fast the old beast is moving. All I need to do is stretch the 3 wire harness to the sensor.

So that's one item off my list today.

Regards,

Gavin
__________________
"Talk is cheap. Whiskey costs money."
Pntyrmvr is offline   Reply With Quote
Old 11-06-2015, 10:26 PM   #48
Senior Member
 
Pntyrmvr's Avatar
 
Join Date: Jul 2011
Location: GTA, Ontario
Posts: 1,102
Re: 1984 Dodge B350 4x4 project

Hi,

My list of required items is growing as I realize that the last thing I want to do is have to replace some buried part in the future while it is close at hand with the engine out of the van. ie water pump, timing chain, frost plugs, and exhaust manifold bolts.

These motors have a fairly big crank to cam distance and so are hard of timing chains. I'll replace it now as they are no fun to do later. The water pump sits in front of the timing chain cover so it's a no brainer. The donor van sat for years in the grass along with a few years of our famous salty winters so the corrosion is pervasive. The frost plugs on the driver's side are corroded so they'll get changed. The crank pulley is a mess and the alternator is seized. The wiring to the starter is green and the valve covers are rusty too. The exhaust manifold bolts rarely come out without grief and are a piece of cake to do now versus the agony of doing them later with a header installation.

So I dropped into Home Depot for some reasonably priced stainless steel hardware for the exhaust manifolds.


I pulled all but one bolt out without issue when the inevitable happened... I broke a bolt coming out of the head. No problem. I pulled the manifold off, grabbed the shaft of the miscreant bolt, and it unwound itself. So far so good. Then the China factor reared it's ugly head. One new bolt had a flaw 2 threads from the beginning. I didn't catch this right away, but realized I'm heading back to the store to get another bolt. JUNK!


The nice thing about having the exhaust manifold off is the exhaust valves are visible and let me see inside the motor. The valves are oil free and a nice brown colour. Good news on a motor with 100,000 miles on it that burns a quart of oil only every 3000 miles or so. A great swap candidate regardless of how the exterior looks. And a great price...


More evidence of moisture. The thermostat housing needs swapping and even the temp sender in brass is rotting.


The exhaust manifold all buttoned up with stainless fasteners. I'll even use stainless bolts for the Y pipe to manifold connections to ensure they can be cracked should an exhaust improvement project show up in the future. Headers anyone?


It's been so long since I've done a project like this I forgot that I do have a few luxuries kicking around. $65 for a fresh pail of parts cleaner and this old soldier is degreasing up a storm.


I cracked off the old trans. At least the rear main seal isn't leaking. Looks like everything else is.


Mike cut the old driveshaft to get the motor and trans out of the donor van as quickly as possible. Note the two layer steel with rubber in between. Theses things weigh a ton. I suspect that vans headed for conversions got this style to reduce noise and vibration in the passenger area. I've never seen one like this before.


So here's the front of the motor with all the bracketry removed, the water pump off, and just the timing cover left in place. Good fun.


Regards,

Gavin
__________________
"Talk is cheap. Whiskey costs money."
Pntyrmvr is offline   Reply With Quote
Old 11-16-2015, 09:32 AM   #49
Senior Member
 
Pntyrmvr's Avatar
 
Join Date: Jul 2011
Location: GTA, Ontario
Posts: 1,102
Re: 1984 Dodge B350 4x4 project

Hi,

I had the torque converter cut open and found out it is junk. Enough moisture seeped into that the bearings are pitted. I'll get a new one from the supplier. They indicated a second one could be had for 50% of the first one. Here's hoping.

The converter damage made me question the condition of the trans. It was bagged and seemed okay from the outside, but now is the time to check.


All looks good. Some moisture in the pan, but no rust. There was enough transmission fluid in it to keep things corrosion free.

The Derale pan is steel with the tubes running front to back for added cooling. It hold 3 more quarts than stock. Here's an interior shot showing the design.


I'll clean it out and reinstall it.

Next step is to head back to the wrecking yard and pull out a newer style tranny dipstick and tube, two valve covers, and some other bits and pieces.

Regards,

Gavin
__________________
"Talk is cheap. Whiskey costs money."
Pntyrmvr is offline   Reply With Quote
Old 11-26-2015, 11:44 AM   #50
Senior Member
 
Pntyrmvr's Avatar
 
Join Date: Jul 2011
Location: GTA, Ontario
Posts: 1,102
Re: 1984 Dodge B350 4x4 project

Hi,

Well the trip to the wrecking yard went well and not so well. The old vans move through so quickly that one must be prepared to grab everything when one sees it and not come back later to a changed landscape minus one or two Dodges.

I needed a newer style transmission dipstick and tube because I want to add a second alternator for a house battery. Space at the firewall engine opening is at a premium so the newer dipstick style locates in a spot above the main alternator freeing up space beside it for a custom mounted house alternator.

I also grabbed a very new looking alternator just for this purpose. It should fit fine and will be governed by an adjustable external voltage regulator that I purchased. This should help the house battery live at an appropriate voltage for long life.

The valve covers and main crank pulley are in better shape than the '93 motor so I grabbed them. It was tough to get at some of the valve cover bolts as the engine in this, the last generation of Dodge vans, is so far forward compared to earlier versions. No sitting high and mighty in the passenger seat working on these things. Down on the floor on all fours, in the dark trying to get at the last rusty bolts.

The transmission cooler and power steering cooler came out of a newer Dodge as well. It had no heavy duty options or gearing so I'm a bit mystified as to why it came equipped that way, but I can use them. The cooler is just 3/4" thick and should ride between the AC condenser and the rad. There is no spare space for a thicker unit in front of the condenser should I add an electric fan to help the AC at low speeds so this factory piece is perfect. The power steering cooler isn't really necessary in our climate, but what the hell. You don't find aluminum factory pieces like this for a Dodge every day.

The plastic battery tray is a great idea. I pulled the mount for it too. No more rotting steel mess.

I also wanted a set of transmission cooler lines, but all the fittings on both vans in the wrecking yard are too rusty to bother. I'll bend up a set from 3/8" steel tubing instead.

The other van with the much needed gas tank straps has been crushed as has the shorty van with the smaller tank I wanted as an auxiliary unit. You snooze, you lose!

I'll keep looking. Of course I have some of the parts in stock. I hate to immobilize a running van... Cue Leggz and a comment about cleaning up some of the junk. Funny thing is she never says it. Ah the beauty of space to spread out the treasures.


Time is running short on my self imposed Dec 18th deadline. The weather is holding out for now too. We'll see.

Happy Thanksgiving for those of you south of 54* 40'. Enjoy the turkey.

Regards,

Gavin
4688
__________________
"Talk is cheap. Whiskey costs money."
Pntyrmvr is offline   Reply With Quote
Reply


Posting Rules
You may not post new threads
You may not post replies
You may not post attachments
You may not edit your posts

BB code is On
Smilies are On
[IMG] code is On
HTML code is Off
Trackbacks are Off
Pingbacks are Off
Refbacks are Off

» Featured Campgrounds

Reviews provided by

Powered by vBadvanced CMPS v3.2.3
Disclaimer:

This website is not affiliated with or endorsed by Sportsmobile SIP or any of its affiliates. This is an independent, unofficial site.


All times are GMT -6. The time now is 11:03 AM.


Powered by vBulletin® Version 3.8.8 Beta 4
Copyright ©2000 - 2024, vBulletin Solutions, Inc.