|
|
 11-24-2020, 06:27 PM
|
#11
|
|
Junior Member
Join Date: Nov 2020
Posts: 9
|
Quote:
Originally Posted by SlimKiteGuy

Here are the links:
Backup Camera - Red Wolf Integrated Tail Light Camera
https://www.amazon.com/gp/product/B0...?ie=UTF8&psc=1
Stereo - Sony XAV-AX100
https://www.amazon.com/gp/product/B0...?ie=UTF8&psc=1
Stereo Replacement Kit
https://www.amazon.com/gp/product/B0...?ie=UTF8&psc=1
A couple thoughts. First, I like my setup but there are certainly cheaper options out there. My backup camera required tapping into the rear light wiring to power the camera. It also required running a cable to the stereo up front. I hear there are other options that use Bluetooth if you want to avoid running the wire through the van.
On the stereo side of things, I wanted a volume knob, so most of the stereos out there would not work. I also wanted both Android Auto (my phone) and Apple Car Play (the ladies phone) to work with the unit, so that limited my options even more. If you have fewer constraints, there are a lot of options out there.
Hope that helps! |
So I have a question to how you wired this for the backup camera. I got the same camera and same stereo unit you did but with the CD/DVD player.
I got everything hooked up but camera doesn't not automatically come on when move into reverse, however camera will come on when I "manually" select on the dashboard.
I connected RCA cable to correct RCA on stereo and the little red pigtail connected that to the purple wire on stereo.
In rear connected ground/power to rear light wires, and RCA to camera and pigtail to power nearby.
Any help would be appreciative.
|

|

|
|
11-24-2020, 10:31 PM
|
#12
|
|
Member
Join Date: Aug 2020
Location: Seattle, WA
Posts: 43
|
Quote:
Originally Posted by Big5f303
So I have a question to how you wired this for the backup camera. I got the same camera and same stereo unit you did but with the CD/DVD player.
I got everything hooked up but camera doesn't not automatically come on when move into reverse, however camera will come on when I "manually" select on the dashboard.
I connected RCA cable to correct RCA on stereo and the little red pigtail connected that to the purple wire on stereo.
In rear connected ground/power to rear light wires, and RCA to camera and pigtail to power nearby.
Any help would be appreciative.
|
I spliced and soldered the power wires to the reverse light wires not the rear light wires. In your configuration, I think you always have power when the car is running. In my configuration, the application of power is when the car is put into reverse. I am not sure that is your problem though.
The other thing you may want to look at is the reverse input into the stereo (red/white wire), see attached picture. I had a matching wire in the kit with the one on the stereo, so I soldered them together. That may actually be what did it now that I think about it.
__________________
2009 Chevy Express 1500 AWD SMB
|
|
|
|
|
12-31-2020, 09:17 PM
|
#13
|
|
Member
Join Date: Aug 2020
Location: Seattle, WA
Posts: 43
|
Prep for Raptor Liner
Been busy over the holiday break prepping the rig for Raptor liner. Sanding the body took about 7-8 hours with an orbital sander using 180 grit. I had a lot of pealing paint, damn Chevy paint jobs! The pop top prep has taken quite a bit longer due to having to remove 2 solar panels that were hard mounted and clean up and fill the holes. Most of the holes were too small to get the Six10 in there, so I oversized the using a 1/4 bit about a 1/4 depth. It worked pretty well. Letting it cure overnight and will cover it with gel paste tomorrow to get a smooth gel coat surface. I am pretty close and should be wrapping up in another 2-3 days (only getting about 4 hrs per day due to work). Posting some pics for your viewing pleasure. Enjoy!
__________________
2009 Chevy Express 1500 AWD SMB
|
|
|
|
|
01-01-2021, 03:52 AM
|
#14
|
|
Senior Member
Join Date: Nov 2016
Location: FL and VA
Posts: 1,952
|
Excellent. Great to see you making progress. Look forward to seeing it when done.
__________________
Chris
2008 GMC 3500 Quigley Weldtec 4x4 Savana SMB
|
|
|
|
|
01-04-2021, 11:47 AM
|
#15
|
|
Junior Member
Join Date: Nov 2020
Posts: 9
|
good progress! keep up the work and posting! do you have an IG?
|
|
|
|
|
01-06-2021, 05:34 PM
|
#16
|
|
Junior Member
Join Date: Nov 2020
Posts: 9
|
Quote:
Originally Posted by SlimKiteGuy
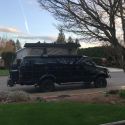
Hey all, I am pretty new here and wanted to showcase my new (to me) rig. I got a great COVID deal on a used 2009 Chevy Express 1500 AWD with the penthouse top that is in great shape. Note: I am a couple months behind on posting this...
The interior is very basic: bench seat that folds down and makes a bed with a rear platform, 2 burner stove, cabinet, sink, house battery and solar. Functional and minimalist systems. I plan to continue to use as is to figure out what we like and then upgrade as necessary.
Planned upgrades:
Fimma 10 Awning (picked up at SMB West on delivery drive home)
Aluminess bumper w/ tire carrier and deluxe box (just ordered it)
Aluminess Side ladder (ordered that too)
New Stereo and backup camera (ordered)
Passenger swivel seat (ordered)
Trailer hitch (ordered)
Wheels and tires (possibly with additional lift)
Raptor liner the whole thing probably
Roof tracks (ordered), Thule bars and box (already own)
Seems like lots of good info on this forum. Will post progress, pumped to have a new way to explore SoCal and the surrounding area and to carry my Kiteboarding gear around.
|
SlimKiteGuy where did you order Passenger swivel seat? I see mixed reviews all over the place and looking to pull the trigger on one.
|
|
|
|
|
01-06-2021, 11:58 PM
|
#17
|
|
Member
Join Date: Aug 2020
Location: Seattle, WA
Posts: 43
|
shop4seats.com is the only place I found that currently stocks the swivel seat for the Chevy Express. It takes about 6-8 weeks to get one. I had some trouble getting mine to fit but after some adjustments and a lot of force, got it to work. It works well otherwise. You do have to bend the release lever to get it out of the way. Also note that it adds about 1.5 of height to the seat.
What is an IG?
__________________
2009 Chevy Express 1500 AWD SMB
|
|
|
|
|
01-07-2021, 01:01 PM
|
#18
|
|
Junior Member
Join Date: Nov 2020
Posts: 9
|
Quote:
Originally Posted by SlimKiteGuy
shop4seats.com is the only place I found that currently stocks the swivel seat for the Chevy Express. It takes about 6-8 weeks to get one. I had some trouble getting mine to fit but after some adjustments and a lot of force, got it to work. It works well otherwise. You do have to bend the release lever to get it out of the way. Also note that it adds about 1.5 of height to the seat.
What is an IG?
|
did you have to cut or trim anything to get the swivel install on the express?
any pics?
|
|
|
|
|
01-07-2021, 01:02 PM
|
#19
|
|
Junior Member
Join Date: Nov 2020
Posts: 9
|
Quote:
Originally Posted by SlimKiteGuy
shop4seats.com is the only place I found that currently stocks the swivel seat for the Chevy Express. It takes about 6-8 weeks to get one. I had some trouble getting mine to fit but after some adjustments and a lot of force, got it to work. It works well otherwise. You do have to bend the release lever to get it out of the way. Also note that it adds about 1.5 of height to the seat.
What is an IG?
|
IG is Instagram! A ton of folks post about their AWD Chevy/GM buids too!
|
|
|
|
|
01-07-2021, 10:42 PM
|
#20
|
|
Member
Join Date: Aug 2020
Location: Seattle, WA
Posts: 43
|
See photo below. You can see that one side was 0.25 longer than it should have been, should be a 13¼ " x 14¼ bolt pattern. This is the side that attaches to the base. The side that attaches to the seat was fine. To get it to work, I had to use a small file to elongate the hole on the swivel side and base side in opposite direction and then push it together with a lot of force (since it was off on the bolt side (upper part of pic) not the hole side (bottom side of pic). It was basically file, file, push, check, and repeat until the holes lined up enough to get the loose bolt through. It took about 45 min, wasnt too bad.
I tried explaining this build error to shop4seats, and they said nothing was wrong. They were willing to take the return but would not build me a new one, so I just made it work.
Hope this helps! Any yes I do have an IG. Any good van peeps to check out?
__________________
2009 Chevy Express 1500 AWD SMB
|
|
|
|
|
|
 Posting Rules
|
You may not post new threads
You may not post replies
You may not post attachments
You may not edit your posts
HTML code is Off
|
|
|
|
 » Recent Threads
 |
|
|
|
|
|
|
|
|
|
|
|
|
|
|
|
|
|
|
|
|
|
|
|
|
|
|
|
|
|
|
|
|
|


 2008 GMC 3500 SMB
 Linear Mode