Journey with Confidence RV GPS App RV Trip Planner RV LIFE Campground Reviews RV Maintenance Take a Speed Test Free 7 Day Trial ×


Reply
 
Thread Tools Display Modes
 
Old 01-17-2021, 08:40 PM   #21
Member
 
SlimKiteGuy's Avatar
 
Join Date: Aug 2020
Location: Seattle, WA
Posts: 43
Did some damage this weekend...need another weekend or two to finish up but wanted to post some teaser pics, enjoy!
Attached Thumbnails
26579718-6A90-40A4-ACB4-6A24FC990637.jpg   F0EFD380-15CA-422B-866B-3E1CCE01F379.jpg   D1CAE28B-48F9-4F6D-BF72-D5C56C7794E6.jpg   EBF3879B-88B7-47BB-9C68-82911B258D18.jpg   8A2C304B-3221-4C07-B544-408D133D3121.jpg  


__________________
2009 Chevy Express 1500 AWD SMB
SlimKiteGuy is offline   Reply With Quote
Old 01-18-2021, 06:39 AM   #22
Senior Member
 
marret's Avatar
 
Join Date: Nov 2016
Location: FL and VA
Posts: 1,951
Garage
Great progress.
__________________
Chris
2008 GMC 3500 Quigley Weldtec 4x4 Savana SMB
marret is online now   Reply With Quote
Old 01-30-2021, 02:43 AM   #23
Senior Member
 
Join Date: Mar 2013
Posts: 105
Post up some photos in the daylight when you can. Looks great
__________________
2006 RB E250 Ford High top, Diesel 6.0 Bullet Proofed (ouch $) 4" Camburg Eng. Lift, Method Wheels, 33" Toyo AT, RB50 interior (homebuilt)
upsidedown is offline   Reply With Quote
Old 01-31-2021, 09:17 PM   #24
Member
 
SlimKiteGuy's Avatar
 
Join Date: Aug 2020
Location: Seattle, WA
Posts: 43
Alright, here is the write up, sorry for the delay and length!


The sanding and prepping the van for Raptor took about 50-60 hours. Most of that time was spent sanding and taping. I highly recommend trying to sand everything and then wash the car and let it dry and then prime the areas you go down to the metal right away. Do all 3 back to back so as not to introduce rusk. I wrapped up all my sanding on a Sunday after spending a week straight on it and then the van sat there until the next Saturday. By the time I got back to it, I saw a few spots that looked like rust was just starting up, which led to having to do more sanding. I live near the ocean though, so it is worse for me. As long as you sand, clean, and prime the bare metal spots, you should be good.


To apply the Raptor, I ended up finding a place that rents spray booths by the hour/day. I rented the large one (13'10" high vs 8'), so I can pop the top inside. I drove the van there the day before I had the space rented and started taping. I taped for about 6 hours and still has some taping to do in the morning before Raptor. They let me park the van in the spray booth overnight, so did not have to worry about moisture. To tape, I used regular painters tape (under 4 rolls) and 18" masking paper from home depot. It worked well, just took a long time. I am sure there are other options that are faster or do a better job, but I was pretty happy with what I did. Raptor has very little overspray, so that was not a concern.


Spraying the van was pretty straight forward. I had a local autobody paint shop mix me the color I wanted (concrete gray) and bought 8 1qt tintable Raptor bottles. I also bought the variable nozzle gun because I wanted a finer texture. I did not realize that it does not come with a pressure gauge or air hose adapter, so I had to purchase both of those a the spray booth place (another $40 on top of the $75 for the gun). Plan ahead and get it cheaper! To mix the raptor, I used 1.5 oz of paint in each bottle. I know you can go higher but read that was the "normal" amount somewhere and went with it. The color ended up being quite a bit different from the paint. It is hard to describe. I like the color I ended up with though. It looks lighter in the sun and darker in the mornings and afternoon, kind of weird but works for me!


I used a large piece of cardboard, so I can dial in the texture. The vari nozzle gun was set to 2 turns of the nozzle. I would say that I probably had too much pressure at first, around 110-120 psi. The texture was very fine though, so I went with it. It definitely sprayed the paint out quickly though. I had to spray about 24" back from the van but did not quite figure this out at first, so there are some areas that got a little saturated from me being too close. I later dialed the pressure back to 80psi and still got the finer texture but better spray control, still staying 24-30" back when spraying.


I did the back and top first because I had to pop the top and tape around the lower canvas seal to get the top of the van body. It took 3 bottles to do the back and top. I was doing a thick coat and with the higher pressure, just went through the bottles quickly. I realized that the other 5 bottles were not going to be enough for the rest of the van, so I picked up another 4 pack during lunch. Bring a bucket to use to spray the gun into pulling the acetone through it like paint to clean the gun. They say clean the gun after every bottle, but I felt that was overkill. I would setup the paint and hardener in pre-measured containers for 2 or 3 bottles of raptor and then spray 2 or 3 bottles back to back. You can probably do 4 or 5 bottles back to back if the temperature is not too high and someone is mixing and shaking while you are spraying. It was about 65-75F while I was spraying.


To give a sense of timing, I did my morning taping from 8-9:30ish. Sprayed 4 bottles by 12, took a while to get set up. I taped around canvas seal and picked up the last 4 bottles by 2. I finished spraying the last 8 bottles by around 3:30 or 4. It goes very quick when you spray 2 or 3 bottles back to back. The hardest part is finding the spots you missed. I probably should have pulled the van outside before the last couple bottles and looked for spots that had less coverage and used those last two bottles for a light coat around the whole van with a small emphasis in the areas that had less coverage. This would help with the color too since there is a bit of variability from bottle to bottle because my paint add was not very precise.


I pulled the van out of the spray booth and started taking the tape off. I should have used a razor blade at first but did not. I was after the tape pulled a could small chunks of raptor with it that I realized I need to cut the tape lines to separate the two. I let the van sit overnight before driving it home the next day. There are a few spots that were the tape covered more of the original paint than I wanted or where the tape removal took a chunk of raptor, so I will have to touch up with the color paint. I cannot emphasize how important it is to take your time and tape it right!


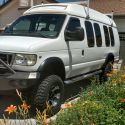
Overall, I am very happy with how it turned out. More pics below, enjoy!
__________________
2009 Chevy Express 1500 AWD SMB
SlimKiteGuy is offline   Reply With Quote
Old 01-31-2021, 09:24 PM   #25
Member
 
SlimKiteGuy's Avatar
 
Join Date: Aug 2020
Location: Seattle, WA
Posts: 43
More pics:
Attached Thumbnails
8E9EDDA6-81C7-48DF-846D-0059E67CA675.jpg   4331DFCA-DA5B-4DA2-9325-4578AF70EC47.jpg   0106C099-BCF9-43C7-8042-49B85E2BF3A7.jpg  
__________________
2009 Chevy Express 1500 AWD SMB
SlimKiteGuy is offline   Reply With Quote
Old 01-31-2021, 10:46 PM   #26
Member
 
SlimKiteGuy's Avatar
 
Join Date: Aug 2020
Location: Seattle, WA
Posts: 43
Another couple busy weekends since the Raptor paint. I decided to install my Aluminess bumper and ladder. The bumper has you remove the existing bumper first then the hitch and reinstall it with some spacers. I did that and everything was peachy! Next, I installed the aluminess bumper and it went on clean, just 4 bolts. I used a file to enlarge the frame bolt holes per instructions and had 2 buddies hold the bumper in place while I bolted it. Next, I went to install the swing arm straps to the van and noticed the bumper was sitting about 1/2” too high to get the strap under the door hinge. I went to lower the bumper but it was already contacting a flange on the top of hitch. Apparently I need larger spacers to install my hitch, a Curt 13040 Class 3, about 5/8” more spacer for a total of 1-1/8”. I got in touch with Aluminess and they are shipping me some new ones. I removed the hitch for now. I also noticed that the tire carrier had an 8 lug pattern adatptor on it. The 1500 AWDs are 6 lug. Aluminess is sending the 6 lug adaptor as well. Make sure you let them know when ordering that it is for a 1500 since the 2500/3500 use 8 lug, so that is what the bumpers come with normally.

Next the delux box installation was pretty straight forward. I have some pics below of where I installed the bolts since the instructions with bolt placement had the square swing arm used on the Sprinter not the angled one for the Chevy. The inside shelf was straight forward as well. I used some self tapping screws to attach the shelf to the brackets because a friend told me it can come dislodged and jam the door if not secured to brackets. The instructions do not tell you to do this.

Finally I attached the ladder. It was fairly straightforward as well. The only advice I have is ensure you drill through the ladder clip and gutter high enough to allow the bolt and washer to fit. I did the first one too close to the bend and had to drill another whole. All good!

Enjoy the pics. Ohh yeah, I named the rig Tank! He is filling in nicely and looking more and more like his name every weekend!
Attached Thumbnails
B9740F13-207B-47F1-A959-9D2492D8079C.jpg   BAD561FA-FA50-41C0-868A-27B9B551FC29.jpg   134A33DF-C99B-4714-ABA7-E230DFDA8167.jpg   55260C6C-315E-4EC9-BAED-4CFA876252EE.jpg   F3D89BE5-267F-4DD0-ABBD-CD51673E6F9C.jpg  

E4168B8D-E0F3-4463-AA78-0063A1BB2EB1.jpg  
__________________
2009 Chevy Express 1500 AWD SMB
SlimKiteGuy is offline   Reply With Quote
Old 02-01-2021, 03:33 AM   #27
Senior Member
 
marret's Avatar
 
Join Date: Nov 2016
Location: FL and VA
Posts: 1,951
Garage
Well done, looks great. Thanks for posting.
__________________
Chris
2008 GMC 3500 Quigley Weldtec 4x4 Savana SMB
marret is online now   Reply With Quote
Old 02-01-2021, 10:30 AM   #28
Site Team
 
BroncoHauler's Avatar
 
Join Date: May 2007
Location: Southern New Mexico
Posts: 10,178
Quote:
Originally Posted by SlimKiteGuy View Post
...To apply the Raptor, I ended up finding a place that rents spray booths by the hour/day...

That's a great resource to have available!


Herb
__________________
SMB-less as of 02/04/2012. Our savings account is richer, but our adventures are poorer.
BroncoHauler is offline   Reply With Quote
Old 02-23-2021, 09:24 PM   #29
Member
 
SlimKiteGuy's Avatar
 
Join Date: Aug 2020
Location: Seattle, WA
Posts: 43
Here is a lesson learned for everyone: if you are going to order the Aluminess bumper with a spare tire carrier, make sure you tell them the wheel lug configuration of your van. They did not ask and shipped me the bumper with the 8x6.5 (8 lug) wheel adaptor plate, which is common to the 2500/3500 Express vans, but I have the 1500, which is a 6x139.7 (6 lug) wheel. Aluminess did agree to send me the adaptor I needed for free and said they usually build it with the 8 lug adaptor because that is what most customers order. However when the 6 lug wheel adaptor arrived, it would not fit on the mounting plate because the plate was bigger than the distance between the bolt heads on the 6 lug adaptor, doh! I had to get back in touch with Aluminess and have them make me a spacer to mount between the plate and adaptor and ship that out to me as well, which means I did not get to mount my spare tire until about 4 weeks after I attached the bumper. My patience is finally rewarded...

Pics below.
Attached Thumbnails
EC8B8C5E-64FB-4FDC-885B-61DC409D2ED7.jpg   99C5D21D-5641-4486-8A31-30044BE6BA9B.jpg   22A0D9FD-DE19-48BC-A187-68D78F80F4BA.jpg   7D3B1F93-9FF1-4897-9955-B1ADEC0E9552.jpg  
__________________
2009 Chevy Express 1500 AWD SMB
SlimKiteGuy is offline   Reply With Quote
Old 02-24-2021, 03:19 AM   #30
Senior Member
 
marret's Avatar
 
Join Date: Nov 2016
Location: FL and VA
Posts: 1,951
Garage
Glad you got it worked out and Aluminess took acre of it. Looks great.
__________________
Chris
2008 GMC 3500 Quigley Weldtec 4x4 Savana SMB
marret is online now   Reply With Quote
Reply

Thread Tools
Display Modes

Posting Rules
You may not post new threads
You may not post replies
You may not post attachments
You may not edit your posts

BB code is On
Smilies are On
[IMG] code is On
HTML code is Off
Trackbacks are Off
Pingbacks are Off
Refbacks are Off

» Featured Campgrounds

Reviews provided by

Powered by vBadvanced CMPS v3.2.3
Disclaimer:

This website is not affiliated with or endorsed by Sportsmobile SIP or any of its affiliates. This is an independent, unofficial site.


All times are GMT -6. The time now is 03:28 AM.


Powered by vBulletin® Version 3.8.8 Beta 4
Copyright ©2000 - 2024, vBulletin Solutions, Inc.