Journey with Confidence RV GPS App RV Trip Planner RV LIFE Campground Reviews RV Maintenance Take a Speed Test Free 7 Day Trial ×


Reply
 
Thread Tools Display Modes
 
Old 05-21-2019, 09:15 PM   #111
Senior Member
 
Otter's Avatar
 
Join Date: Apr 2016
Location: Oregon
Posts: 1,186
Garage
Quote:
Originally Posted by cthayn View Post
I added some vertical stringers on the driver side where the two sheets of plywood meet to provide more support. I added a few other vertical stringers on the passenger side to support the wall cabinet that will be added later. These stringers were screwed to the horizontal stringers and the cut to the inner wall profile.
Cthayn, this is a great build and I really appreciate the photos. I’m building out my van in a similar manner. I can’t tell from the photos, are those horizontal stringers 2x4 or 2x2?

__________________
"PhoTo" - 2014 Ford E350 5.4L RB - Agile 4x4 - CCV Poptop
Otter is offline   Reply With Quote
Old 05-21-2019, 10:35 PM   #112
Senior Member
 
Join Date: May 2017
Posts: 201
I believe I started with a 2x4 and trimmed them to fit. They were likely just slightly wider than a 2x2.
cthayn is offline   Reply With Quote
Old 05-24-2019, 10:50 PM   #113
Senior Member
 
Join Date: Nov 2012
Location: Salt Lake City
Posts: 101
Are you still happy with the CCV top? Would love an update and thoughts on the top after you have had a little time with it.

Also, are you in Salt Lake City or close by? If so, I would love to come look at your van and the CCV top if you wouldn't mind.

Thanks! Great write up, beautiful rig!
__________________
"Not all Those Who Wander are Lost"
2003 Ford SMB EB-50, 7.3L 4x4, "La Mulita Blanca"
2006 Land Rover LR3 SE/HD
2010 BMW GSA 30th
medicfernando is offline   Reply With Quote
Old 05-25-2019, 10:10 AM   #114
Senior Member
 
Join Date: May 2017
Posts: 201
Overall I am pretty happy with the CCV top. We have spent maybe 25 nights in it so far. Below are my thoughts on the top.

Pros:
Love the space, it is plenty high to sit-up in and I believe it is close to a full size bed width. We added 4 inches of foam and it is a pretty comfortable bed.

The large window openings are great on warm nights. There is a lot is ventilation when you zip all the windows down.

The storage space in the front is very useful, even when the top is down.

We got the high top because of the ability to almost stand up straight when the top is down. There is also a nice amount of storage on the bed when the top is down. Plenty of room for all the bedding and clothing.

These Pros were all the areas where the CCV top was better than the Sportsmobile top for us.


Cons:
I still think the high top is ugly, but I am starting to get use to it. It looked really awkward when we first installed it on the van, but after we added the 4x4, larger tires and bumpers, it kind of balanced things out. Adding the black awning and roof rack broke up the large white surface, so I think that helped a lot. However, I still think the benefits of the high top overcome these negatives.

New top
Click image for larger version

Name:	IMG_3078.jpg
Views:	31
Size:	94.0 KB
ID:	27431

Added 4X4, bumpers and tires
Click image for larger version

Name:	IMG_0527.jpg
Views:	36
Size:	109.9 KB
ID:	27432

Awning and roof rack
Click image for larger version

Name:	IMG_4888.jpg
Views:	36
Size:	106.2 KB
ID:	27433


There were a few small fit and finish things that were a little annoying, but not too difficult to fix.

There have been a few issues that I still need address. The remote control only works intermittently. I replaced the battery, but still have the issue. Also, one side goes up and down faster than the other. There is a 4-5 seconds lag between the two sides. I don’t know if this causes a problem or not, but it seems like they should go up and down together

The CCV customer service is really lacking. They are slow or nonexistent in their responses. I still haven’t heard back from them regarding the remote control issue (I need to follow up again). When we arrived to pick up the van, there were not ready, and we had to wait 3-4 hours to pick up the van.


But again, overall we are happy with the top. At the time it was the best option for us.


I live is Lehi, just south of SLC. PM me and we can connect so you can take a look at the van and CCV top. We had a forum member allow us to look at his CCV top before we pulled the trigger. Nothing beats a hands on look.


>> Corey
cthayn is offline   Reply With Quote
Old 05-29-2019, 09:38 PM   #115
Senior Member
 
Join Date: May 2017
Posts: 201
2012 E-350 EB V10, 4x4, CCV Top

Wesbasto 2000 STC Heater Installation

I installed the heater a couple of months ago, but I haven’t had a chance to write it up.

I went with Wesbasto gasoline powered heater so I didn’t have to add a second fuel source. It seems that the diesel version is a bit cheaper and maybe a little more reliable, but there were mixed reviews on that.

I decided to put the heater in the cabinet under the fridge, just inboard from the wheel wells. It was not an ideal location, but the best location considering the trade offs. I know the heat will rise to the fridge, but I figure we will only run the heater when its cold, so hopefully there will not be much a negative efficiency with the fridge from having the heater below. I added a layer of rigid foam insulation in the cabinet above the heater to help insulate the fridge.

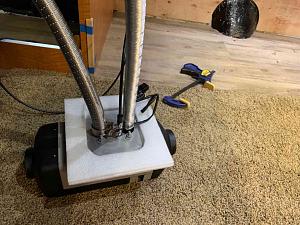
Finished installation

Attachment 27574

In this location the warm air outlet is in the isle, and the cold air intake is at the back of the cabinets, behind the sofa.

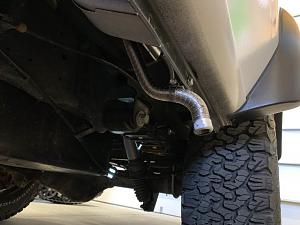
This location put the under-van exhaust and fuel input just inboard of the van frame and aft of the fuel tank. This should be a fairly protected, but allows access for the installation.


The first step was to cut a 4” hole in the plywood floor and insulation. From there I cut a 3-3/4” concentric hole in the metal van floor. I painted the cut edges to eliminate the risk of rust. I used a piece of ABS pipe to “line” the hole through the plywood floor, down to the metal floor. I used silicone to seal around the pipe at the floor, below the van, to make it air tight and weather tight.

Click image for larger version

Name:	IMG_0375.jpg
Views:	20
Size:	73.9 KB
ID:	27575


I couldn’t find the proper sized metal pipe, but since the working temperature of ABS is just above the exhaust temperature of gasoline, so I think it should be okay. I also smeared an ~1/8” layer of silicon on the ABS pipe to add some insulation. I decided, since Wesbasto has a plastic fuel line just 1/2” away from the exhaust, this ABS pipe should be safe.

The heater kit included a square mounting plate. I put the included heater gasket between the heater and the plate, and made a closed-cell foam gasket for the perimeter of the square plate. To make it easier I attached the exhaust, air intake and fuel lines before attaching the mounting plate to the floor

Click image for larger version

Name:	IMG_0376.jpg
Views:	21
Size:	113.5 KB
ID:	27576

Under the van I routed the exhaust above the frame, through the muffler and build a bracket to hold the end of the exhaust pipe to the pinch weld of the van body.

Click image for larger version

Name:	IMG_0388.jpg
Views:	28
Size:	106.9 KB
ID:	27577

Click image for larger version

Name:	IMG_0396.jpg
Views:	28
Size:	107.3 KB
ID:	27578

Click image for larger version

Name:	IMG_0397.jpg
Views:	25
Size:	89.6 KB
ID:	27579

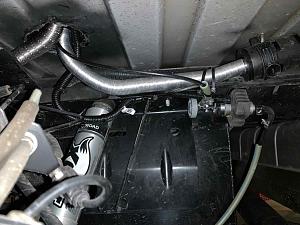
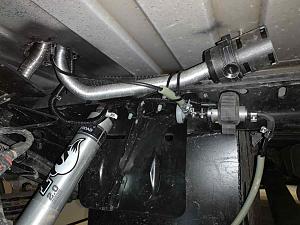
The cold air intake was easy to terminate just above the fuel tank. I used zip ties to hold everything in place.

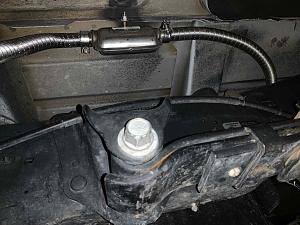
The fuel is sourced through a filtered petcock that I installed in the 1/4 npt port in the bottom of the tank. The petcock is a little exposed to damage, but I hope it will be okay. It does extend below the fuel tank, but there is a risk of a rock hitting the petcock and breaking it off. This could leave me stranded with an empty tank. I may change it to the transitional siphon tube in the future.

Click image for larger version

Name:	IMG_0391.jpg
Views:	34
Size:	96.0 KB
ID:	27581

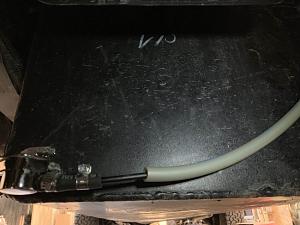
I also used a QuikFist to mount the fuel pump, rather than the included band clamp. I read that this will dampen the pump cycles and make it a little more quiet.

Click image for larger version

Name:	IMG_0392.jpg
Views:	31
Size:	107.9 KB
ID:	27582

The electrical install was pretty straightforward. Just connecting 12V power and plug in the control panel.

I then spent a full day trying to start the heater. No matter how many times I tried, it would not start. I used gas filled syringe to prime both sides of the pump, but still no go. I even remove the pump and placed it below the fuel tank so it was a gravity feed, and still no fuel from the output of the pump. It was pretty frustrating because we had a camping trip planned in southern Utah and my wife was excited to have heat for the cold mornings. But no matter what I did, no fuel would flow through the pump. Well we went camping and had to use our Buddy heater in the mornings.

I went back a forth with Heatso a few times, but nothing would help. Finally I removed the pump from the van and did some bench-top testing. I still could not get the pump to move fuel through. In desperation, I back pressured the pump and then noticed a piece of yellow plastic in the intake fuel port. When the pump is shipped, they place yellow caps on each of the fuel ports. It appears that the cap was impacted and the impact cored a piece of the plastic cap, with the cored piece tightly fitting in the fuel intake port. This completely blocked the fuel from passing through to the pump. I used a dental pick to grab the plastic piece out of the port. After reinstalling the pump, the heater fired up on the first try.

Since installing the heater I have not had a chance to use it further. I have taken out the temporary electrical system so I can build the cabinets. Once I have the heater back in the van, I will pass on how well it works.
cthayn is offline   Reply With Quote
Old 05-30-2019, 06:59 AM   #116
Senior Member
 
86Scotty's Avatar
 
Join Date: Jul 2011
Location: TN
Posts: 10,244
Good looking install and great idea on the Quick Fist!
86Scotty is offline   Reply With Quote
Old 05-30-2019, 10:13 AM   #117
Senior Member
 
shadetreevanman's Avatar
 
Join Date: Jun 2017
Location: Riverside, CA
Posts: 385
Haha, sounds like my first camping trip with my recently installed chinese heater. Wound up using the Mr Buddy on that trip, and now that the heater truly works, we probably won't need heat until next winter.

I can't tell from the pics, but is your exhaust downhill all the way to the tip? Condensation will need to have a place to drain. Any low spots could potentially rust prematurely unless a drain is provided.
__________________
Tim Potts

2012 Chevrolet Express 3500 6.0
shadetreevanman is offline   Reply With Quote
Old 05-30-2019, 01:17 PM   #118
Senior Member
 
Join Date: May 2017
Posts: 201
I have the tubing sloping down to the exit, but I was wondering about the exhaust muffler. It seems like it would just collect water from condensation. There is no way to have it drain.

Anyone have an idea if this is an issue? Does the muffler stay hot enough to keep the water from condensing?
cthayn is offline   Reply With Quote
Old 05-30-2019, 01:29 PM   #119
Senior Member
 
shadetreevanman's Avatar
 
Join Date: Jun 2017
Location: Riverside, CA
Posts: 385
Quote:
Originally Posted by cthayn View Post
...I was wondering about the exhaust muffler. It seems like it would just collect water from condensation. There is no way to have it drain....
My muffler looks just like yours. I haven't looked but I've read there is a small drain hole on one side of it. I'm planning on rerouting mine to the drivers side, currently on passenger, and will make sure mine is oriented properly. If there is no hole, I don't suppose adding a small one would hurt. EDIT: actually, I think yours is oriented properly. Looking at the picture there looks to be a small hole right on the seam.
__________________
Tim Potts

2012 Chevrolet Express 3500 6.0
shadetreevanman is offline   Reply With Quote
Old 05-30-2019, 03:13 PM   #120
Senior Member
 
marret's Avatar
 
Join Date: Nov 2016
Location: FL and VA
Posts: 1,953
Garage
Well done and agree on the QuickFist.

What made you decide on the Webasto instead of Espar?

Thanks.
__________________
Chris
2008 GMC 3500 Quigley Weldtec 4x4 Savana SMB
marret is offline   Reply With Quote
Reply


Posting Rules
You may not post new threads
You may not post replies
You may not post attachments
You may not edit your posts

BB code is On
Smilies are On
[IMG] code is On
HTML code is Off
Trackbacks are Off
Pingbacks are Off
Refbacks are Off

» Featured Campgrounds

Reviews provided by

Powered by vBadvanced CMPS v3.2.3
Disclaimer:

This website is not affiliated with or endorsed by Sportsmobile SIP or any of its affiliates. This is an independent, unofficial site.


All times are GMT -6. The time now is 07:55 AM.


Powered by vBulletin® Version 3.8.8 Beta 4
Copyright ©2000 - 2024, vBulletin Solutions, Inc.