Journey with Confidence RV GPS App RV Trip Planner RV LIFE Campground Reviews RV Maintenance Take a Speed Test Free 7 Day Trial ×


Reply
 
Thread Tools Display Modes
 
Old 10-27-2019, 12:16 PM   #151
Senior Member
 
Join Date: May 2017
Posts: 199
2012 E-350 EB V10, 4x4, CCV Top

Extra Gas Storage

I have been disappointed with the gas capacity of the van. When Agile Offroad installed the the 4x4, they replaced the stock tank with a new tank from Aerotank. The new tank was only ~31 gallons. This limited the range to between 250 miles (off-road) to 350 miles (highway). That is normally plenty of range for most situations, except when it isn’t. I’m not too worried about the highway range, as you can usually find a gas station, but sometimes it’s hard to predict the off-road mileage performance.

I know that some people have added a Ford 40 gallon tank aft of the axle. When Agile was doing the 4x4 work, we tried to go with that option, but it did no work out. It was also a pretty expensive option.

My first thought was to get a Rotopax tank and mount it on the back of the Aluminess box. The 3 gallon Rotopax can is only 4-1/2” thick. Unfortunately, the space between the rear of the box and the van door is only ~3-1/2” deep.

While looking at the Rotopax, I bought this 8 gallon tank from BEEYO

https://www.amazon.com/gp/product/B0...?ie=UTF8&psc=1

Click image for larger version

Name:	IMG_3258.JPG
Views:	48
Size:	38.1 KB
ID:	30243

It is very similar to the Rotopax in construction, but they have a larger 8 gallon can available.

Since I don’t have the rear under van box, I wanted to take advantage of that space behind the rear axle. My first thought was to build some type of mechanism to raise the gas can and secure it under the van. After brainstorming some ideas, it struck me that the van already comes with a lifting mechanism. Since I have a bumper mounted spare tire arm, I had previously removed the spare time winch. So my new plan was to use the spare tire winch to raise and lower the gas can to the under van position. Since the winch supports an 80 pound tire, it should have no problems with 50 pounds of gas.

The spare tire winch cable has a “shoe” that is used to pass through the center hole of the wheel to support the wheel/tire. I cut that off and made a new shoe that would match the holes in the gas can.

Click image for larger version

Name:	IMG_2263.JPG
Views:	47
Size:	89.8 KB
ID:	30268

The new shoe was made from a 5” steel disk with a 3/4” washer welded to the center. I drilled a hole in the center and cut a slot for the winch cable to pass through.

Click image for larger version

Name:	IMG_2269.JPG
Views:	41
Size:	84.3 KB
ID:	30245

Click image for larger version

Name:	IMG_2270.JPG
Views:	42
Size:	81.4 KB
ID:	30246

To finish the shoe, I made a tapered plug from mahogany wood that I coated with epoxy to waterproof it. The plug will fit in the center support hole of the gas tank.

Click image for larger version

Name:	Adjustments.JPG
Views:	40
Size:	32.2 KB
ID:	30261

To finish the plug, I painted it black.

Click image for larger version

Name:	IMG_2313.JPG
Views:	40
Size:	54.6 KB
ID:	30247

Click image for larger version

Name:	IMG_2314.JPG
Views:	40
Size:	52.3 KB
ID:	30248

With the winch mounted under the van, I am able to raise the gas can up under the van. However, the since the underside of the van frame was shaped for a spare tire, the gas can did not rest flat in the stored position.

So I built a frame from 1” square tubing that I bolted to the van frame. This creates a flat surface to pull the gas can tight against. I added some pipe insulation to minimized rubbing of the plastic gas can.

Click image for larger version

Name:	IMG_2300.JPG
Views:	46
Size:	73.8 KB
ID:	30249

Click image for larger version

Name:	IMG_2285.JPG
Views:	45
Size:	55.3 KB
ID:	30250

I had hoped to use just the winch to hold up the gas can. After all, it holds the spare tire on all the vans out there. However, after a quick Google search on “ford spare tire winch cables”, it sounds like cable failure, and dropping your tire on the road, is a risk.

So I build a few more brackets and installed a retention bar, that will support the gas can and reduce the risk of cable failure. It would also hold the tank into position if the cable were to fail. This retention bar is held into place with a removable pin.

Click image for larger version

Name:	IMG_2302.JPG
Views:	49
Size:	82.4 KB
ID:	30257

Click image for larger version

Name:	IMG_2308.JPG
Views:	54
Size:	72.8 KB
ID:	30258

With everything in place, the gas can hangs below the frame of the van, about the same as the receiver hitch. It is a little lower than I would like, but should not be a problem.

Click image for larger version

Name:	IMG_2312.JPG
Views:	48
Size:	63.2 KB
ID:	30259

To access the gas can, I remove the retention bar and lower the winch. After the tank is on the ground I let out all the cable. I can then drag the tank out from under the van and disconnect the cable. To raise the tank I position it under the van as far as possible and connect the cable. Then while retracting the cable, I guide the tank up into the raised position. The retention bar is then re-installed.

The final step was to remove one section of the stock jack handle. This is used to crank the winch up and down and the shorter handle is easier to use and store.

Click image for larger version

Name:	IMG_2311.JPG
Views:	47
Size:	72.6 KB
ID:	30267

I will admit that raising and lower the tank is a little awkward. Unfortunately, the center hole in the gas tank, is not quite in the center, so you need to guide it into position. It is a little easier with two people. However, if I can avoid a 10 mile walk with gas can, it will be worth it.

I currently have it filled with gas and loaded under the van. I will see how it rides there on our White Rim Trail trip later this week.
Attached Thumbnails
Adjustments.JPG   Adjustments.JPG  

cthayn is offline   Reply With Quote
Old 10-27-2019, 12:24 PM   #152
Senior Member
 
Join Date: May 2017
Posts: 199
I don’t know why there are extra pictures at the end, but I can’t seem to delete them. Probably a Tapatalk problem.
cthayn is offline   Reply With Quote
Old 10-27-2019, 04:31 PM   #153
Senior Member
 
Twoxentrix's Avatar
 
Join Date: Mar 2015
Location: Maryland
Posts: 3,378
Garage
Very inventive! I like it.
I'd be a little concerned with ripping it off on a trail, but as long as you remain aware you should be fine. To your point, Certainly beats hiking out with a gas can in hand.
__________________
TwoXentrix
"AWOL"
Twoxentrix is offline   Reply With Quote
Old 10-28-2019, 10:19 AM   #154
Senior Member
 
Join Date: May 2017
Posts: 199
Yes, I will have to be careful when on a rougher trail.

Unfortunately, it is on the rougher trails that I will likely need the additional gas.
cthayn is offline   Reply With Quote
Old 10-28-2019, 10:29 AM   #155
Site Team
 
BroncoHauler's Avatar
 
Join Date: May 2007
Location: Southern New Mexico
Posts: 10,179
Maybe at least build a small metal deflector in front of the gas can to shield it from rocks thrown up by the rear tires.


Herb
__________________
SMB-less as of 02/04/2012. Our savings account is richer, but our adventures are poorer.
BroncoHauler is online now   Reply With Quote
Old 10-28-2019, 10:37 AM   #156
Senior Member
 
1der's Avatar
 
Join Date: Apr 2013
Location: San Francisco, CA
Posts: 3,283
I was not aware of Aerotanks making a 31 gal tank for the conversion. I am able to fill 41/42 gal without an issue in our Aerotanks w Agile conversion. I am guessing capacity is around 43. Jake’s conversion tank is similar to the TransferFlow tank which while marketed as 46, but really has 41 usable.

Have you checked the depth of the pick up foot in the tank? Something seems off.
__________________
Ray
Beastie 3: 2002 7.3 EB Cargo: Agile TTB, CCV High Top, Custom Walk Through, Lots of stuff added. www.BlingMyRig.com
1der is offline   Reply With Quote
Old 10-28-2019, 10:43 AM   #157
Senior Member
 
Join Date: May 2017
Posts: 199
On my Agile receipt they list it as a 31 gallon tank. Maybe it’s not an Aerotank.

I am in the road now, but when I get home I will measure it and calculate the volume.

Thanks for the input.
cthayn is offline   Reply With Quote
Old 12-06-2019, 03:26 AM   #158
Junior Member
 
Join Date: Nov 2019
Location: SoCal
Posts: 5
Would just like to give a big thank you - am new to vans and this forum and I just finished your whole thread over the last couple days. Fantastic work!! Your pictures speak for themselves about your quality work, and your implementation and write up of your ideas is super awesome and super helpful. Cheers! I hope do to as well when my wife and I start building out our own van!!
__________________
Sent from an evil pocket calculator with a flashy screen
furbucket is offline   Reply With Quote
Old 12-06-2019, 01:35 PM   #159
Senior Member
 
Join Date: May 2017
Posts: 199
Furbucket,

Thanks for the comment. It has been fun, and a huge learning experience for me. There was a lot of things that I had no experience with, but I just decided to jump in and figure it out.

I am finishing up the last major project for the van, building custom brackets and installing a set of Amp Powerstep. I will add a post about it in a few days.
cthayn is offline   Reply With Quote
Old 12-11-2019, 08:43 PM   #160
Senior Member
 
Join Date: May 2017
Posts: 199
Amp Powersteps Installation

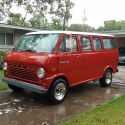
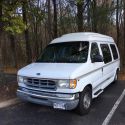
When we bought the van 2 years ago, one condition my wife had was to install the Amp Powersteps. She is a little vertically challenged, and loves vehicles with these steps. With the addition of the Agile 4x4 and larger tires, it has become more critical that we find an easier way for her to get in and out of the van.

I agreed to her conditions, even though I knew these steps were expensive. I assumed that it would be easy to order the steps for the E350 van and doing an install. After a little searching, I realized that Amp did not make steps for our vans. Sportsmobile had also stopped making them and the only option I could find was from a company called Specialized Applications. They make brackets for the Amp Powersteps that will mount to Econoline vans, but they are expensive. It would be $2400 shipped to me in Utah. That was more than we were willing to spend, so I kept looking for options.

Over the past 2 years, I have been watching for used steps, both on the forum and the local classified adds, with no luck. So we decided to just go ahead and buy a new set of Powersteps and then figure out how to build the brackets to mount the Powersteps to the van.

After some research, and info I pulled from the forum, I learned that several have used the Amp Powersteps designed for the Hummer H2 (P/N 75107-01A). The step mechanisms mount to the frame, so it give you a pretty sturdy step, compared to the steps that mount to the body. However, since the Hummer steps are pretty short, I also purchased two of the longest steps that Amp makes (P/N 20-03752-85). These steps are 85” long, which isn’t quite long enough to stretch between the Bushwacker flares, but close enough that it looks fits good.

Materials List
1 ea Amp Powersteps - P/N 75107-01A
2 ea Amp Running boards - P/N 20-03752-85
1 ea 3/16” x 4” X 20’ mild steel
18 ea 7/16” x 1.5” hex head bolt - Yellow zinc finish
18 ea 7/16” hex nut - Yellow zinc finish
18 ea 7/16” locking washer
36 ea 7/16” flat washer
3 ea 1/2” x 1.5” hex head bolt
3 ea 1/2” rivet nut
3 ea 1/2 lock washer
3 ea 1/2 flat washer

In addition, I bought various drill bits, including stubby bits, so I could get into the tight areas to drill holes into the frame. I also ended up buying a used 1/2” right angle drill, because the space between the frame and van body was too tight for a standard drill. In fact, for a couple of holes it was so tight that I had to use the right angle drill with a stubby drill bit after I cut 1-1/4” off the shank of the stubby bit.

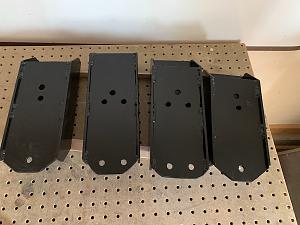
The most challenging part of the build was determining the thickness of the brackets. The frame of the van is not parallel to the body and each side of the van is a little different. This required building four different bracket thicknesses to keep the steps parallel to the body. I built prototype brackets from wood to fine tune the design of each bracket.

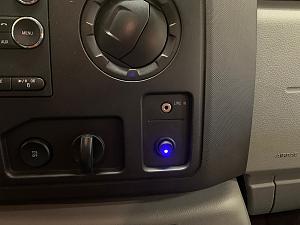
The wiring of the steps is pretty easy. You need to tap into the door ajar wire from each door, to obtain a ground signal to trigger the steps. I also added a toggle switch in the dash that will lock the steps in the down position with the doors shut. The switch is part of a circuit with a relay and two shunts at each side of the van.


Wood bracket prototypes for determining the proper bracket thickness.
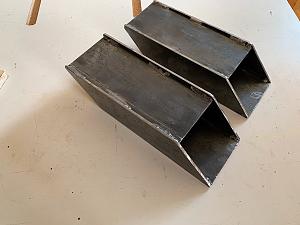
Click image for larger version

Name:	IMG_0044.jpg
Views:	40
Size:	104.9 KB
ID:	30988

Building steel brackets. I don’t have a way to accurately cut metal to a set width, so I used wood spacers to space the front and back of each bracket to the proper distance.

Click image for larger version

Name:	IMG_3598.jpg
Views:	33
Size:	109.2 KB
ID:	30990

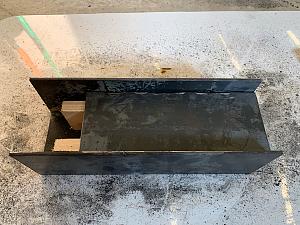
With the spacers in place, I tack welded the brackets.

Click image for larger version

Name:	IMG_0046.jpg
Views:	33
Size:	108.5 KB
ID:	30994

Click image for larger version

Name:	IMG_3586.jpg
Views:	33
Size:	107.0 KB
ID:	30992

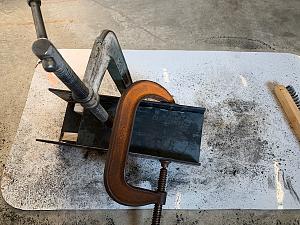
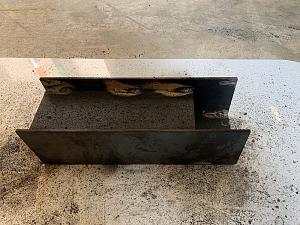
After confirming the dimensions, I fully welding the brackets and trimmed the sides using an angle grinder.

Click image for larger version

Name:	IMG_0049.jpg
Views:	33
Size:	82.0 KB
ID:	30995

Brackets are trimmed, cleaned up and painted.

Click image for larger version

Name:	IMG_0051.jpg
Views:	35
Size:	100.8 KB
ID:	30993

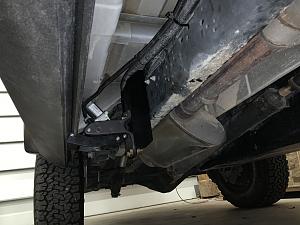
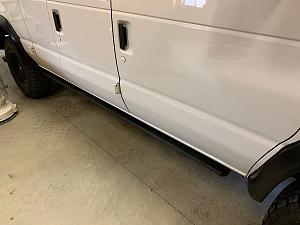
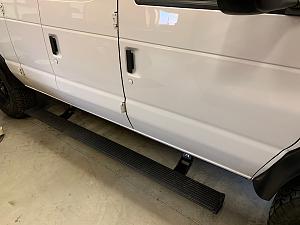
Brackets and steps installed.

Click image for larger version

Name:	IMG_2761.jpg
Views:	45
Size:	102.7 KB
ID:	30996

Click image for larger version

Name:	IMG_0053.jpg
Views:	39
Size:	81.5 KB
ID:	30983

Click image for larger version

Name:	IMG_0056.jpg
Views:	37
Size:	84.1 KB
ID:	30986

Switch to lock steps in down position.

Click image for larger version

Name:	IMG_0052.jpg
Views:	37
Size:	100.3 KB
ID:	30987

This was one of the more challenging projects on the van. It was a lot of money to spend, without being sure how to make the steps fit on the van. It was also a lot of work, on cold December days, to get the holes drilled in the frame in the proper location.

I think the steps look good on the van, and it makes my wife happy.
cthayn is offline   Reply With Quote
Reply


Posting Rules
You may not post new threads
You may not post replies
You may not post attachments
You may not edit your posts

BB code is On
Smilies are On
[IMG] code is On
HTML code is Off
Trackbacks are Off
Pingbacks are Off
Refbacks are Off

» Featured Campgrounds

Reviews provided by

Powered by vBadvanced CMPS v3.2.3
Disclaimer:

This website is not affiliated with or endorsed by Sportsmobile SIP or any of its affiliates. This is an independent, unofficial site.


All times are GMT -6. The time now is 10:04 AM.


Powered by vBulletin® Version 3.8.8 Beta 4
Copyright ©2000 - 2024, vBulletin Solutions, Inc.