Journey with Confidence RV GPS App RV Trip Planner RV LIFE Campground Reviews RV Maintenance Take a Speed Test Free 7 Day Trial ×


Reply
 
Thread Tools Display Modes
 
Old 12-11-2019, 08:56 PM   #161
MSD
Senior Member
 
MSD's Avatar
 
Join Date: Nov 2014
Location: Fort Collins, Colorado
Posts: 1,236
Garage
The old saying goes happy wife, happy life. All kidding aside great work!

__________________
2004 E350 EB Quigley - aka MCSporty6.0
2013 Fiat 500 pop/abarth - Sold
2003 Land Rover Disco II
1997 E350 7.3l 2wd - Sold
MSD is offline   Reply With Quote
Old 05-10-2020, 06:06 PM   #162
Senior Member
 
Join Date: May 2017
Posts: 199
Hot Water Heater Update

Original post describing 12 volt hot water system is in post #133 of this thread.

Click image for larger version

Name:	IMG_5475.jpg
Views:	41
Size:	104.1 KB
ID:	33206


Original Installation

After about 80-90 nights of no issue with the hot water heater, we had a problem. It appeared that the relay or the blade connector had overheated and either the adhesive from the shrink tubing, or from the relay had melted and filled the blade connector, interrupting the current flow. The relay was sized appropriately for the current, so I think the blade connector may have be vibrating and arcing and generating heat.

Click image for larger version

Name:	IMG_5487.jpg
Views:	34
Size:	97.3 KB
ID:	33207

Click image for larger version

Name:	IMG_5488.jpg
Views:	32
Size:	85.6 KB
ID:	33208


Damaged Connectors


I had used an 30/40 amp automotive type relay to activate the heater. Since I had used 8 ga wire to power the heating element I connected the wires directly to blades #85 and #86 of the relay, rather than using the stock connector. Even though the wires were supported, I believe the weight of the heavier wires vibrated enough to damage the relay.

To fix the issue I found a higher rated relay that had threaded connectors, and used ring terminals to attach the 8 ga wire to pins #85 and #86.

Click image for larger version

Name:	IMG_5483.jpg
Views:	32
Size:	92.5 KB
ID:	33209


It didn’t take long to switch-out the blade connectors for ring connectors and re-install the relay back into place.

Click image for larger version

Name:	IMG_5485.jpg
Views:	30
Size:	40.8 KB
ID:	33210
Click image for larger version

Name:	IMG_5486.jpg
Views:	34
Size:	88.7 KB
ID:	33211


So far no more issues with the hot water.
cthayn is offline   Reply With Quote
Old 05-11-2020, 04:27 AM   #163
Senior Member
 
marret's Avatar
 
Join Date: Nov 2016
Location: FL and VA
Posts: 1,952
Garage
Excellent, nicely done.
__________________
Chris
2008 GMC 3500 Quigley Weldtec 4x4 Savana SMB
marret is offline   Reply With Quote
Old 05-17-2020, 09:06 AM   #164
Senior Member
 
Join Date: May 2017
Posts: 199
2012 E-350 EB V10, 4x4, CCV Top

I have wanted to add a front bumper receiver hitch to the van to carry bikes. I could have bought one from Aluminess for $150 + tax and shipping, but I thought I would save a little money and have some fun building something.

Material List

- 1 ea-2” receiver hitch tube (12” long) $18
- 2 ea-1/2”x1”x7” steel bar stock $1
- 4 ea-1/2” x 2” hex bolts, flat washers, locking washers, nuts $4

First step was making a plywood template for the bolt holes in the bumper and hitch brackets. This will ensure all the holes line up after everything is welded.

With the template I drilled the holes in the bumper and the bar stock.

Click image for larger version

Name:	IMG_5499.jpg
Views:	28
Size:	98.3 KB
ID:	33327

Click image for larger version

Name:	IMG_5511.jpg
Views:	24
Size:	67.2 KB
ID:	33361


The receiver hitch tube was a few inches too long, so I cut 3” off the back end.

Name:  IMG_5500.jpg
Views: 278
Size:  58.9 KB


The crossbars were bolted to the template and tack welded to the hitch tube. I then verified the fit up to the bumper.

Click image for larger version

Name:	IMG_5502.jpg
Views:	24
Size:	71.1 KB
ID:	33329

Click image for larger version

Name:	IMG_5504.jpg
Views:	24
Size:	64.0 KB
ID:	33330

Click image for larger version

Name:	IMG_5506.jpg
Views:	24
Size:	70.7 KB
ID:	33331


Fully welded and cleaned up for painting.

Click image for larger version

Name:	IMG_4013.jpg
Views:	24
Size:	24.8 KB
ID:	33332


Primed and painted.

Click image for larger version

Name:	IMG_4018.jpg
Views:	31
Size:	12.2 KB
ID:	33333


Installed on the bumper.

Click image for larger version

Name:	Adjustments.jpg
Views:	33
Size:	94.9 KB
ID:	33339

Click image for larger version

Name:	Adjustments.jpg
Views:	31
Size:	92.6 KB
ID:	33340


This was a good quick project that will add some versatility to the van.
cthayn is offline   Reply With Quote
Old 05-17-2020, 10:03 AM   #165
Senior Member
 
vandiesel's Avatar
 
Join Date: Oct 2009
Location: Portland, OR
Posts: 1,257
Garage
Quote:
Originally Posted by cthayn View Post
I have wanted to add a front bumper receiver hitch to the van to carry bikes. I could have bought one from Aluminess for $150 + tax and shipping, but I thought I would save a little money and have some fun building something.

Material List

- 1 ea-2” receiver hitch tube (12” long) $18
- 2 ea-1/2”x1”x7” steel bar stock $1
- 4 ea-1/2” x 2” hex bolts, flat washers, locking washers, nuts $4

First step was making a plywood template for the bolt holes in the bumper and hitch brackets. This will ensure all the holes line up after everything is welded.

With the template I drilled the holes in the bumper and the bar stock.

Attachment 33327


The receiver hitch tube was a few inches too long, so I cut 3” off the back end.

Attachment 33328


The crossbars were bolted to the template and tack welded to the hitch tube. I then verified the fit up to the bumper.

Attachment 33329

Attachment 33330

Attachment 33331


Fully welded and cleaned up for painting.

Attachment 33332


Primed and painted.

Attachment 33333


Installed on the bumper.

Attachment 33339

Attachment 33340


This was a good quick project that will add some versatility to the van.

Thanks for the motivation! I need to make one of those for loading trailers from the front with the winch. Nice work.
__________________
2001 Ford RB 7.3 Quadvan (sold)
2006 Sportsmobile EB Transformer 6.0
vandiesel is offline   Reply With Quote
Old 01-20-2024, 04:00 PM   #166
Senior Member
 
Join Date: May 2017
Posts: 199


3 Year Campervan Review

It has been over 3 years since my last post on this build. I thought I would give an update/review what has worked well and what changes I have made.

Since we finished the build in October 2019, we have driven about 37,000 miles and spent over 255 nights camping. This includes storing the rig in our garage for 18 months while we were living out of the country. Our longest trip was 49 days in Baja. It was also our longest drive of ~4600 miles.

Here are my comments on the major systems. There are details on the build in the preceding posts or ask if you have any questions. Sorry, it is a long read.


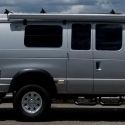
2012 Ford E-350 EB V10

I think everyone know how great this platform is. We haven’t had a single problem with the engine or the rest of the vehicle. Plenty of power but it does drive and ride like a heavy van.

I have weighed it twice, fully loaded for a long trip. We are about 9700 lbs, just slightly over the GVWR of 9500 lbs. Front axle weight was 3680 lbs and rear axle weight was 6060 lbs, just below capacity for both.

After driving the White Rim Trail and bouncing around Baja for thousands of miles, I found a broken rear leaf spring on the driver’s rear side. We replace the broken leaf spring and then added an additional leaf on both sides. This made a great improvement in the ride. Much more stable when making turns and it really reduced the “top heavy wobble” when going through an angled dip or hitting a hole on one side.

Based on the trip computer, we get between 11-14 mpg, many of our trips are about 50/50 highway/dirt road and we generally average around 12 mpg.
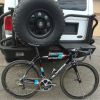


Agile Off-Road 4x4

I have been very happy with the 4x4 conversion. We have used the 4x4 on most trips, but usually to get through a muddy spot, across some sand and up/down rocky hills. In Baja there were a lot of rough, rocky trails where we used the 4x4 for miles. We were able to keep up with the Jeeps and Tacomas. They were impressed with the capabilities of the van. The only problem we had was when a brake caliper bolt came out while in Baja. It was obviously not torqued properly when it was installed.


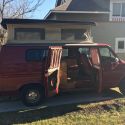
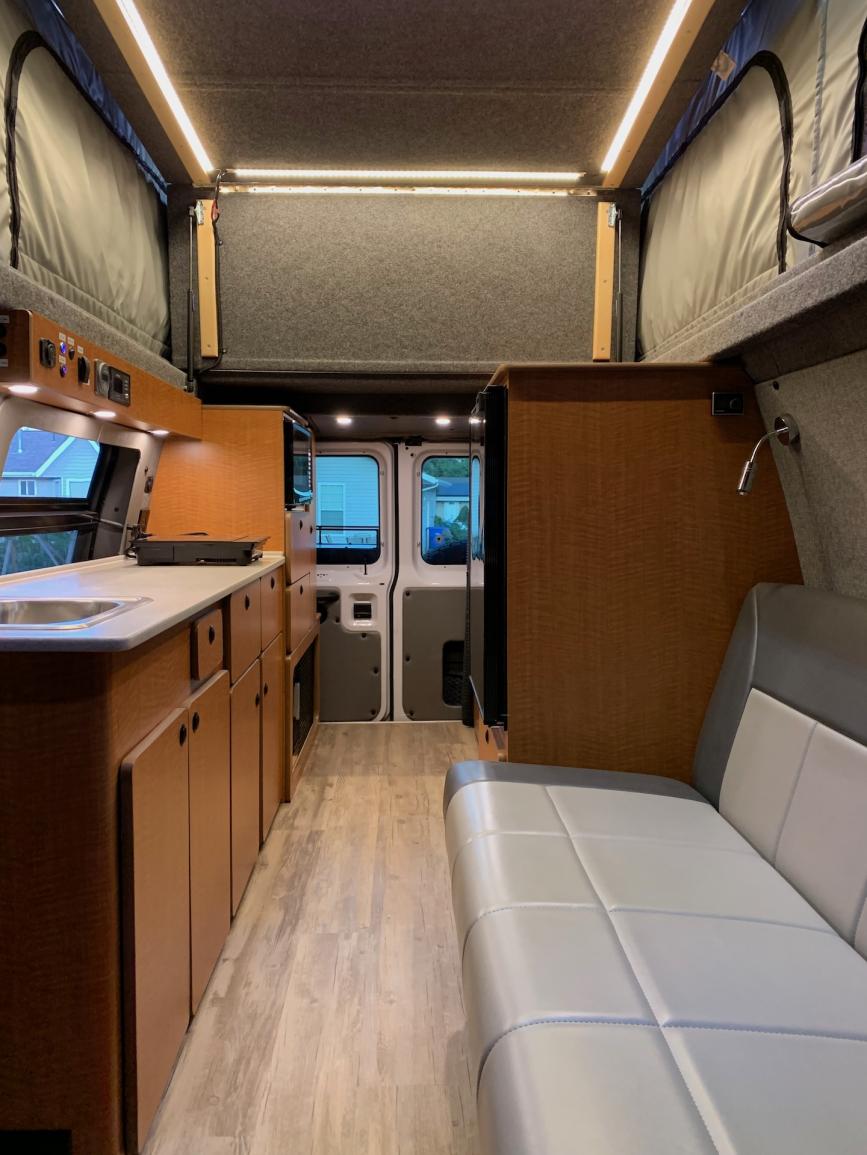
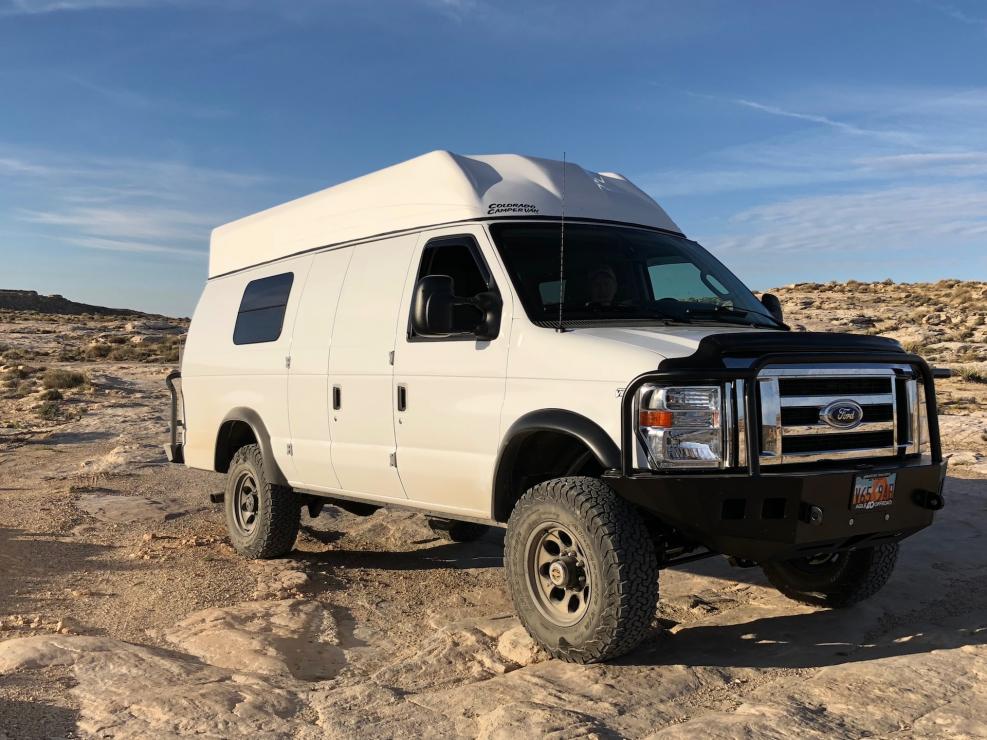
Colorado CamperVan Poptop

We love the pop-top. However, it does take a while to get use to the looks. When the top is down, it is almost high enough that I can stand up. With the top up, there is plenty of head room above the bed. Raising and lowering the top has been easy. Before lowering the top we turn on the overhead fan, so it sucks air out. This draws the fabric sides in as the top lowers.

The build quality has been good. No real problems. After probably 5-700 actuation, the roller wheels on one side failed a few months ago. It wasn’t too hard to replace the rollers on both sides.

The only other problem is the remote control for raising/lowering the top has never really work, but we never use it.


Bed in pop-top

We love the bed. I made the modifications to the bed platform, so we can keep the bed made all the time. The wood slat platform and 6” foam mattress makes it almost as comfortable as our bed at home.


Solar/Battery

We have 400 watts of solar and 200 amp/hrs of LiFePO4 battery. We have never had an issue with battery storage capacity. We rarely drop below 60% capacity and after a couple of hours of morning sun it is fully recharged. We also normally drive somewhere every day, so the alternator keeps the battery bank full.


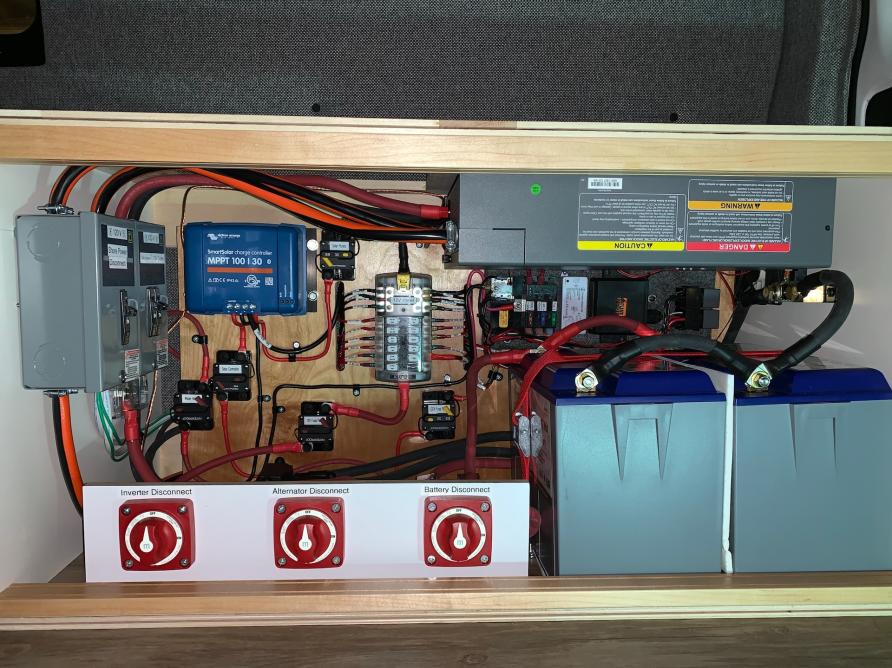
Electric Hot Water Heater

This has worked great. Our setup is a 2-gallon electric HW heater, with a 12 V heating element. The HW heater is controlled by a three position switch; OFF, SOLAR or BATTERY. In the BATTERY position the energy all comes from the battery, in the SOLAR position, a relay only allows the power to the HW heater when the battery is above 95% SOC. We normally keep it in SOLAR mode. The water is kept hot during the day and unless the weather is really cold, we still have hot water the next morning. We wrapped the tank with insulation to hold the heat in the tank.


Water system

Instead of a fixed water tank, we use two 5-gallon plastic jerry cans. The water pump pulls concurrently from both cans. The 10-gallon capacity will last us 3-4 days and I have space for two additional 5-gallon cans if we are worried about access to potable water. We like the portable tanks because it allows us to fill up water at any water source. We are also able to completely empty and dry the tanks between trips.


Layout/Floor plan

The floor plan has worked well for us. Our favorite place to sit is on the couch with the barn doors open. We also usually rotate the passenger seat towards the back and that gives us plenty of room to relax when we stay inside.

The center isle configuration gives us good access to the back of the van and allows storage on both sides.


AMP PowerSteps

These running boards have worked great without any issues. They are rock-solid. It makes entering and exiting the van much easier and more convenient. My wife loves the easy access to the high clearance vehicle.


Changes/Improvements

There is not a lot that we would change. The only design problem is the microwave door opens the wrong way. I thought I could get microwaves with doors opening both ways, but that is not correct for this size of microwave.

I have had to change out a few switches that failed. I also changed out the electric dump valve on the gray water tank. I went to a valve with a larger port and more positive actuation.


Overall Impressions

We love the van and the ability to get to remote campgrounds. We boondock 90% of the time and never have concern about any of the systems. After the bed upgrades, we have always had a good sleep.


cthayn is offline   Reply With Quote
Old 01-20-2024, 10:35 PM   #167
Senior Member
 
86Scotty's Avatar
 
Join Date: Jul 2011
Location: TN
Posts: 10,241
Excellent update, thanks for sharing!

86Scotty is offline   Reply With Quote
Old 01-21-2024, 06:35 AM   #168
Junior Member
 
Join Date: Feb 2012
Posts: 2
Thanks for the update. I used many of your design decisions in my own van build, which we completed about a year ago. We absolutely love going out in that thing.
traeshep is offline   Reply With Quote
Old 01-24-2024, 12:41 AM   #169
Senior Member
 
h.grenade's Avatar
 
Join Date: Jun 2022
Location: Bend, OR
Posts: 139
Great update! I had not seen your build before and I just went through every page. Great detailed photos and descriptions on everything. The whole interior looks amazing especially the cabinets.

I did not see how you attached the countertop to the cabinets but I hope its not just silicon sealant in the case of an accident. You mentioned that for the wood spacers. I just personally really worry about anything inside the van become a projectile if we get rear ended.

Great trip pics too. Can't wait to see more of your adventures.
h.grenade is offline   Reply With Quote
Reply


Posting Rules
You may not post new threads
You may not post replies
You may not post attachments
You may not edit your posts

BB code is On
Smilies are On
[IMG] code is On
HTML code is Off
Trackbacks are Off
Pingbacks are Off
Refbacks are Off

» Sportsmobile Registry

Bruce

Sboring35

Coddiwomple

Rpence
Add your Sportsmobile
» Featured Campgrounds

Reviews provided by

Powered by vBadvanced CMPS v3.2.3
Disclaimer:

This website is not affiliated with or endorsed by Sportsmobile SIP or any of its affiliates. This is an independent, unofficial site.


All times are GMT -6. The time now is 03:59 AM.


Powered by vBulletin® Version 3.8.8 Beta 4
Copyright ©2000 - 2024, vBulletin Solutions, Inc.