Time to cut some holes.
When I started this thread, I never said it would be one of those speed builds. It will take a while, but I hope to keep the updates coming.
Between the holidays, some minor surgery, family things, work and sometimes it was too cold to go work on the van, but I finally found a Saturday to do some work.
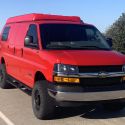
It was time to make the big move of cutting holes in a perfectly fine wall of a van. I had bought 2 CRL windows from DK Hardware. They arrived about a week later. I started by laying out the cutout on the outside of the van.

Wait a minute, something does not look right.
I laid out the window centered between the body lines and parallel with the top of the van. Remember the old saying "measure twice, cut once"? Well that paid off as I relooked at the layout. Is my van the only one where the body lines are not parallel? On the passenger side the two body lines narrow by about 1.5" along the length of the van.
So what do I do? Align with the top line? Or with the bottom? Or split the difference. One thing I learned from doing home construction is making it look right is better than being right. So I chose to split the difference. The lines of the window are not parallel with either body line, but I think it looks good. My wife did not even notice it, until I pointed it out.

Looks better.
For some reason the driver slide body lines were parallel and I just centered the window.
With the outside laid out, I transferred the layout lines to inside the van. This did not have to be exact as I just need to cut the inside wall larger than the outside cut and leave room for a frame around the window. I thought it would good to warm up to cutting the van by starting on the inside.
Like many of you, I use these DYI projects as an excuse to buy more tools. For this job I needed a good way to cut the interior wall of the van. A jig saw would not work and an angle grinder would make a big mess and be hard to control. I ended up buying a Ingersoll Rand air saw of Amazon.

It is a great tool. It made the cutting easy if I kept a sharp blade. The air saw is small enough to maneuver the cut through the various geometry of the inside wall. I did use an angle grinder to cut the areas of the interior wall that were touching the exterior wall.

Once the inside was cut out, it was on to the cut that mattered. I put some masking tape to protect the paint and used a step bit to drill a starter hole. The cutout was made with the jigsaw. It was actually pretty easy. I just stayed inside the lines and made the cut going halfway around in both directions. I used tape to hold the waste piece while finishing the cut.

I started on the passenger side, and was so worried about cutting too much, I stayed too far inside the lines. It took 30-40 minutes with a file and test fitting before I was able to drop the window in place.

Now on to the driver side. This time I cut right at the line and the window dropped in place on the first try. I just used the file to clean up the sharp edges.

Looking through the van.
With the two holes cut, I used some white Rust Bullet for two coats on the edges of the cut metal. After it dried I popped the window in the hole and attached the interior frame. This was not too hard, but needed to be careful to avoid stripping the head of the screws out. Just use the right Phillips bit size and enough pressure. I screwed in the corners, and both sides of the split in the frame, then filled the in between screw holes.


This was not too hard of a job. I was worried about getting the layout right and getting a good cut. All it took was a good jigsaw and the air saw. And a couple of new blades for each.
Next step is some soundproofing in the cab area. I hope it will get warm enough for the adhesive to stick.
Sent from my iPad using Tapatalk


 MCSporty


 Tan Hot Dog


 Linear Mode